Linux 虚拟化技术 KVM
目录
virt-install 命令创建虚拟机 命令版 半手工
利用 qemu-img命令创建虚拟磁盘
基于已有系统直接创建新的虚拟机启动 复制
编辑
复制 可以 适用于脚本 可以批量改 内存之类的 克隆没法子改
利用virt-clone克隆实现
半虚拟化设备统一接口virtio
创建 Windows Server 2008 虚拟机
生成Windows Server 2008 镜像模版、
libvirt 架构
快照
#查看虚拟机详细信息
#查看当前启动的虚拟机
#查看所有虚拟机
启动和关闭虚拟机
#列出开机状态虚拟机的UUID和名称
#列出所有虚拟机的UUID和name
查看虚拟机UUID,通过UUID启动关闭虚拟机
暂停和恢复虚拟机
配置虚拟机开机自动启动
磁盘预分配策略
虚拟磁盘类型
qcow2 格式选项
创建raw格式非稀疏文件
创建raw格式稀疏文件
raw文件复制的格式控制
virsh 管理虚拟机快照
使用virsh 命令还原快照
#删除快照
[root@ubuntu2004 isos]#virsh dominfo centos7.0    #查看虚拟机详细信息
Id:             -
Name:           centos7.0
UUID:           266d67e2-8630-4dcf-955d-b0bbb71f9ae6
OS Type:        hvm
State:          shut off
CPU(s):         2
Max memory:     1048576 KiB
Used memory:    1048576 KiB
Persistent:     yes
Autostart:      disable
Managed save:   no
Security model: apparmor
Security DOI:   0
apt update
apt install cpu-checker
apt install qemu-kvm virt-manager libvirt-daemon-system
apt install bridge-utils #网桥
[root@rocky8 ~]#yum install bridge-utils.x86_64
[root@ubuntu2004 ~]#export DISPLAY=10.0.0.1:0.0
#如果没有需要加载一下环境变量,export=DISPLAY=ip地址:0.0
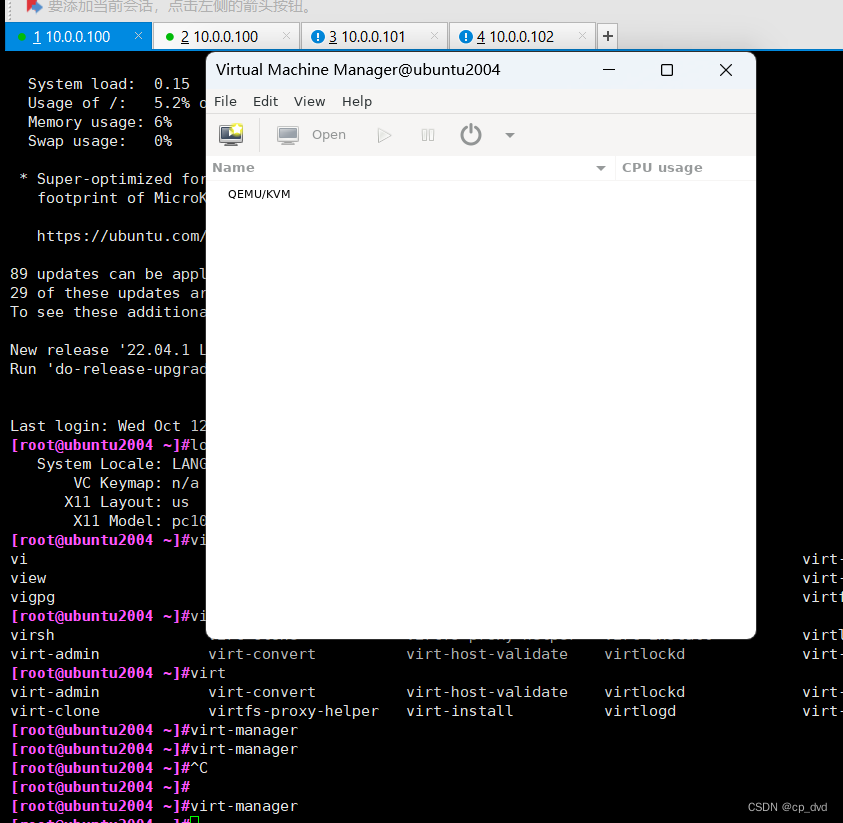
[root@ubuntu2004 ~]#virt-manager #需要安装Xmanager
CentOS 安装 KVM
[root@centos8 ~]#yum -y install qemu-kvm libvirt virt-manager virt-install virt-viewer
[root@centos8 ~]#systemctl start --now libvirtdCentOS 8 还提供基于Web的虚拟机管理方式
root@centos8 ~]#yum -y install cockpit cockpit-machines
[root@centos8 ~]#systemctl enable --now cockpit.socketCreated symlink /etc/systemd/system/sockets.target.wants/cockpit.socket →
/usr/lib/systemd/system/cockpit.socket.#打开浏览器,访问以下地址:
https://centos8主机:9090图形化工具 virt-manager
[root@rocky8 ~]#yum install bridge-utils.x86_64
[root@rocky8 ~]#export DISPLAY=10.0.0.1:0.0
[root@rocky8 ~]#virt-manager
- [root@ubuntu2004 ~]#localectl status #查看当前字符集 (为乱码)
- [root@ubuntu2004 ~]#localectl set-locale LANG=en_US.UTF-8 #把他改写成utf8格式
- [root@ubuntu2004 ~]#exit #退出之后重新执行
- [root@ubuntu2004 ~]#virt-manager
cat /etc/libvirt/qemu/networks/default.xml
[root@ubuntu2004 ~]# cat /etc/libvirt/qemu/networks/default.xml    #定义范围
<!--
WARNING: THIS IS AN AUTO-GENERATED FILE. CHANGES TO IT ARE LIKELY TO BE
OVERWRITTEN AND LOST. Changes to this xml configuration should be made using:
  virsh net-edit default
or other application using the libvirt API.
-->

<network>
  <name>default</name>
  <uuid>d28f09ba-f940-4647-bed1-19fd734ff209</uuid>
  <forward mode='nat'/>
  <bridge name='virbr0' stp='on' delay='0'/>
  <mac address='52:54:00:a1:e2:bd'/>
  <ip address='192.168.122.1' netmask='255.255.255.0'>
    <dhcp>
      <range start='192.168.122.2' end='192.168.122.254'/>
    </dhcp>
  </ip>
</network>
往下走 20G是立即20G
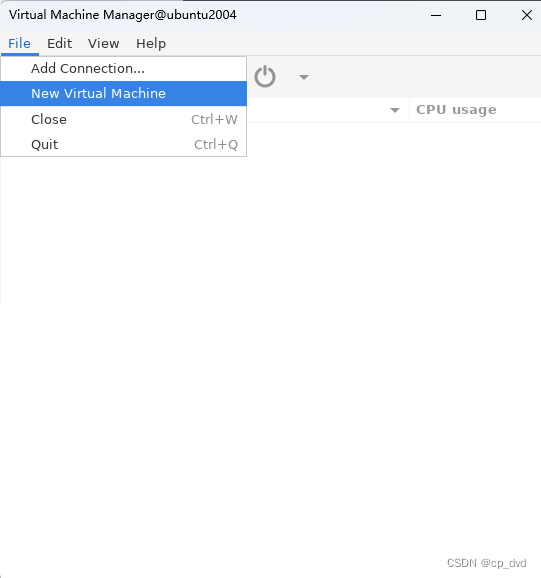
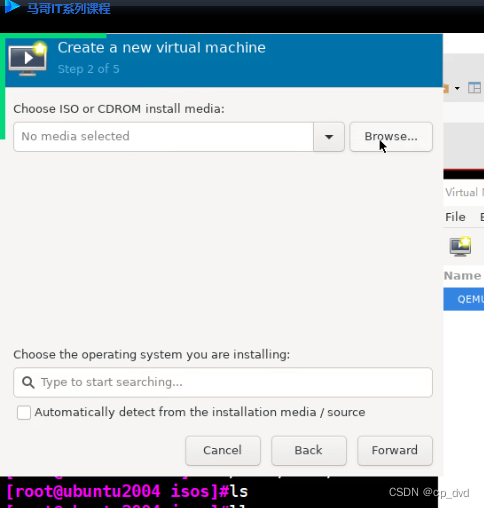
[root@ubuntu2004 isos]#ls /var/lib/libvirt/images/ #默认so路径
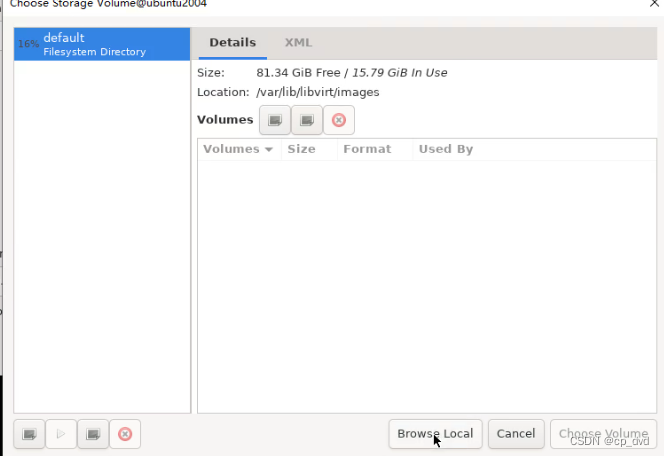
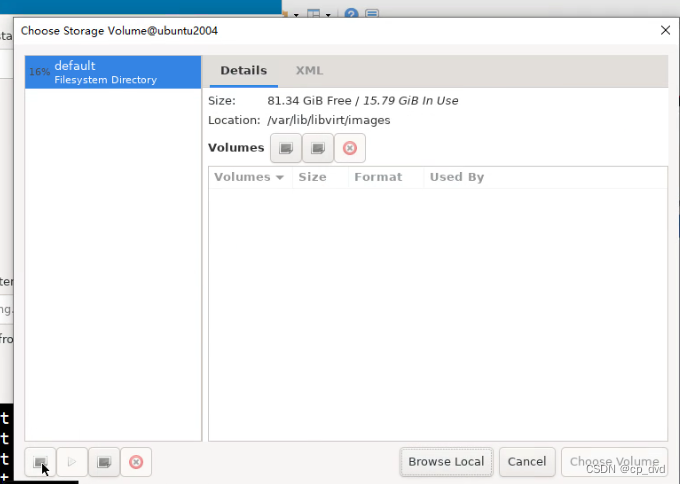
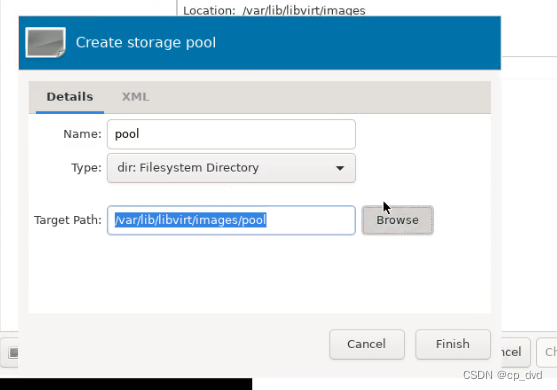
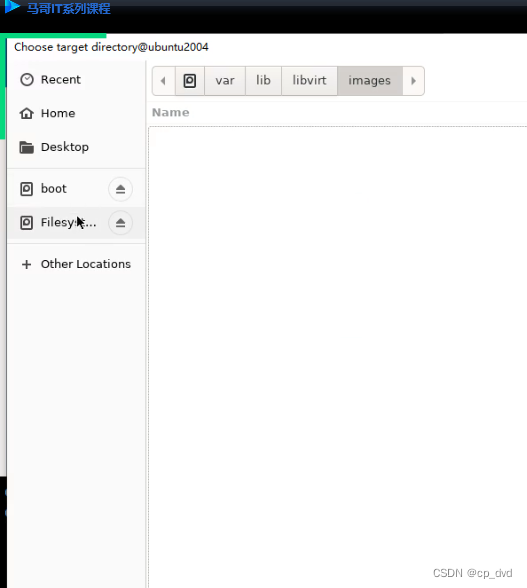

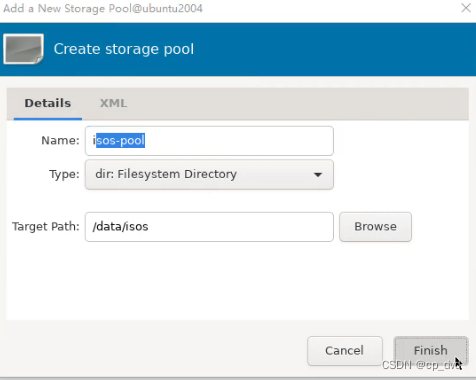
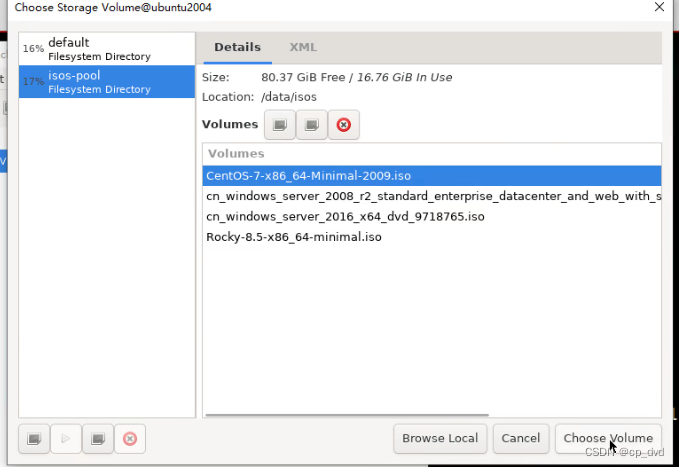
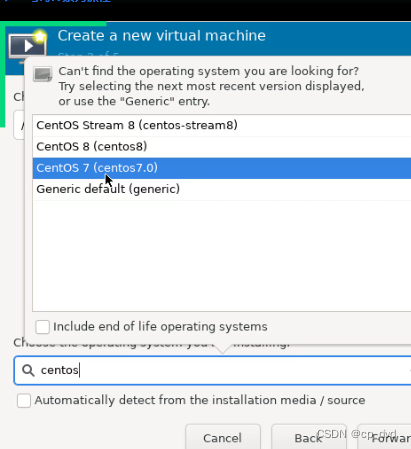
一直确定

virt-install 命令创建虚拟机 命令版 半手工
利用 qemu-img命令创建虚拟磁盘
注意: qemu-img create 一定要确认对应路径下没有此文件,如果存在将覆盖原文件
[root@centos8 ~]#qemu-img create -f qcow2 /var/lib/libvirt/images/rocky8.qcow2 20G
#模拟硬盘20G,不是要求立即20G
Formatting '/var/lib/libvirt/images/centos7.qcow2', fmt=qcow2 size=21474836480
cluster_size=65536 lazy_refcounts=off refcount_bits=16#观察文件虚拟磁盘大小,比较用virt-manager创建的虚拟机磁盘文件大小
[root@centos8 ~]#ll -h /var/lib/libvirt/images/centos7.qcow2
-rw-r--r-- 1 root root 193K Sep 13 21:25 /var/lib/libvirt/images/centos7.qcow2
[root@ubuntu2004 ~]#virsh list --all #查看虚拟机鼠粮
Id Name State
---------------------------
4 centos7.0 running
virt-install --virt-type kvm --name rocky8 --ram 1024 --vcpus 2 --cdrom=/data/isos/Rocky-8.5-x86_64-minimal.iso --disk path=/var/lib/libvirt/images/rocky8.qcow2 --network network=default --graphics vnc,listen=0.0.0.0 --noautoconsole --os-variant=rhel8.2
#默认网络default模式 支持远程vnc链接 接听端口0.0.0.0 注意格式
打开终端 安装操作系统
WARNING Requested memory 1024 MiB is less than the recommended 1536 MiB for OS rhel8.2Starting install...

基于已有系统直接创建新的虚拟机启动 复制
[root@rocky8 images]# scp rocky8.qcow2 10.0.0.100:/var/lib/libvirt/images/
把rock8的复制到ubuntu


[root@ubuntu2004 images]#virt-install --virt-type kvm --name rocky8 --ram 2048 --vcpus 2  --disk bus=virtio,path=/var/lib/libvirt/images/rocky8.qcow2 --network network=default,model=virtio  --graphics vnc,listen=0.0.0.0 --noautoconsole --autostart --boot hd
WARNING  No operating system detected, VM performance may suffer. Specify an OS with --os-variant for optimal results.

Starting install...
Domain creation completed.
 启动下
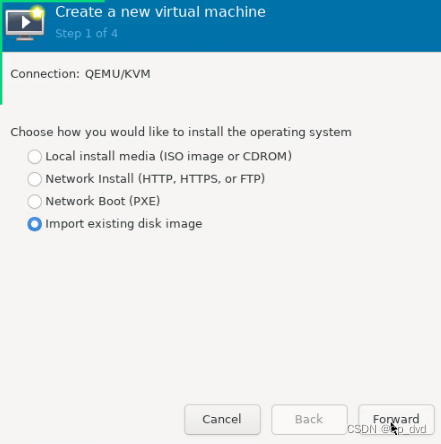
导入现有的虚拟磁盘

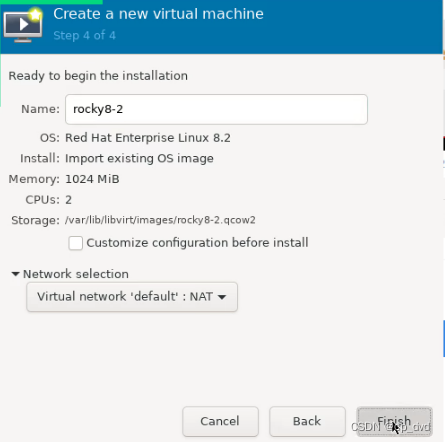
复制 可以 适用于脚本 可以批量改 内存之类的 克隆没法子改
root@centos8 images]#pwd
/var/lib/libvirt/images

[root@centos8 images]#cp centos8.qcow2 centos8-2.qcow2

[root@centos8 images]#virt-install --virt-type kvm --name centos8-2 --ram 2048 --
vcpus 2 --disk bus=virtio,path=/var/lib/libvirt/images/centos8-2.qcow2 --network
network=default,model=virtio --graphics vnc,listen=0.0.0.0 --noautoconsole --
autostart --boot hd
WARNING No operating system detected, VM performance may suffer. Specify an OS
with --os-variant for optimal results.
Starting install...
Domain creation completed.

#运行工具,可以看到下面出现新的虚拟机
[root@centos8 images]#virt-manager
利用virt-clone克隆实现
#基于已有的虚拟机克隆生成新的虚拟机
[root@ubuntu2004 ~]#virt-clone -o rocky8 -f /var/lib/libvirt/images/rocky8-
3.qcow2 -n rocky8-3
-o rocky8 #指已存在的虚拟机的名称
-f /var/lib/libvirt/images/rocky8-3.qcow2 #新虚拟机磁盘文件路径,此文件自动生成,不需要
事先创建 两个名字
-n rocky8-3 #新虚拟机的名称
[root@ubuntu2004 ~]#virsh list --all
 Id   Name              State
----------------------------------
 -    centos7-2         shut off
 -    centos7.0         shut off
 -    rocky8            shut off
 -    rocky8-template   shut off

[root@ubuntu2004 ~]#virsh start rocky8-template   #跑起来
Domain rocky8-template started

[root@ubuntu2004 ~]#virsh list --all
 Id   Name              State
----------------------------------
 2    rocky8-template   running
 -    centos7-2         shut off
 -    centos7.0         shut off
 -    rocky8            shut off
虚拟化区别
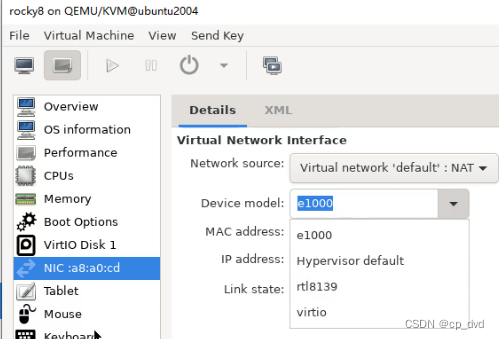
性能对比
https://www.ilsistemista.net/index.php/virtualization/42-kvm-virtio-paravirtualized-drivers-why-they-matter.html?start=2virtio 半虚拟化
e1000全虚拟化
半虚拟化设备统一接口virtio

过统一的接口virtio以支持的多种硬件设备
- 不同的虚拟设备和不同的虚拟机可以有不同的前端驱动
- 不同的硬件设备可以有不同的后端驱动
- 两者之间的交互遵循virtio的标准
测试主机速度
[root@localhost ~]# dd | hdparm -t /dev/vda
/dev/vda:
Timing buffered disk reads: 1774 MB in 3.00 seconds = 591.20 MB/sec
创建 Windows Server 2008 虚拟机
#创建磁盘文件 倒入相关文件
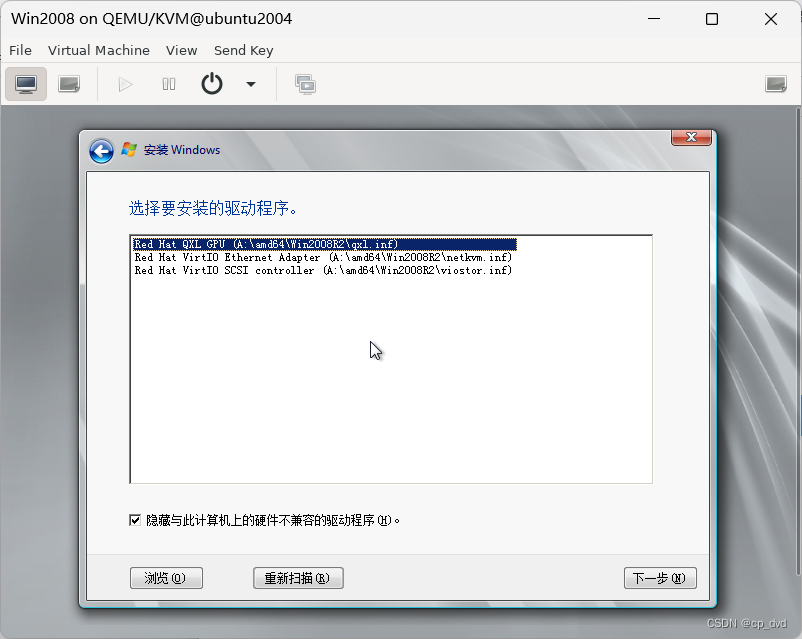
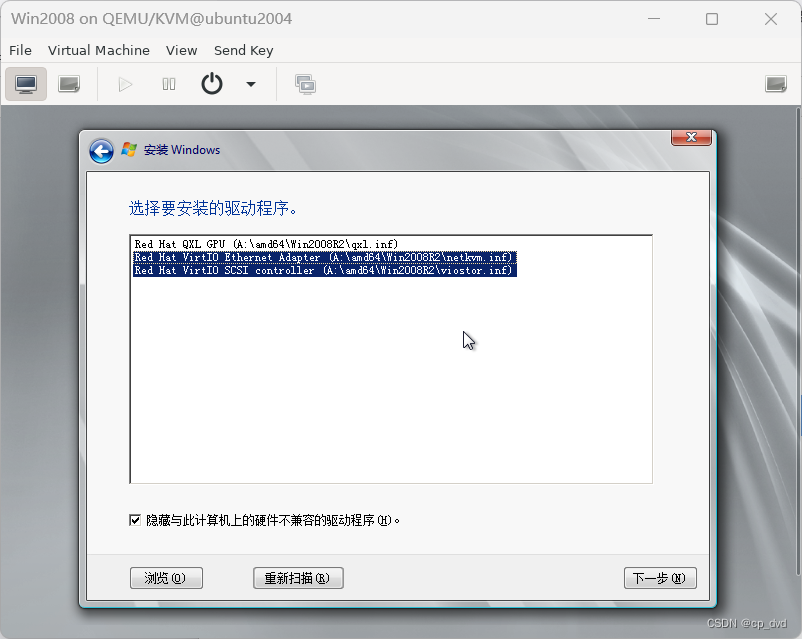
[root@ubuntu2004 images]#qemu-img create -f qcow2 /var/lib/libvirt/images/Windows-2008_r2-x86_64.qcow2 200G[root@ubuntu2004 isos]#virt-install --virt-type kvm --name Win2008 --memory 3072 --vcpus=2 --os-variant=win2k8r2 --cdrom=/data/isos/cn_windows_server_2008_r2_standard_enterprise_datacenter_and_web_with_sp1_x64_dvd_617598.iso --disk path=/var/lib/libvirt/images/Windows-2008_r2-x86_64.qcow2,format=qcow2,bus=virtio --disk path=/data/isos/virtio-win-0.1.141_amd64.vfd,device=floppy --network bridge=virbr0,model=virtio --graphics vnc,listen=0.0.0.0 --noautoconsole --autostart
挂载virtio-win的141的ISO光盘文件virtio-win-0.1.141.iso进行安装驱动
注意:不要安装其它版本,比如189版本会蓝屏死机,185安装后显示黄色,工作不正常
生成Windows Server 2008 镜像模版、
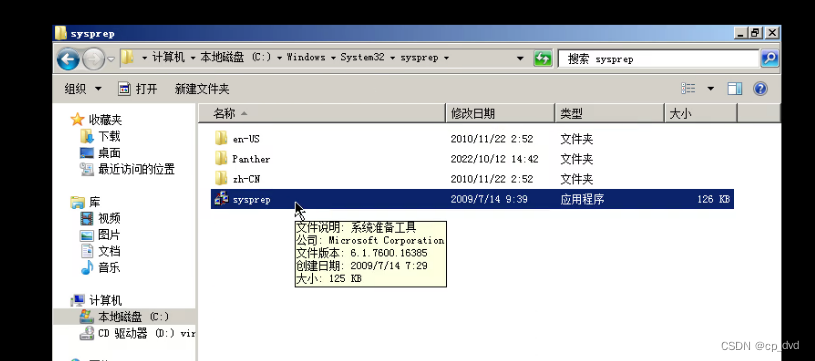
利用sysprep工具,清除个性信息,下次Windows开机时, 会自动生成初始化个性信息
Linux 有相同打架 ,windows有SID相同打架 (就是机器名)

libvirt 架构
注意: 如果libvirtd服务意外关闭,将导致相关工具,如:virt-manager等无法和虚拟机连接,但虚拟机仍会正常运行
[root@ubuntu2004 ~]#systemctl stop libvirtd libvirtd.socket libvirtd-admin.socket libvirtd-ro.socket
[root@centos8 ~]#systemctl stop libvirtd
[root@centos8 ~]#virsh list
error: failed to connect to the hypervisor
error: Failed to connect socket to '/var/run/libvirt/libvirt-sock': No such file
or directory#virt-manager工具也无法连接虚拟机
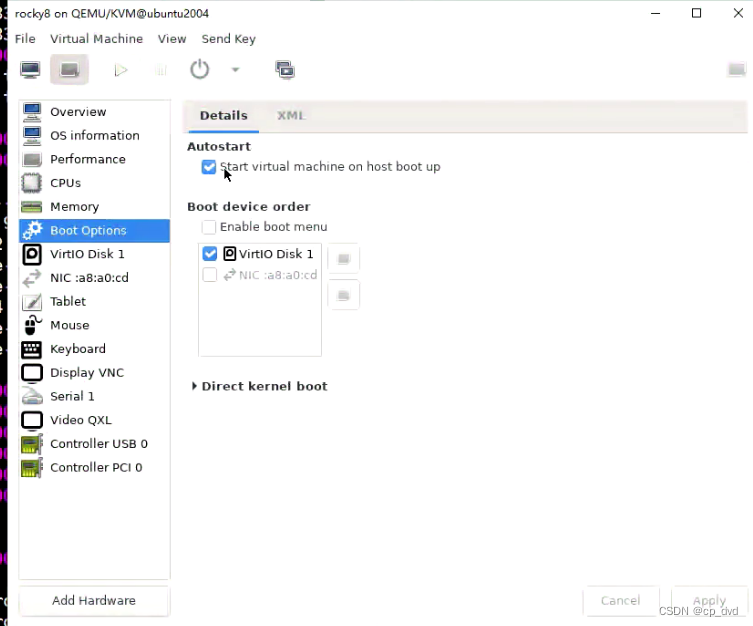
开机自启动 点个对钩,自动创建快捷方式
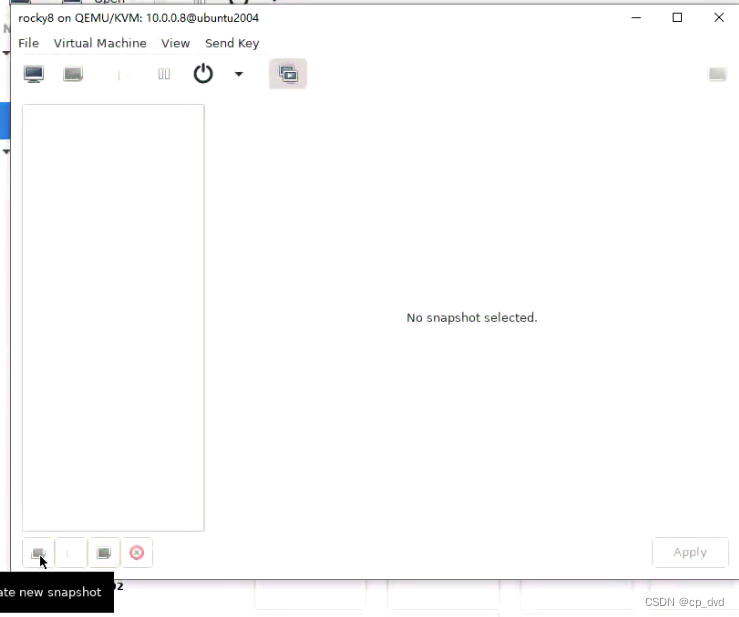
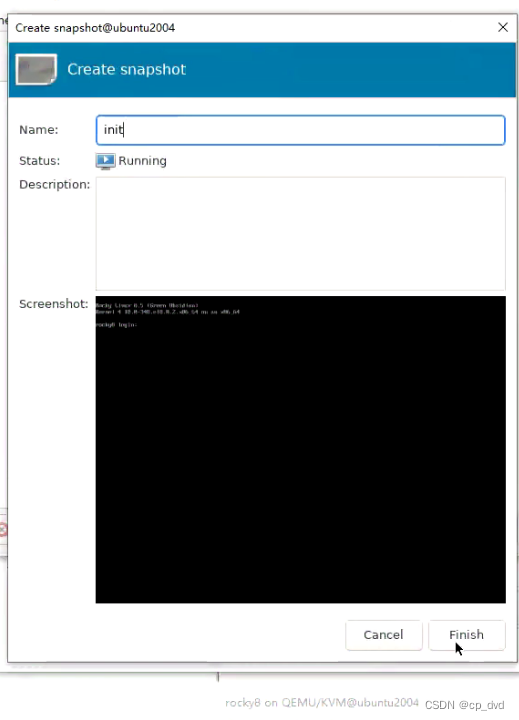
快照

#查看虚拟机详细信息
[root@ubuntu2004 isos]#virsh dominfo centos7.0    #查看虚拟机详细信息
Id:             -
Name:           centos7.0
UUID:           266d67e2-8630-4dcf-955d-b0bbb71f9ae6
OS Type:        hvm
State:          shut off
CPU(s):         2
Max memory:     1048576 KiB
Used memory:    1048576 KiB
Persistent:     yes
Autostart:      disable
Managed save:   no
Security model: apparmor
Security DOI:   0
#查看当前启动的虚拟机
[root@centos8 ~]#virsh list
#查看所有虚拟机
[root@centos8 ~]#virsh list --all
启动和关闭虚拟机
#正常关机
[root@centos8 ~]#virsh shutdown 1
#强制关机,慎重使用
[root@centos8 ~]#virsh destroy 1
#列出开机状态虚拟机的UUID和名称
[root@centos8 ~]#virsh list --uuid --name
#列出所有虚拟机的UUID和name
[root@ubuntu2004 ~]#virsh list --uuid --all --name
查看虚拟机UUID,通过UUID启动关闭虚拟机
[root@centos8 ~]#virsh list
#查看虚拟机的UUID
[root@centos8 ~]#virsh domuuid 1
99765478-cfb1-4164-b038-f62004ccab9e[root@centos8 ~]#virsh destroy 99765478-cfb1-4164-b038-f62004ccab9e
Domain 99765478-cfb1-4164-b038-f62004ccab9e destroyed[root@centos8 ~]#virsh list --all
[root@centos8 ~]#virsh domuuid centos8
99765478-cfb1-4164-b038-f62004ccab9e[root@centos8 ~]#virsh start 99765478-cfb1-4164-b038-f62004ccab9e
Domain centos8 started
暂停和恢复虚拟机
[root@centos8 ~]#virsh suspend centos8
Domain centos8 suspended#虚拟机暂停后,宿主机中还存有相关的进程
[root@centos8 ~]#ps aux|grep kvm
配置虚拟机开机自动启动
[root@centos8 ~]#virsh autostart centos8
Domain centos8 marked as autostarted#设置虚拟机随宿主机启动而自动启动,本质就是在下面目录生成软链接
[root@centos8 ~]#ll /etc/libvirt/qemu/autostart/
total 0
lrwxrwxrwx 1 root root 29 Sep 17 18:53 centos8.xml ->
/etc/libvirt/qemu/centos8.xml[root@centos8 ~]#virsh autostart 1 --disable
Domain 1 unmarked as autostarted
[root@centos8 ~]#ll /etc/libvirt/qemu/autostart/
total 0
lrwxrwxrwx 1 root root 29 Sep 17 18:53 centos8.xml ->
/etc/libvirt/qemu/centos8.xml
[root@centos8 ~]#reboot
[root@centos8 ~]#virsh list
Id Name State
----------------------------------------------------
1 centos8 running
磁盘预分配策略
raw 文件的预分配策略和文件系统是否支持有关,而qcow2则无关
预分配策略
off
此为缺省策略,即不使用预分配策略,预分配后的虚拟磁盘占用空间很小,不属于稀疏映像类型
生成的磁盘文件占用空间很小
metadata
只预分配元数据(metadata),预分配后的磁盘文件属于稀疏映像类型,相当于vmware中的磁盘置备选项: Thin Provision(精简配置)生成的磁盘文件为稀疏格式,实际占用的空间比off策略稍大一些
falloc
分配文件的块并标识它们的状态为未初始化,即只分配空间,但不置零. 预分配后的虚拟磁盘属于非稀疏映像类型,相对full模式来说,创建虚拟磁盘的速度要快很多,相当于vmware中的磁盘置备选项:厚置备延迟置零
生成的磁盘文件实际占用的空间和分配的空间相同大小
full分配所有磁盘空间并置零,预分配后的虚拟磁盘属于非稀疏映像类型,创建最慢,相当于vmware中的磁盘置备选项: 厚置备置零生成的磁盘文件实际占用的空间和分配的空间相同大小
文件系统显示大小
[root@centos8 ~]#ll -h test*.qcow2
-rw-r--r-- 1 root root 193K Sep 20 13:31 test1.qcow2
-rw-r--r-- 1 root root 193K Sep 20 13:32 test2.qcow2
-rw-r--r-- 1 root root 1.1G Sep 20 13:35 test3.qcow2
-rw-r--r-- 1 root root 1.1G Sep 20 13:36 test4.qcow2
-rw-r--r-- 1 root root 1.1G Sep 20 13:37 test5.qcow2
#查看真实大小
[root@centos8 ~]#du -h test*.qcow2
196K test1.qcow2
196K test2.qcow2
836K test3.qcow2
1.1G test4.qcow2
1.1G test5.qcow
虚拟磁盘类型
固定Fixed
在配置时,指定磁盘大小
不管在虚拟磁盘上实际存储多少数据,都将占用相同大小宿主机的磁盘空间
动态Dynamic
初始空间占用小
随着空间的使用逐渐增长到最大容量,但是只根据需求使用更多的空间
差异Differencing
因为创建是差异磁盘,所以只保存变更的数据
例如,将操作系统安装在父盘,然后创建差异化磁盘来执行进一步配置
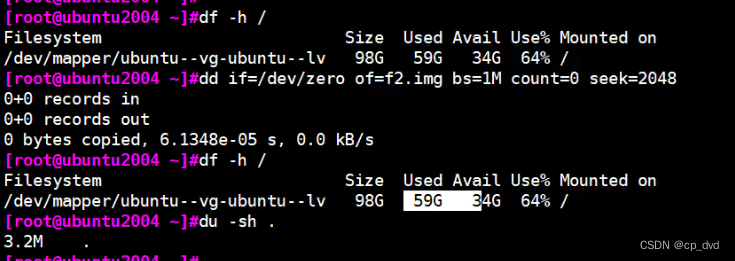
写入最后面前面没有
qcow2 格式选项
backing_file #指定后端镜像文件
backing_fmt #设置后端镜像的镜像格式
cluster_size #设置镜像中的簇大小,取值在512到2M之间,默认值为64K
preallocation #设置镜像文件空间的预分配模式
encryption #用于设置加密
创建raw格式非稀疏文件
[root@centos8 ~]#dd if=/dev/zero of=vm2.img bs=1M count=1024
1024+0 records in
1024+0 records out
1073741824 bytes (1.1 GB, 1.0 GiB) copied, 3.20332 s, 335 MB/s[root@centos8 ~]#qemu-img info vm2.img
image: vm2.img
file format: raw
virtual size: 1.0G (1073741824 bytes)
disk size: 1.0G[root@centos8 ~]#ls -hl vm2.img
-rw-r--r-- 1 root root 1.0G Sep 20 12:31 vm2.img[root@centos8 ~]#du -h vm2.img
1.0G vm2.img
创建raw格式稀疏文件
[root@centos8 ~]#dd if=/dev/zero of=vm3.img bs=1M count=0 seek=1024
0+0 records in
0+0 records out
0 bytes copied, 9.2173e-05 s, 0.0 kB/s[root@centos8 ~]#qemu-img info vm3.img
image: vm3.img
file format: raw
virtual size: 1.0G (1073741824 bytes)
disk size: 0[root@centos8 ~]#ll -h vm3.img
-rw-r--r-- 1 root root 1.0G Sep 20 12:34 vm3.img
[root@centos8 ~]#du -h vm3.img
0 vm3.img
raw文件复制的格式控制
#复制非稀疏文件,默认也为非稀疏文件
[root@centos8 ~]#cp vm2.img vm2.img.bak
[root@centos8 ~]#du -h vm2.img.bak
1.0G vm2.img.bak

[root@centos8 ~]#ll -h vm2.img.bak
-rw-r--r-- 1 root root 1.0G Sep 20 12:38 vm2.img.bak
[root@centos8 ~]#qemu-img info vm2.img.bak
image: vm2.img.bak
file format: raw
virtual size: 1.0G (1073741824 bytes)
disk size: 1.0G

#复制稀疏文件,默认仍为稀疏文件
[root@centos8 ~]#cp vm3.img vm3.img.bak
[root@centos8 ~]#ll -h vm3.img.bak
-rw-r--r-- 1 root root 1.0G Sep 20 12:36 vm3.img.bak
[root@centos8 ~]#du -h vm3.img.bak
0 vm3.img.bak

[root@centos8 ~]#qemu-img info vm3.img.bak
image: vm3.img.bak
file format: raw
virtual size: 1.0G (1073741824 bytes)
disk size: 0

#指定将非稀疏文件复制为稀疏格式格式
[root@centos8 ~]#cp --sparse=always vm2.img vm2.img.bak2
[root@centos8 ~]#qemu-img info vm2.img
image: vm2.img
file format: raw
virtual size: 1.0G (1073741824 bytes)
disk size: 1.0G

[root@centos8 ~]#qemu-img info vm2.img.bak2
image: vm2.img.bak2
file format: raw
virtual size: 1.0G (1073741824 bytes)
disk size: 0

#指定将稀疏文件复制为非稀疏格式格式
[root@centos8 ~]#cp --sparse=never vm3.img vm3.img.bak2
[root@centos8 ~]#qemu-img info vm3.img
image: vm3.img
file format: raw
virtual size: 1.0G (1073741824 bytes)
disk size: 0

[root@centos8 ~]#qemu-img info vm3.img.bak2
image: vm3.img.bak2
file format: raw
virtual size: 1.0G (1073741824 bytes)
disk size: 1.0G
virsh 管理虚拟机快照
[root@centos8 ~]#virsh snapshot-list centos8
Name Creation Time State
------------------------------------------------------------#创建虚拟机快照
[root@centos8 ~]#virsh snapshot-create centos8
Domain snapshot 1600593611 created
[root@centos8 ~]#virsh snapshot-list centos8
Name Creation Time State
------------------------------------------------------------
1600593611 2020-09-20 17:20:11 +0800 shutoff
使用virsh 命令还原快照
[root@centos8 ~]#virsh list
Id Name State
----------------------------------------------------
#无需关机,即可还原快照
[root@centos8 ~]#virsh snapshot-revert centos8 --snapshotname 1600593611 --
running
[root@centos8 ~]#virsh list
Id Name State
----------------------------------------------------
23 centos7 running
#删除快照
#删除快照
[root@centos8 ~]#virsh snapshot-delete centos8 --snapshotname 1600593611
Domain snapshot 1600593611 deleted
[root@centos8 ~]#virsh snapshot-list centos8
Name Creation Time State
------------------------------------------------------------
[root@centos8 ~]#

