Spring5框架总结学习(从入门到进阶)-AOP
文章目录
- AOP
- 1、基本概念
- 2、底层原理
- 3、底层原理实现
- 4、AOP(术语)
- 5、准备工作
- 6、基于注解实现
AOP
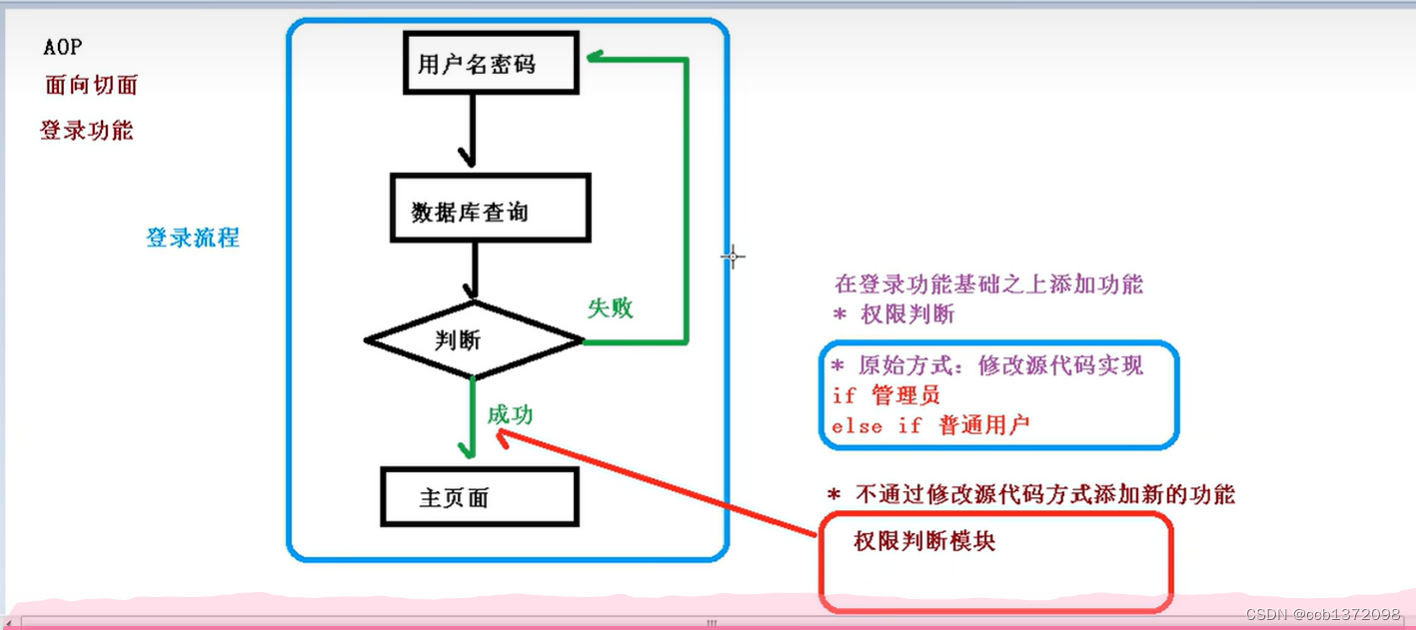
1、基本概念
- 面向切面编程
- 可用对各个业务逻辑各个部分进行隔离

2、底层原理
AOP底层使用动态代理
有2种情况动态代理
- 有接口 使用JDK动态代理
- 无接口 使用CGLIB动态代理
3、底层原理实现
1、JDK接口
package Portx;

import com.Dao.UserDao;
import com.Dao.UserDaoDemo;
import com.Spring5.User;

import java.lang.reflect.InvocationHandler;
import java.lang.reflect.Method;
import java.lang.reflect.Proxy;

public class Portex {


    public static void main(String[] args) {
        Class[] interfaces = { UserDao.class };
        UserDaoDemo user=new UserDaoDemo();
      UserDao userDao=  (UserDao)Proxy.newProxyInstance(JDKProxy.class.getClassLoader(),interfaces,new UserProxy(user));
    }
}

class UserProxy implements InvocationHandler
{
    //把之前的对象传进来
    private Object obj;
    public UserProxy(Object obj)
    {
        this.obj=obj;
    }
    //增强的逻辑
    @Override
    public Object invoke(Object proxy, Method method, Object[] args) throws Throwable {

        Object ret=method.invoke(obj,args);
        return ret;
    }
}
4、AOP(术语)
1、连接点
类里面哪些方法可以被增强,这些方法被称为连接点
2、切入点
实际被真正增强的方法,称为切入点
3、通知
实际增强的逻辑部分称为通知。(也就是增加的功能)
前置通知
后置通知
环绕通知
异常通知
最终通知
4、切面
5、准备工作
1、Aspectj不是Spring组成部分,独立AOP框架,一般将Aspectj和Spring框架一起使用,进行AOP操作。
2、基于Aspectj实现AOP操作
- 基于XML配置文件
- 基于注解方式实现
3、在项目里面引入依赖
4、切入点表达式
execution([权限修饰符][返回类型][类全路径][方法名称] ([参数列表]))
例如
对com.BookDao类里面的add进行增强
execution(*com.BookDao.add(…))
对com.BookDao类里面的所有方法进行增强
execution(*com.BookDao. *(…))
对com包下所有类,方法进行增强
execution(*com. * . *(…))
6、基于注解实现
1、创建类
public class UserDemo {
    public void add()
    {
        System.out.println("add+Plus");
    }

}
2、创建增强类,编写增强的逻辑
public class UserStrong {

    //前置通知
    public void before()
    {
        System.out.println("add before...");

    }
}
3、进行通知的配置
- 开启注解扫描
- 使用注解对象
- 在增强类上面添加注解@Aspect
- 在Spring配置文件中开启生成代理对象
a、引入名称空间context,aop
<beans xmlns="http://www.springframework.org/schema/beans"
       xmlns:xsi="http://www.w3.org/2001/XMLSchema-instance"
       xmlns:context="http://www.springframework.org/schema/context"
       xmlns:aop="http://www.springframework.org/schema/aop"
       xsi:schemaLocation="http://www.springframework.org/schema/beans http://www.springframework.org/schema/beans/spring-beans.xsd
http://www.springframework.org/schema/context http://www.springframework.org/schema/context/spring-context.xsd
http://www.springframework.org/schema/aop http://www.springframework.org/schema/aop/spring-aop.xsd">
</bean>
b、开启组件扫描
<beans xmlns="http://www.springframework.org/schema/beans"
       xmlns:xsi="http://www.w3.org/2001/XMLSchema-instance"
       xmlns:context="http://www.springframework.org/schema/context"
       xmlns:aop="http://www.springframework.org/schema/aop"
       xsi:schemaLocation="http://www.springframework.org/schema/beans http://www.springframework.org/schema/beans/spring-beans.xsd
http://www.springframework.org/schema/context http://www.springframework.org/schema/context/spring-context.xsd
http://www.springframework.org/schema/aop http://www.springframework.org/schema/aop/spring-aop.xsd">


<context:component-scan base-package="Strong">

    </context:component-scan>
</bean>
c、创建类对象
@Component
public class UserStrong {
@Component
public class UserDemo {
d、.在增强类上面添加注解@Aspect
@Aspect
@Component
public class UserStrong {
e、开启生成代理对象
<beans xmlns="http://www.springframework.org/schema/beans"
       xmlns:xsi="http://www.w3.org/2001/XMLSchema-instance"
       xmlns:context="http://www.springframework.org/schema/context"
       xmlns:aop="http://www.springframework.org/schema/aop"
       xsi:schemaLocation="http://www.springframework.org/schema/beans http://www.springframework.org/schema/beans/spring-beans.xsd
http://www.springframework.org/schema/context http://www.springframework.org/schema/context/spring-context.xsd
http://www.springframework.org/schema/aop http://www.springframework.org/schema/aop/spring-aop.xsd">


<context:component-scan base-package="Strong">

    </context:component-scan>
    <!-- 开启代理对象-->
    <aop:aspectj-autoproxy></aop:aspectj-autoproxy>
</bean>
f、配置不同类型的通知
@Aspect
@Component
public class UserStrong {

    //前置通知
    @Before(value = "execution(* Strong.UserDemo.add(..))")
    public void before()
    {
        System.out.println("add before...");

    }
}
   //后置
    @After(value = "execution(* Strong.UserDemo.add(..))")

	//异常通知,有异常时才执行
    @AfterThrowing(value = "execution(* Strong.UserDemo.add(..))")

	//在返回结果后执行
    @AfterReturning(value = "execution(* Strong.UserDemo.add(..))")

    //环绕,在方法之前,之后都执行
    @Around(value = "execution(* Strong.UserDemo.add(..))")
    public void before(ProceedingJoinPoint proceedingJoinPoint) throws Throwable {
        System.out.println("add around...");

        //被增强的方法
        proceedingJoinPoint.proceed();

    }
4、测试
 ApplicationContext context=new ClassPathXmlApplicationContext("bean6.xml");
        UserDemo userDemo=context.getBean("userDemo",UserDemo.class);
        userDemo.add();
