【OpenVINO】量化流程
模型量化具备降低内存、提高计算速度等有点,并且是一种比较成熟的方案,已经得到广泛应用。
OpenVINO提供了两种量化方式
参考自 官网 https://docs.openvino.ai/latest/openvino_docs_model_optimization_guide.html
- Post-training Optimization w/POT。 通过post-traning方法,对模型进行量化,比如post-training 8-Bit量化,无需对模型进行重新训练或者fine-tuning
- Training-time Optimization w/NNCF。 在DL框架内,训练时间段进行模型优化。比如可以基于Pytorch和TensorFlow框架内,支持量化感知训练和裁剪。
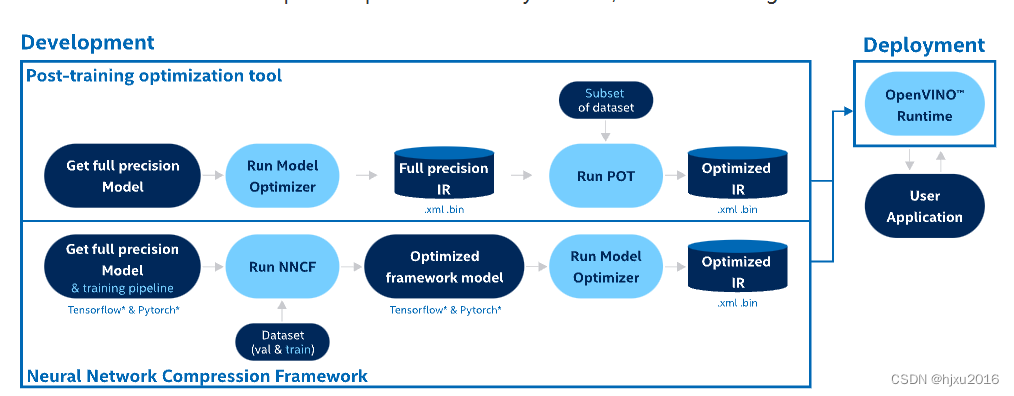
下图为量化的流程
- 训练一个全精度的模型
- 运行Model Optimizer或者NNCF模块,得到 IR模型或者量化后的框架模型
- 运行POT模块对模型进行量化,或者运行Model Optimizer模块获取优化后的IR模型
二、Post-training Optimization Tool
优势:
- 无需重新训练模型
- 将全精度IR模型转换为低精度数据类型INT8,可以减少模型大小、降低latency
- 会降低一些精度,也可能降低的比较多
下图是PTO的量化流程
输入模型->经过MO后得到IR文件->运行PTO工具(可输入数据)->得到量化后的模型
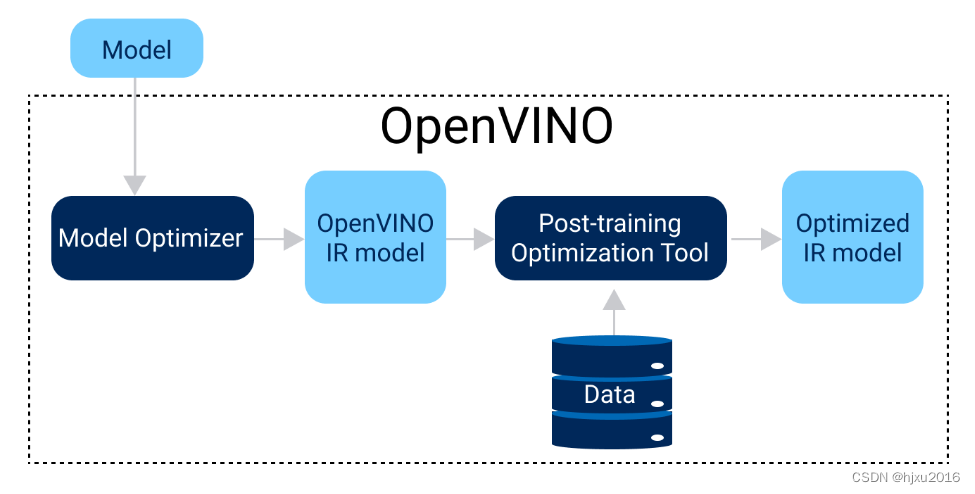
2.1 运用MO工具获取OpenVINO的IR模型
IR指 Intermediate Representation 中间表示,生成的也是OpenVINO的模型,可以是FP32或者FP16的。
Mo工具是OpenVINO提供的,可以在命令行操作。
#!/usr/bin/env python3
# -*- coding: utf-8 -*-
"""
*  * *** *  * *  *
*  *  *   **  *  *
****  *   **  *  *
*  *  *   **  *  *
*  * **  *  * ****

@File    : hello_openvino.py
@Date    : 2022/9/26/026
@Require :
@Author  : https://blog.csdn.net/hjxu2016
@Funtion :

"""


import openvino.inference_engine as ie
import os

print(ie.__version__)
if __name__ == "__main__":
    import subprocess
    file = "F:/PyPro/Classification/weight/res18_5_focal_loss_9954.onnx"
    #
    f = str(file).replace('.onnx', '_openvino_model_fp16' + os.sep)
    #
    # cmd = f"mo --input_model {file} --output_dir {f} --data_type FP16 --log_level NOTSET --input_shape [1,3,224,224]"
    # cmd = f"mo --help "
    cmd = f"mo --input_model {file} --output_dir {f} --data_type FP16 --log_level NOTSET"

    p = os.popen(cmd)
    print(p.read())
    # subprocess.check_output(cmd, shell=True)
2.2 DefaultQuantization 与 AccuracyAwareQuantization
PostTraining 提供了两种量化方式
可以通过python脚本执行量化步骤
也可以通过命令行的接口来进行量化,这里只介绍Python量化的流程
整个量化差不多准备三个步骤
- 准备数据和数据接口
- 设置量化算法参数
- 定义和执行量化过程
2.2.1 准备数据和数据接口
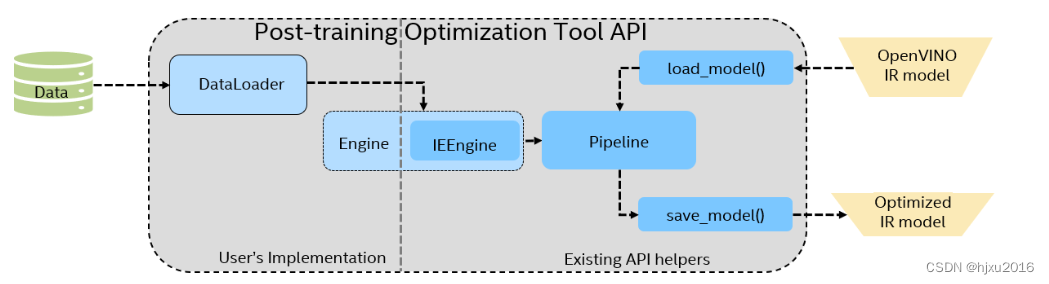
在大多数案例中,需要集成openvino.tools.pot.DataLoade 来设置数据。
接口介绍: https://docs.openvino.ai/latest/pot_default_quantization_usage.html
接口可以从数据集中获取数据,并且应用模型的特殊预处理工具,可以按照索引访问。
再看Dataloader接口
-
len(), 返回数据集的size
-
getitem(), 可以按照索引访问数据,它还可以封装特定于模型的预处理逻辑。此方法应以(data,annotation)格式返回数据,其中:数据是在推理时传递给模型的输入,因此应该对其进行适当的预处理。它可以是numpy。数组对象或字典,其中键是模型输入的名称,值是numpy。对应于此输入的数组。默认量化方法不使用annotation。因此,在这种情况下,此对象可以为“None”
class DataLoader(ABC):
    """An abstract class representing a dataset.

    All custom datasets should inherit.
    ``__len__`` provides the size of the dataset and
    ``__getitem__`` supports integer indexing in range from 0 to len(self)
    """

    def __init__(self, config):
        """ Constructor
        :param config: data loader specific config
        """
        self.config = config if isinstance(config, Dict) else Dict(config)

    @abstractmethod
    def __getitem__(self, index):
        pass

    @abstractmethod
    def __len__(self):
        pass
2.2.2 设置量化参数
默DefaultQuantization量化算子有一些强制性或者可选的参数,这些参数以字典的方式定义
如果选择AccuracyAwareQuantization量化算子,可以设置maximal_drop最大精度下降的的范围,这时候会自动搜索哪些层对量化的精度损失高的层,然后对这些层不进行量化操作
{
    "name": "DefaultQuantization", # AccuracyAwareQuantization
    "params": {
        "target_device": "ANY",
        "stat_subset_size": 300,
        "stat_batch_size": 1,
        "maximal_drop":0.01,
    },
}
默认量化算子存在三个参数
- target_device 目前只可以选择“ANY”或者“CPU”
- stat_subset_size 用于计算用于量化的激活统计信息的数据子集的大小。如果未指定参数,则使用整个数据集。建议使用不少于300个样品。
- stat_batch_size 用于计算用于量化的激活统计信息的批大小。如果未指定参数,则为1。
- maximal_drop 精度下降的最大值
2.2.3 设置metric评估指标
metric评估指标在DefaultQuantization量化阶段可以用来衡量量化前和量化后的精度对比,当然,在DefaultQuantization量化阶段,可以将这个设置为None
在AccuracyAwareQuantization量化阶段,则必须设置好,因为需要通过这个指标来确定精度下降的范围。
如下实例为分割的IOU评估指标。
class Accuracy(Metric):
    def __init__(self):
        super().__init__()
        self._name = "accuracy"
        self._matches = []
        self.intersection = 0.0
        self.union = 0.0
    @property
    def value(self):
        """Returns accuracy metric value for the last model output."""
        # print(self._matches[-1])
        return {self._name: self._matches[-1]}

    @property
    def avg_value(self):
        """
        Returns accuracy metric value for all model outputs. Results per image are stored in
        self._matches, where True means a correct prediction and False a wrong prediction.
        Accuracy is computed as the number of correct predictions divided by the total
        number of predictions.
        """
        miou = 1.0 * self.intersection / self.union
        print('miou', miou)
        return {self._name: miou}

    def update(self, output, target):
        """Updates prediction matches.

        :param output: model output
        :param target: annotations
        """
        predict = output[1]
        predict = predict[0] > 0.5
        target = target[0] > 0.5
        intersection = np.sum((predict) & (target))

        self.intersection += np.sum((predict) & (target))
        self.union += np.sum(predict) + np.sum(target) - intersection

        self._matches.append([self.intersection/(self.union+0.00001)])
    def reset(self):
        """
        Resets the Accuracy metric. This is a required method that should initialize all
        attributes to their initial value.
        """
        self.intersection = 0
        self.union = 0
        self._matches = []
    def get_attributes(self):
        """
        Returns a dictionary of metric attributes {metric_name: {attribute_name: value}}.
        Required attributes: 'direction': 'higher-better' or 'higher-worse'
                             'type': metric type
        """
        return {self._name: {"direction": "higher-better", "type": "accuracy"}}
2.2.4 执行量化
参考案例来自
https://github.com/openvinotoolkit/openvino_notebooks/blob/main/notebooks/301-tensorflow-training-openvino/301-tensorflow-training-openvino-pot.ipynb
总共有9个步骤,其中精度metric是可选的,DefaultQuantization量化时,metric可以设置为None,也可以用来对比量化前和量化后的精度损失。
在AccuracyAwareQuantization量化阶段,则必须设置metric好,因为需要通过这个指标来确定精度下降的范围
    folder = "F:/DataSet/LyophilizedBall/classification/val/"

    # step1: 加载模型
    model = load_model(model_config)
    original_model = copy.deepcopy(model)
    # print(model)
    # step2: 初始化 dataloader
    data_loader = ClassificationDataLoader(folder)

    # step3: 可选,设置评估指标,可用于和原模型做对比
    metric = Accuracy()
    # metric = None
    # step4: 初始化引擎,通过数据、评估指标计算
    engine = IEEngine(config=engine_config, data_loader=data_loader, metric=metric)

    # step5: 创建模型压缩算法的管道
    pipeline = create_pipeline(algo_config=algorithms, engine=engine)

    # step6: 执行管道流程
    compressed_model = pipeline.run(model=model)

    # step7: 可选:为了减少最后.bin 文件的大希奥,压缩模型权重进度
    compress_model_weights(model=compressed_model)

    # step8: 可选:保存模型, 返回保存模型的路径
    compress_model_path = save_model(model=compressed_model, save_path="./models/weight/ptqModel")
    print(compress_model_path)

    # Step 9 (Optional): Evaluate the original and compressed model. Print the results
    original_metric_results = pipeline.evaluate(original_model)
    if original_metric_results:
        print(f"Accuracy of the original model:  {next(iter(original_metric_results.values())):.5f}")

    quantized_metric_results = pipeline.evaluate(compressed_model)
    if quantized_metric_results:
        print(f"Accuracy of the quantized model: {next(iter(quantized_metric_results.values())):.5f}")