aws beanstalk 理解和使用eb工作线程环境
参考资料
- beanstalk 工作线程环境
- beanstalk 工作线程环境管理
- https://catalog.us-east-1.prod.workshops.aws/workshops/b317e4f5-cb38-4587-afb1-2f75be25b2c0/en-US/03-provisionresources
理解 beanstalk 工作线程环境
https://docs.amazonaws.cn/elasticbeanstalk/latest/dg/using-features-managing-env-tiers.html
创建工作线程环境后,eb通过cloudformation创建主要资源如下
- autoscaling group 和 ec2 instance
- sqs(前端推送,sqsd拉取)
- dynamodb(领导选举)
- cw alarm(告警扩容)
工作线程节点的userdata如下,核心是beanstalk的bootstrap.sh脚本,显然对于不同的平台和language来说启动脚本是不同的。大致逻辑如下
#!/bin/bash
exec > >(tee -a /var/log/eb-cfn-init.log|logger -t [eb-cfn-init] -s 2>/dev/console) 2>&1
echo [`date -u +"%Y-%m-%dT%H:%M:%SZ"`] Started EB User Data
set -x
# Executing bootstrap script
SLEEP_TIME=2
SLEEP_TIME_MAX=3600
while true; do
  curl https://elasticbeanstalk-platform-assets-public-beta-cn-north-1.s3.cn-north-1.amazonaws.com.cn/stalks/eb_ruby27_amazon_linux_2_1.0.2256.0_20221227225055/lib/UserDataScript.sh > /tmp/ebbootstrap.sh
  RESULT=$?
  if [[ "$RESULT" -ne 0 ]]; then
    sleep_delay
  else
    /bin/bash /tmp/ebbootstrap.sh     'https://cloudformation-waitcondition-cn-north-1.s3.cn-north-1.amazonaws.com.cn/arn%3Aaws-cn%3Acloudformation%3Acn-north-1%3A037047667284%3Astack/awseb-e-jkygfehwpb-stack/29d62c60-93e1-11ed-88ae-064daeaf9a60/AWSEBInstanceLaunchWaitHandle?X-Amz-Algorithm=AWS4-HMAC-SHA256&X-Amz-Date=20230114T075804Z&X-Amz-SignedHeaders=host&X-Amz-Expires=86399&X-Amz-Credential=AKIAOMTUJJXMXKXJZEPQ%2F20230114%2Fcn-north-1%2Fs3%2Faws4_request&X-Amz-Signature=98e6cf0a626f4041a81c6292900f118e2f8d31889b948979ea7a7059b05a6c97'    'arn:aws-cn:cloudformation:cn-north-1:xxxxxxx:stack/awseb-e-jkygfehwpb-stack/29d62c60-93e1-11ed-88ae-064daeaf9a60'    '2c7b3a9b-d24e-4896-b509-18e2e8af2ed2'    'https://elasticbeanstalk-health.cn-north-1.amazonaws.com.cn'    ''    'https://elasticbeanstalk-platform-assets-public-beta-cn-north-1.s3.cn-north-1.amazonaws.com.cn/stalks/eb_ruby27_amazon_linux_2_1.0.2256.0_20221227225055'    'cn-north-1'
    RESULT=$?
    if [[ "$RESULT" -ne 0 ]]; then
      sleep_delay
    else
      exit 0
    fi
  fi
done
启动脚本太长就不放了,主要包括eb平台初始化以及和cfn交互的逻辑,把错误和异常处理取消之后如下
if test -f "/opt/elasticbeanstalk/.aws-eb-system-bootstrapped"; then
...
else
   log first init of instance.
   retry_execute cfn_init '_OnInstanceBoot'
   log finished _OnInstanceBoot
   /bin/wget --waitretry=20 -O /tmp/platform-engine.zip $ENGINE_URL
   mkdir -p /opt/elasticbeanstalk/bin
   /bin/unzip -o /tmp/platform-engine.zip -d /opt/elasticbeanstalk/
fi
# only move engine binary here
# we have a `InstallEngine` instruction to move /tmp/configuration dir to /opt/elasticbeanstalk
/opt/elasticbeanstalk/bin/platform-engine -command=userdata-exec -stack-id=$STACK_ID
log_and_exit 'Successfully bootstrapped instance.'
创建worker类型环境时需要依赖sqs,可以选择使用已有或创建新的,默认创建两个sqs包括一个死信队列。此外还创建了一个ddb用来进行领导选举

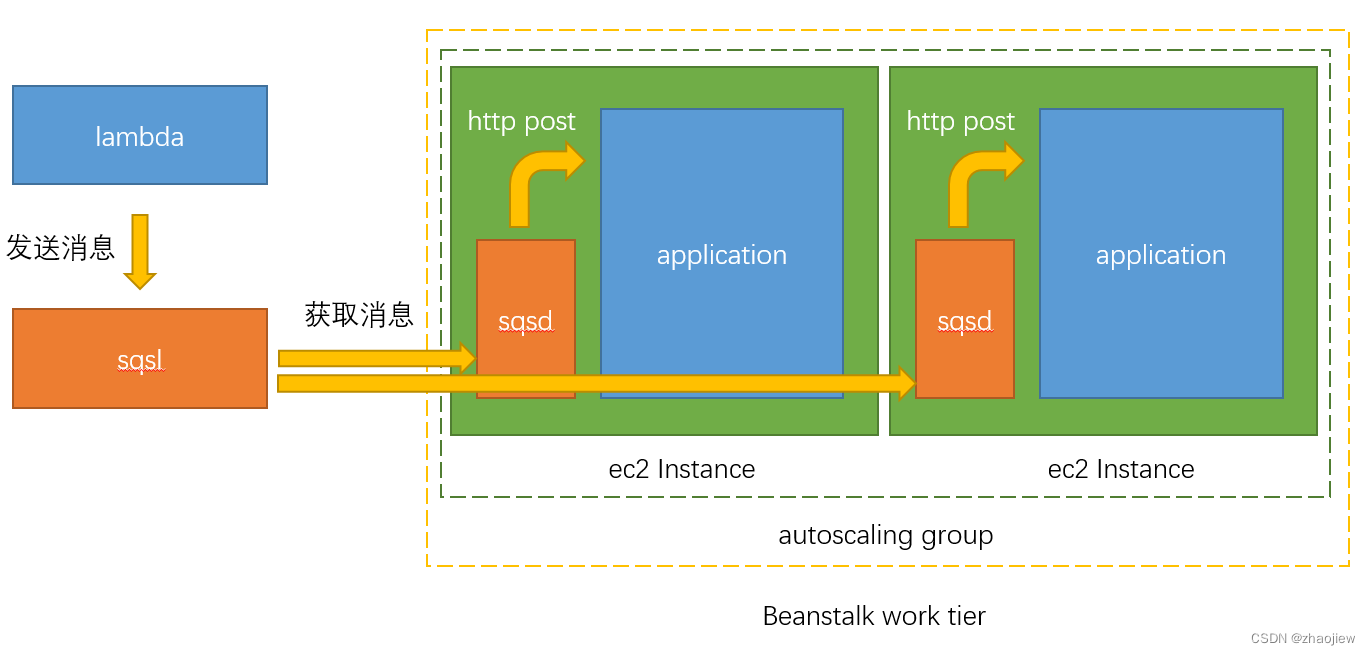
beanstalk工作线程环境除了创建asg,ec2实例和iam角色外,还会预配置一个sqs队列。eb实例启动时会按照language平台不同安装不同的守护进程。该守护进程读取sqs消息并发送给线程环境中的webserver处理。多个实例共享同一个sqs

工作线程的目的在于将需要长时间执行的操作或流程从前端的webserver上卸载,这里用lambda函数来模拟前端webserver发送消息。
工作线程环境中的守护进程从sqs提取消息,并通过http post请求发送到本地的80端口。可以配置守护程序以发布到其他路径,使用 application/JSON 之外的 MIME 类型,连接到现有队列或自定义连接(最大并发请求数)、超时和重试。
注意:可以配置发布工作线程队列消息的 URL 路径,但不能配置ip端口。Elastic Beanstalk 始终在端口 80 上发布工作线程队列消息。工作线程环境应用程序或其代理必须侦听端口 80。
- 应用程序收到消息后返回 200,则守护进程删除sqs队列中的消息。
- 如果返回200外的响应,则等待
ErrorVisibilityTimeout时间重新将消息放回队列。 - 如果仍然没有响应,等待
InactivityTimeout时间将消息重新放回队列。 - sqs会自动删除存在时间超过
RetentionPeriod时间的消息
eb工作线程支持sqs死信队列,存放对由于某种原因其他队列无法成功处理的消息,能够处理未成功处理的消息。死信队列无法禁用,无法成功处理的消息最终会发送到死信队列。但是可以通过将eb环境中的MaxRetries设置为100来禁用次功能
eb本身支持定期任务,只需要在源码包中配置cron.yaml即可。eb通过领导选举的方式决定那个实例对定时任务排队,并将状态写入到之前提到的dynamoodb中

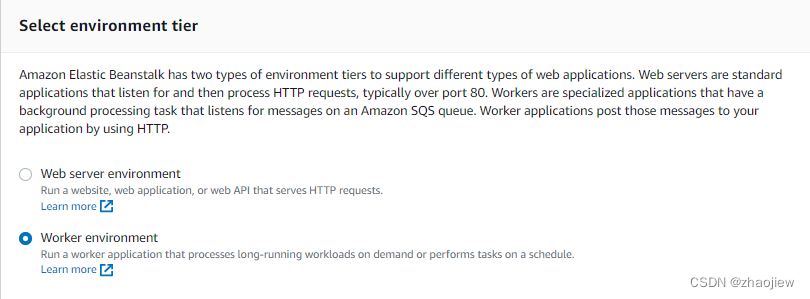
创建和使用线程环境
这里我们使用nodejs平台创建高可用的工作线程环境,使用示例的代码

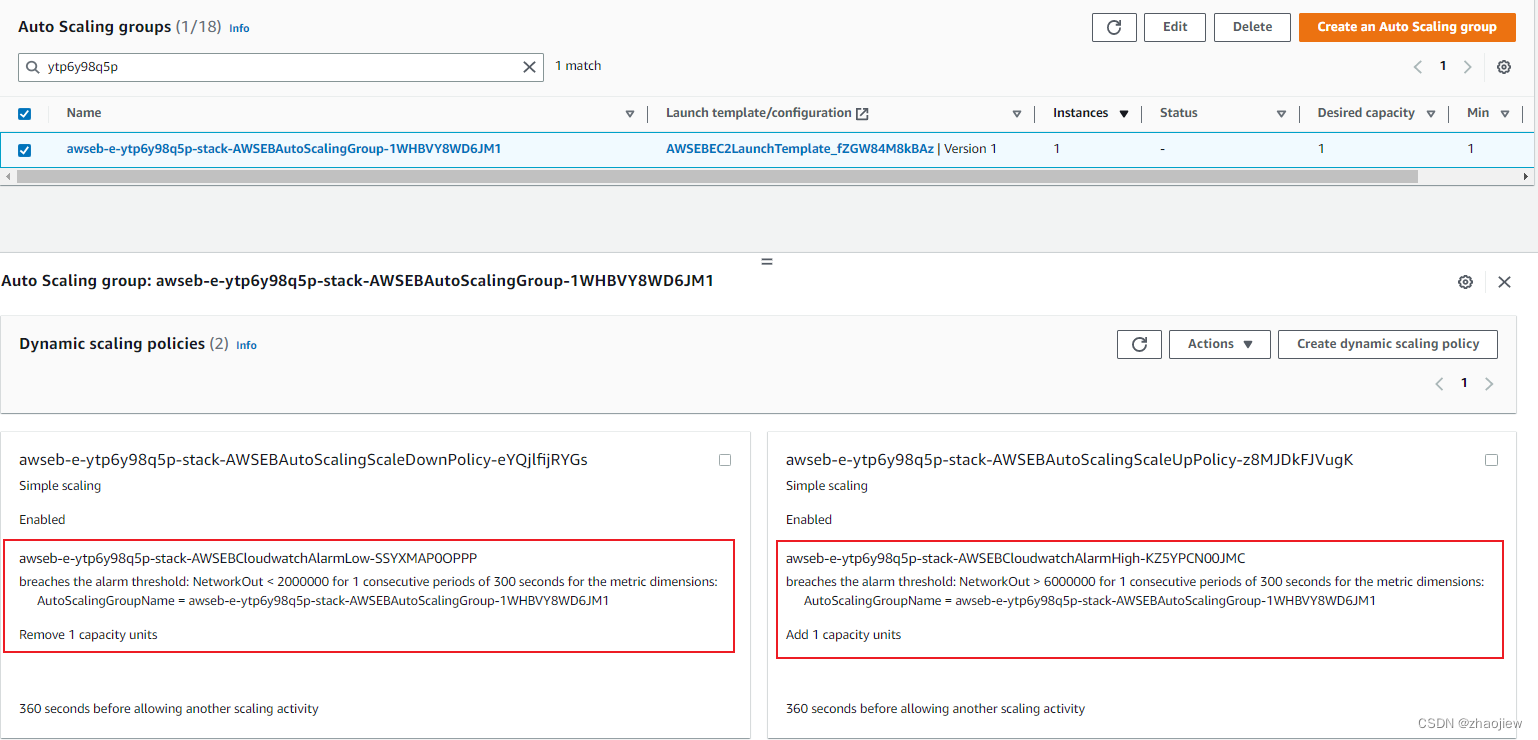
注意:创建工作线程环境如果选择single instance 则不会创建cw告警和asg扩展策略,无法通过eb控制台指定实力数量
创建asg之后会附加如下扩展策略

登录到实例上查看进程,sqsd本身使用ruby启动的守护进程
$ systemctl status sqsd
● sqsd.service - This is sqsd daemon
   Loaded: loaded (/etc/systemd/system/sqsd.service; enabled; vendor preset: disabled)
   Active: active (running) since Sun 2023-01-15 03:22:37 UTC; 3h 39min ago
 Main PID: 3209 (aws-sqsd)
   CGroup: /system.slice/sqsd.service
           └─3209 /opt/elasticbeanstalk/lib/ruby/bin/ruby /opt/elasticbeanstalk/lib/ruby/bin/aws-sqsd start
查看实例webserver,默认监听3000端口,并通过nginx代理暴露到80端口,接受post请求并将结果记录在/tmp/sample-app.log中,这个app.js本身也是通过web.service服务守护的
var port = process.env.PORT || 3000,
    http = require('http'),
    fs = require('fs'),
    html = fs.readFileSync('index.html');
var log = function(entry) {
    fs.appendFileSync('/tmp/sample-app.log', new Date().toISOString() + ' - ' + entry + '\n');
};

var server = http.createServer(function (req, res) {
    if (req.method === 'POST') {
        var body = '';

        req.on('data', function(chunk) {
            body += chunk;
        });

        req.on('end', function() {
            if (req.url === '/') {
                log('Received message: ' + body);
                log('Record Http headers: ' + JSON.stringify(req.headers))
            } else if (req.url = '/scheduled') {
                // 定期任务额外设置的http表头
                // X-Aws-Sqsd-Taskname 定时任务名称
                // X-Aws-Sqsd-Scheduled-At 定时任务时间
                // X-Aws-Sqsd-Sender-Id 账号id
                log('Received task ' + req.headers['x-aws-sqsd-taskname'] + ' scheduled at ' + req.headers['x-aws-sqsd-scheduled-at']);
            }

            res.writeHead(200, 'OK', {'Content-Type': 'text/plain'});
            res.end();
        });
    } else {
        res.writeHead(200);
        res.write(html);
        res.end();
    }
});
// Listen on port 3000, IP defaults to 127.0.0.1
server.listen(port);
// Put a friendly message on the terminal
console.log('Server running at http://127.0.0.1:' + port + '/');
创建lambda函数如下,注意设置较大的超时时间,否则会直接超时函数无法执行
import json
import logging
import boto3
import datetime

from botocore.exceptions import ClientError

sqs_client = boto3.client('sqs', region_name='cn-north-1')


def send_sqs_message(QueueUrl, msg_body):

    try:
        msg = sqs_client.send_message(QueueUrl=QueueUrl,
                                      MessageBody=json.dumps(msg_body))
    except ClientError as e:
        logging.error(e)
        return None
    return msg


def lambda_handler(event, context):

    QueueUrl = 'https://sqs.cn-north-1.amazonaws.com.cn/037047667284/awseb-e-emmmtzpif6-stack-AWSEBWorkerQueue-uq1hZHWrMqHI'
    Duration = 1

    logging.basicConfig(level=logging.DEBUG, format='%(levelname)s: %(asctime)s: %(message)s')

    msgCount = 0
    endTime = datetime.datetime.now() + datetime.timedelta(minutes=Duration)
    while datetime.datetime.now() < endTime:
        msg = send_sqs_message(QueueUrl,'message ' + str(msgCount))
        msgCount = msgCount + 1
        if msg is not None:
            logging.info(f'Sent SQS message ID: {msg["MessageId"]}')

    return {
        'statusCode': 200,
        'body': 'Sent ' + str(msgCount) + ' messages'
    }
在lambda函数中模拟发送消息到sqs

在工作线程实例(已经通过托管策略AWSElasticBeanstalkWorkerTier授权获取sqs消息)上查看到对应日志。这里除了“/”请求,还有定期任务的日志
2023-01-15T07:41:03.526Z - Record Http headers:
{
    "connection": "upgrade",
    "host": "localhost",
    "x-real-ip": "127.0.0.1",
    "x-forwarded-for": "127.0.0.1",
    "content-length": "14",
    "content-type": "application/json",
    "user-agent": "aws-sqsd/3.0.4",
    "x-aws-sqsd-msgid": "789fc356-0429-453a-9398-1603ba594d39",
    "x-aws-sqsd-receive-count": "1",
    "x-aws-sqsd-first-received-at": "2023-01-15T07:41:03Z",
    "x-aws-sqsd-sent-at": "2023-01-15T07:41:03Z",
    "x-aws-sqsd-queue": "awseb-e-emmmtzpif6-stack-AWSEBWorkerQueue-uq1hZHWrMqHI",
    "x-aws-sqsd-path": "/",
    "x-aws-sqsd-sender-id": "AROAQRIBWRJKBIFFZVTSM:queuedepth-populate-sqs",
    "accept-encoding": "gzip, compressed"
}
2023-01-15T07:42:00.113Z - Received task task1 scheduled at 2023-01-15T07:42:00Z
定期任务配置如下,URL 是为触发作业而将 POST 请求发送到的路径
at cron.yaml
version: 1
cron:
  - name: "task1"
    url: "/scheduled"
    schedule: "* * * * *"
以上通过示例的eanstalk线程环境,结合官方文档简单了解了beanstalk运行逻辑。
