vue3-admin商品管理后台项目(图库模块开发)
今天我们继续来进行图库模块的开发工作
首先是布局实现:
使用element提供的container布局容器
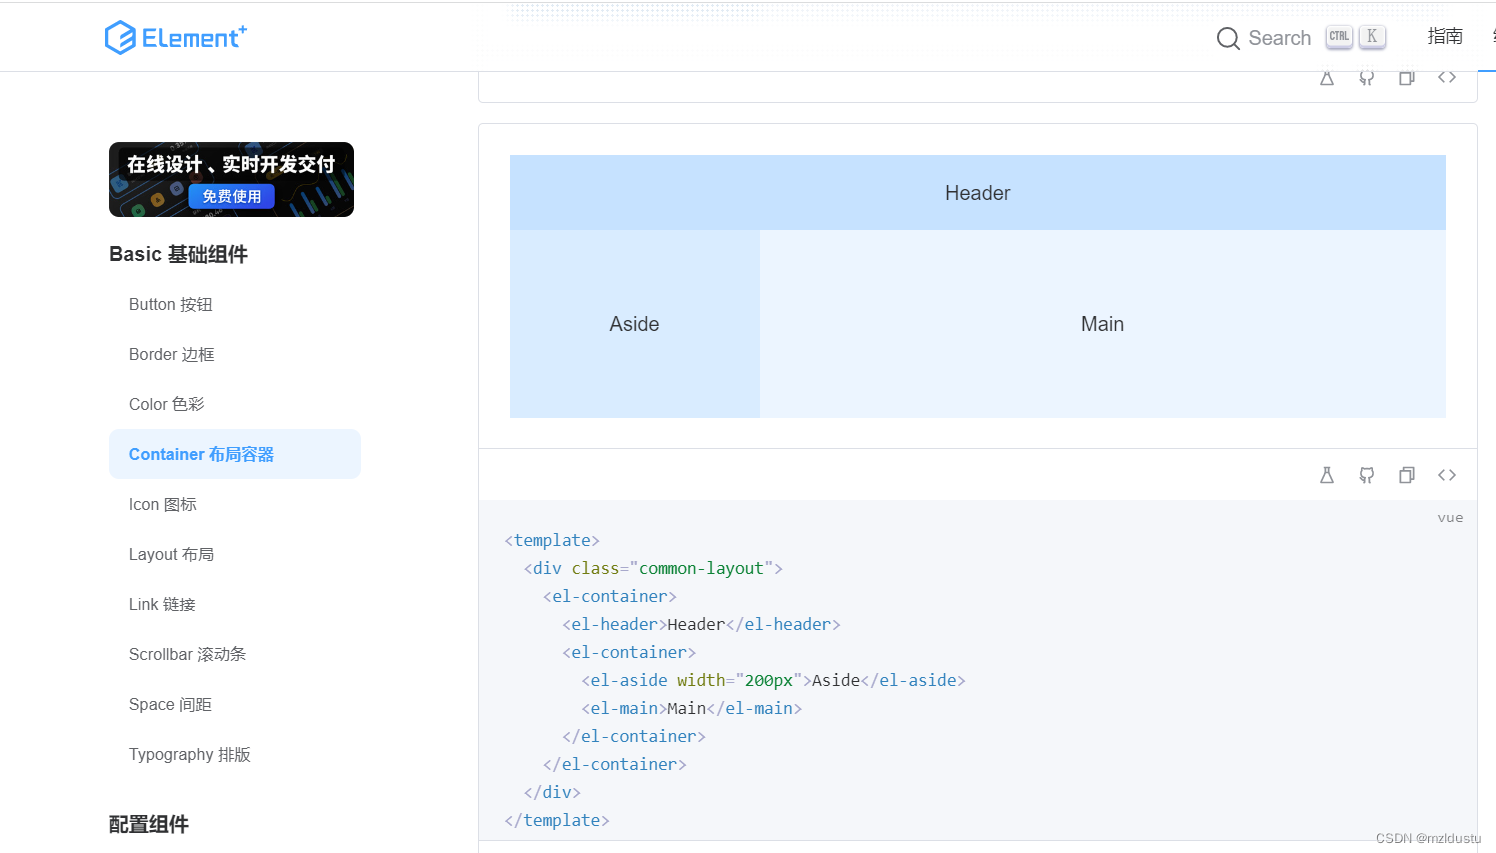
利用布局将其分为左右两块,一块是侧边栏,一块是主体部分,然后书写它的样式
<template>
    <el-container class="bg-white rounded" :style="{ height: (h + 'px') }">
      <el-header class="image-header">Header</el-header>
      <el-container>
        <el-aside width="220px" class="image-aside">
            <div class="top">
                <div v-for="i in 100" :key="i">{{ i }}</div>
            </div>
            <div class="bottom">
                分页区域
            </div>
        </el-aside>
        <el-main class="image-main">
            <div class="top">
                <div v-for="i in 100" :key="i">{{ i }}</div>
            </div>
            <div class="bottom">
                分页区域
            </div>
        </el-main>
      </el-container>
    </el-container>
</template>

<script setup>
// 拿到浏览器高度
const windowHeight = window.innerHeight || document.body.clientHeight;
// 减去header高度+导肮栏高度+padding
const h = windowHeight - 64 - 44 -40;
</script>

<style>
.image-header{
    border-bottom: 1px solid #eeeeee;
    @apply flex items-center;
}

.image-aside{
    border-right: 1px solid #eeeeee;
    position: relative;
}

.image-main{
    position: relative;
}

.image-aside .top, .image-main .top{
    /* 相对aside定义,撑满左右两边和上下 */
    position: absolute;
    top: 0;
    right: 0;
    left: 0;
    bottom: 50px;
    /* y轴方向上默认 */
    overflow-y: auto;
}

.image-aside .bottom, .image-main .bottom{
    position: absolute;
    bottom: 0;
    height: 50px;
    left: 0;
    right: 0;
    @apply flex items-center justify-center;
}
</style>
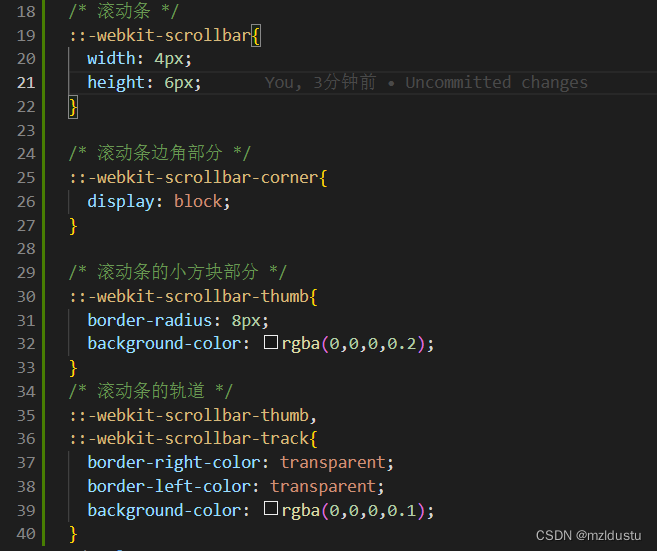
另外,在App.vue里面对其滚动条进行样式优化:
然后目前的效果就是:
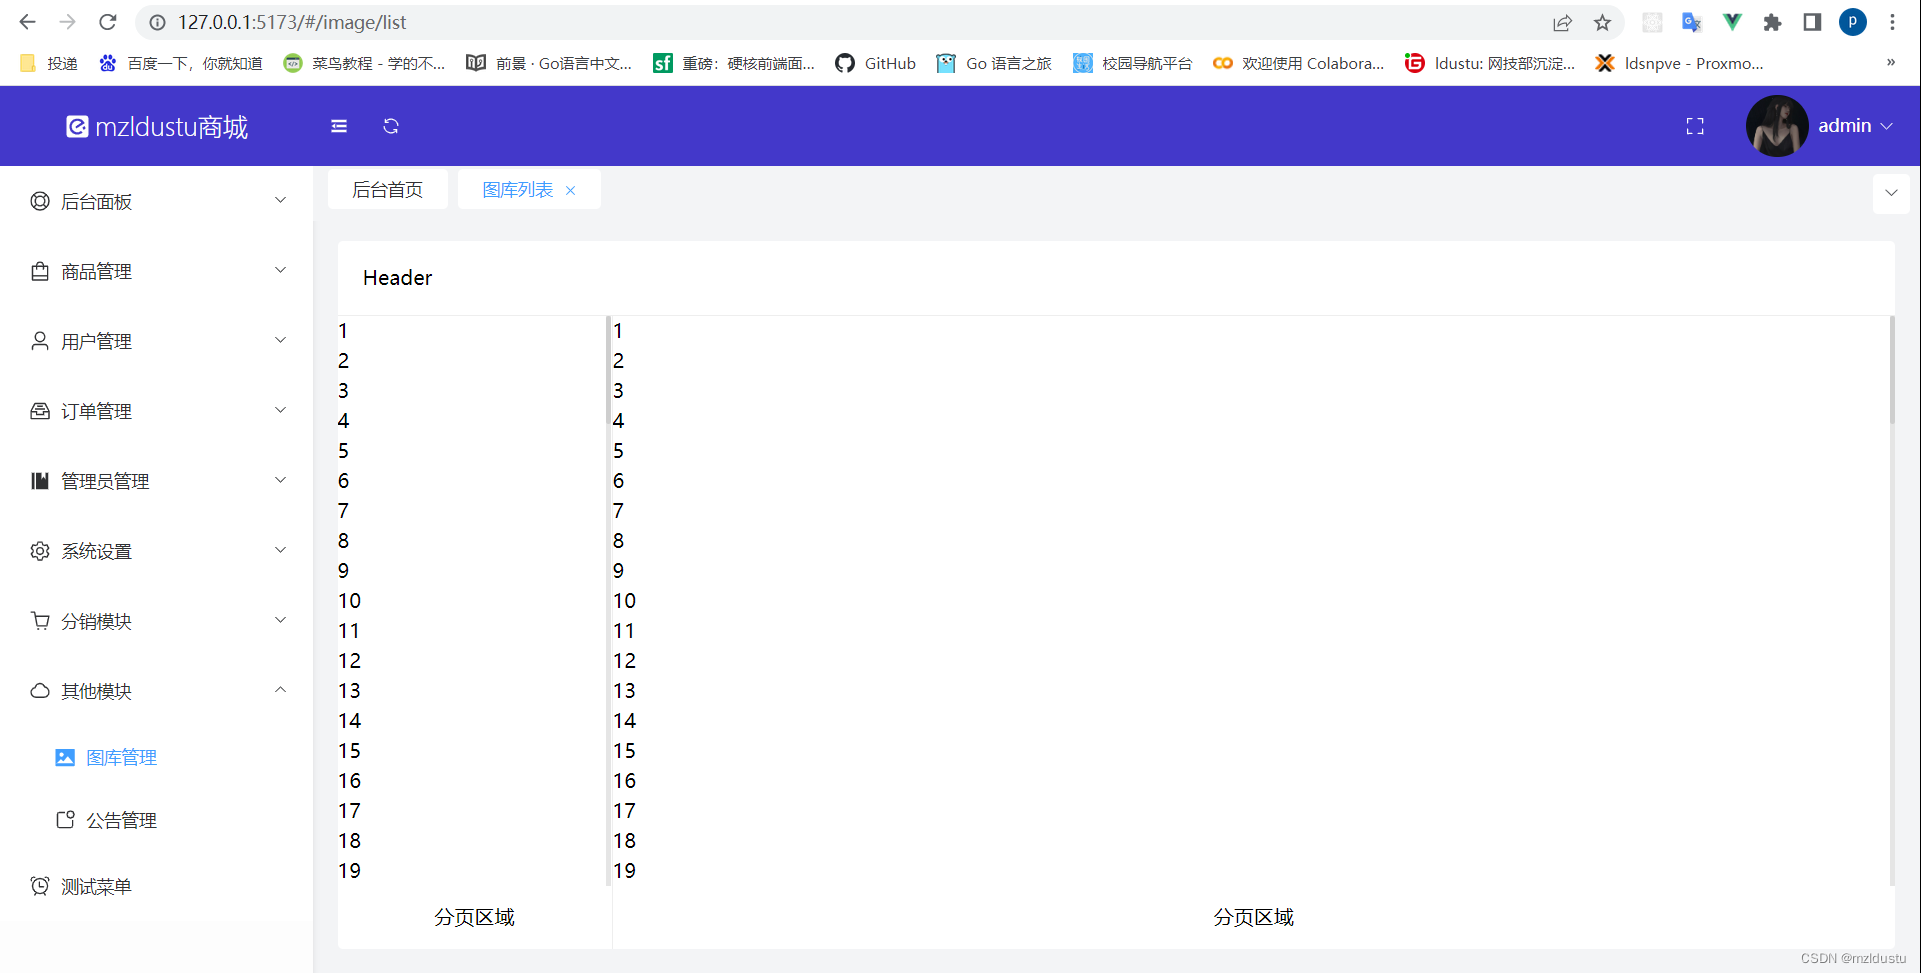
因为后面很多部分要用到相同的侧边栏和主体部分,所以我们对这两块进行抽离:
在components文件夹下面创建ImageAside.vue和ImageMain.vue
然后抽离:
ImageAside.vue
<template>
    <el-aside width="220px" class="image-aside">
        <div class="top">
            <div v-for="i in 100" :key="i">{{ i }}</div>
        </div>
        <div class="bottom">
            分页区域
        </div>
    </el-aside>
</template>

<style>
.image-aside{
    border-right: 1px solid #eeeeee;
    position: relative;
}

.image-aside .top{
    /* 相对aside定义,撑满左右两边和上下 */
    position: absolute;
    top: 0;
    right: 0;
    left: 0;
    bottom: 50px;
    /* y轴方向上默认 */
    overflow-y: auto;
}

.image-aside .bottom{
    position: absolute;
    bottom: 0;
    height: 50px;
    left: 0;
    right: 0;
    @apply flex items-center justify-center;
}
</style>
ImageMain.vue
<template>
    <el-main class="image-main">
        <div class="top">
            <div v-for="i in 100" :key="i">{{ i }}</div>
        </div>
        <div class="bottom">
            分页区域
        </div>
    </el-main>
</template>

<style>
.image-main{
    position: relative;
}
.image-main .top{
    /* 相对aside定义,撑满左右两边和上下 */
    position: absolute;
    top: 0;
    right: 0;
    left: 0;
    bottom: 50px;
    /* y轴方向上默认 */
    overflow-y: auto;
}

.image-main .bottom{
    position: absolute;
    bottom: 0;
    height: 50px;
    left: 0;
    right: 0;
    @apply flex items-center justify-center;
}
</style>
此时的list.vue
<template>
    <el-container class="bg-white rounded" :style="{ height: (h + 'px') }">
      <el-header class="image-header">Header</el-header>
      <el-container>
        <!-- <el-aside width="220px" class="image-aside">
            <div class="top">
                <div v-for="i in 100" :key="i">{{ i }}</div>
            </div>
            <div class="bottom">
                分页区域
            </div>
        </el-aside> -->
        <ImageAside />
        <!-- <el-main class="image-main">
            <div class="top">
                <div v-for="i in 100" :key="i">{{ i }}</div>
            </div>
            <div class="bottom">
                分页区域
            </div>
        </el-main> -->
        <ImageMain />
      </el-container>
    </el-container>
</template>

<script setup>
// 引入公共侧边栏
import ImageAside from "~/components/ImageAside.vue"
// 引入公共主体部分
import ImageMain from "~/components/ImageMain.vue"
// 拿到浏览器高度
const windowHeight = window.innerHeight || document.body.clientHeight;
// 减去header高度+导肮栏高度+padding
const h = windowHeight - 64 - 44 -40;
</script>

<style>
.image-header{
    border-bottom: 1px solid #eeeeee;
    @apply flex items-center;
}
</style>
抽离完成
然后我们进行图库分类组件开发:
除去之前的1-100,然后加上需要的按钮图标
此时的ImageAside.vue
<template>
    <el-aside width="220px" class="image-aside">
        <div class="top">

            <AsideList>
                分类标题
            </AsideList>

            <!-- 激活状态 -->
            <AsideList active>
                分类标题
            </AsideList>

        </div>
        <div class="bottom">
            分页区域
        </div>
    </el-aside>
</template>
<!-- 公共侧边栏部分抽离 -->

<script setup>
import AsideList from './AsideList.vue';
</script>

<style>
.image-aside{
    border-right: 1px solid #eeeeee;
    position: relative;
}

.image-aside .top{
    /* 相对aside定义,撑满左右两边和上下 */
    position: absolute;
    top: 0;
    right: 0;
    left: 0;
    bottom: 50px;
    /* y轴方向上默认 */
    overflow-y: auto;
}

.image-aside .bottom{
    position: absolute;
    bottom: 0;
    height: 50px;
    left: 0;
    right: 0;
    @apply flex items-center justify-center;
}


</style>
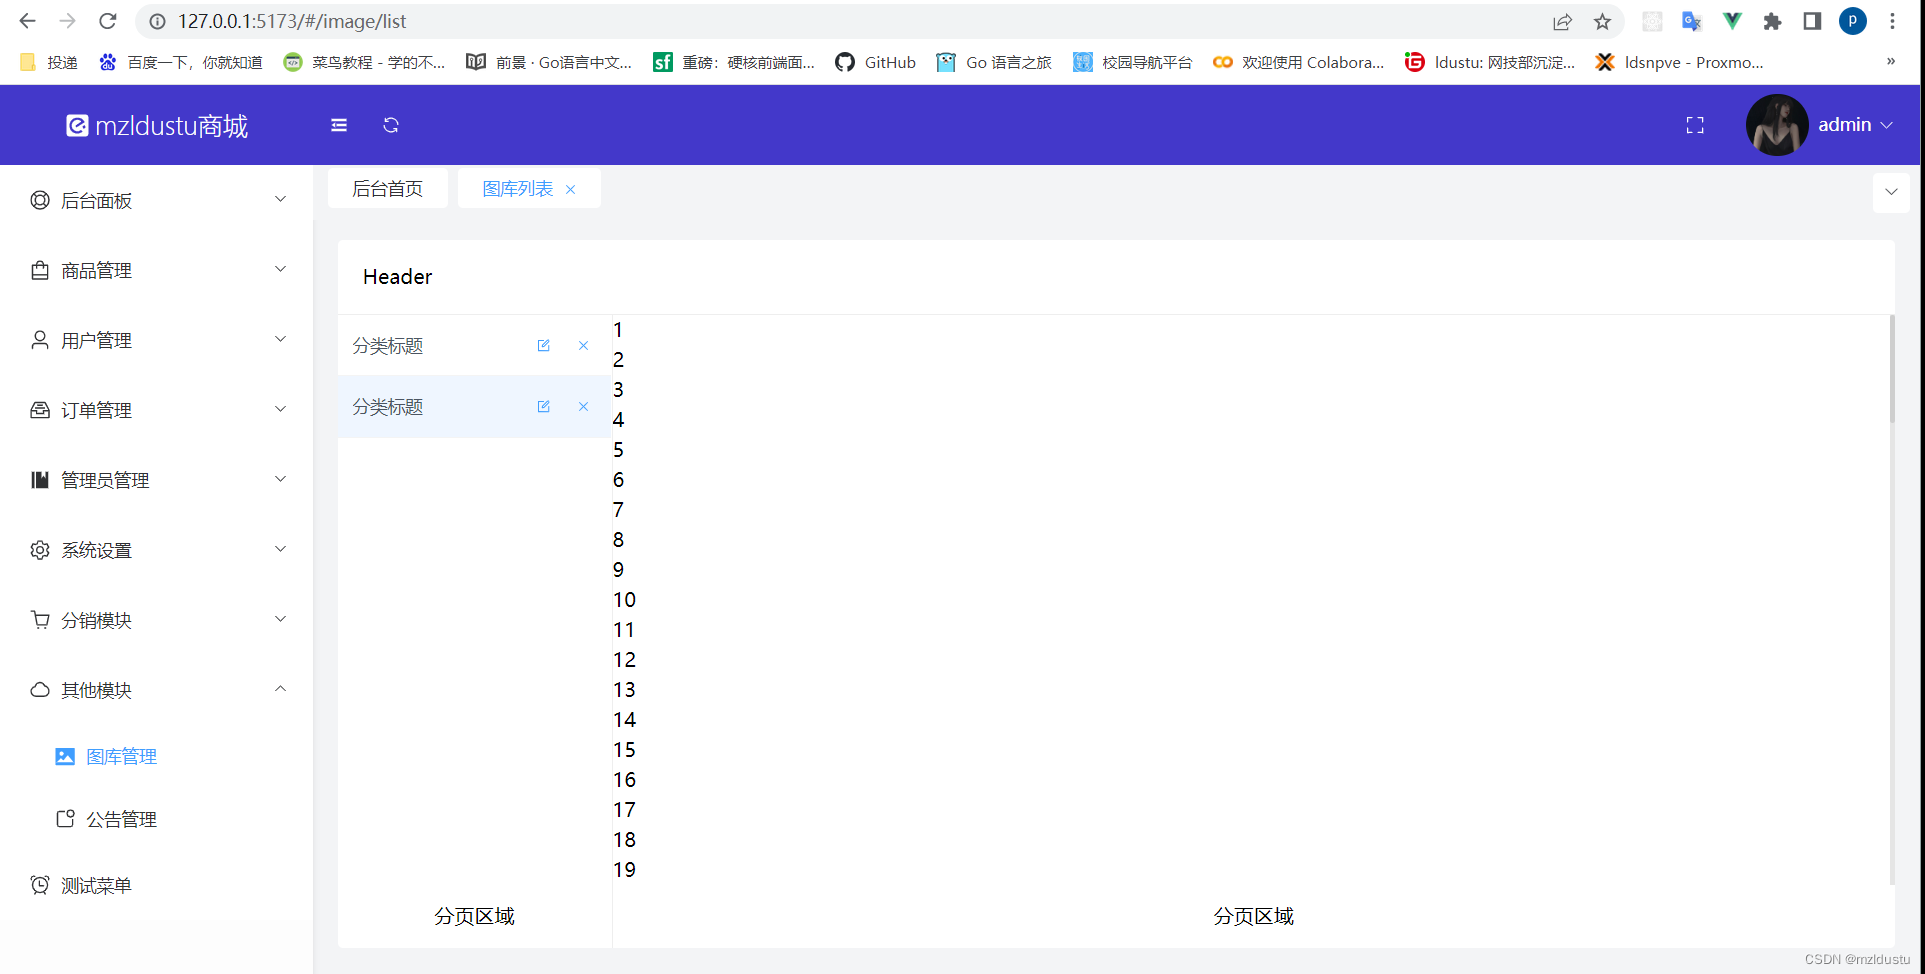
新建了一个AsideList.vue,用于抽离选项及按钮部分
<template>
    <!-- 非激活状态 -->
    <div class="aside-list" :class="{ 'active' : active }">
        <!-- 超出部分显示... -->
        <span class="truncate"><slot/></span>

        <!-- 两个按钮 -->
        <el-button class="ml-auto px-1" text type="primary" size="small" @click="$emit('edit')">
            <el-icon :size="12">
                <Edit />
            </el-icon>
        </el-button>

        <el-button text class="px-1" type="primary" size="small" @click="$emit('delete')">
            <el-icon :size="12">
                <Close />
            </el-icon>
        </el-button>
    </div>
</template>

<script setup>
defineProps({
    active:{
        type:Boolean,
        default:false
    }
})

// 暴露两个按钮
defineEmits(["edit","delete"])
</script>

<style>
.aside-list{
    border-bottom: 1px solid #f4f4f4;
    cursor: pointer;
    @apply flex items-center p-3 text-sm text-gray-600;
}

.aside-list:hover, .active{
    @apply bg-blue-50;
}
</style>
运行项目:
然后我们继续进行分页的实现:
首先在api文件夹里新建一个image_class.js进行页码接口的书写
import axios from "~/axios"

export function getImageClassList(page){
    return axios.get("/admin/image_class/" + page)
}
然后编辑ImageAside.vue,分页用的是element提供的分页,然后对页码进行动态绑定
<template>
    <!-- v-loading="loading"调用loading状态 -->
    <el-aside width="220px" class="image-aside" v-loading="loading">
        <div class="top">

            <AsideList :active="activeId == item.id" v-for="(item, index) in list" :key="index">
                {{ item.name }}
            </AsideList>

        </div>

        <!-- 分页 -->
        <div class="bottom">
            <el-pagination background layout="prev, next" :total="total" :current-page="currentPage" :page-size="limit" @current-change="getData"/>
        </div>
    </el-aside>
</template>
<!-- 公共侧边栏部分抽离 -->

<script setup>
import { ref } from 'vue';
import AsideList from './AsideList.vue';
import { getImageClassList } from "~/api/image_class.js"

// 加载动画
const loading = ref(false)
// 保存列表数据
const list = ref([])
// 激活状态
const activeId = ref(0)
//分页部分
const currentPage = ref(1)
const total = ref(0)
// 每页默认显示10条
const limit = ref(10)

// 获取数据的方法
function getData(p = null) {
    // 拿到的页数,就是当前选中的页码
    // console.log(p)

    if(typeof p == "number"){
        currentPage.value = p
    }

    loading.value = true
    getImageClassList(currentPage.value)
        .then(res => {
            total.value = res.totalCount
            // console.log(res)
            // 拿到列表的值
            list.value = res.list
            // 默认选中第一个
            let item = list.value[0]
            if (item) {
                activeId.value = item.id
            }
        })
        .finally(() => {
            loading.value = false
        })
}

getData()

</script>

<style>
.image-aside {
    border-right: 1px solid #eeeeee;
    position: relative;
}

.image-aside .top {
    /* 相对aside定义,撑满左右两边和上下 */
    position: absolute;
    top: 0;
    right: 0;
    left: 0;
    bottom: 50px;
    /* y轴方向上默认 */
    overflow-y: auto;
}

.image-aside .bottom {
    position: absolute;
    bottom: 0;
    height: 50px;
    left: 0;
    right: 0;
    @apply flex items-center justify-center;
}
</style>
运行项目:
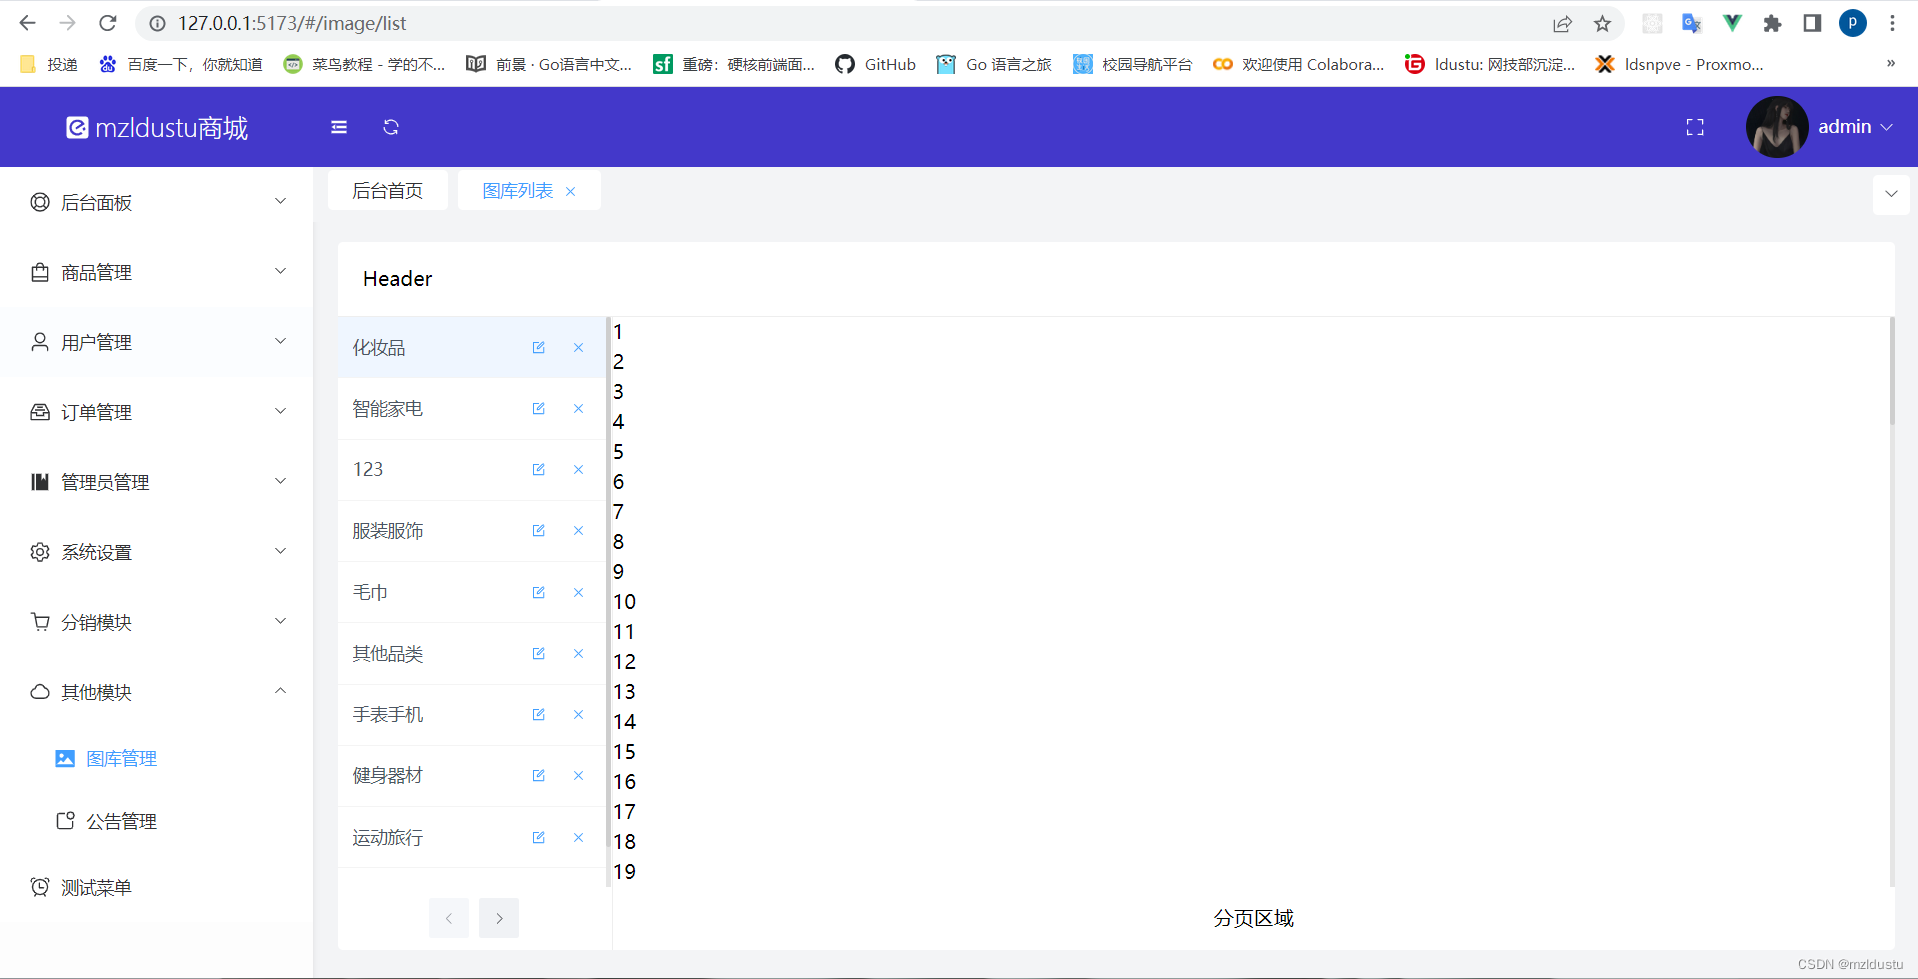
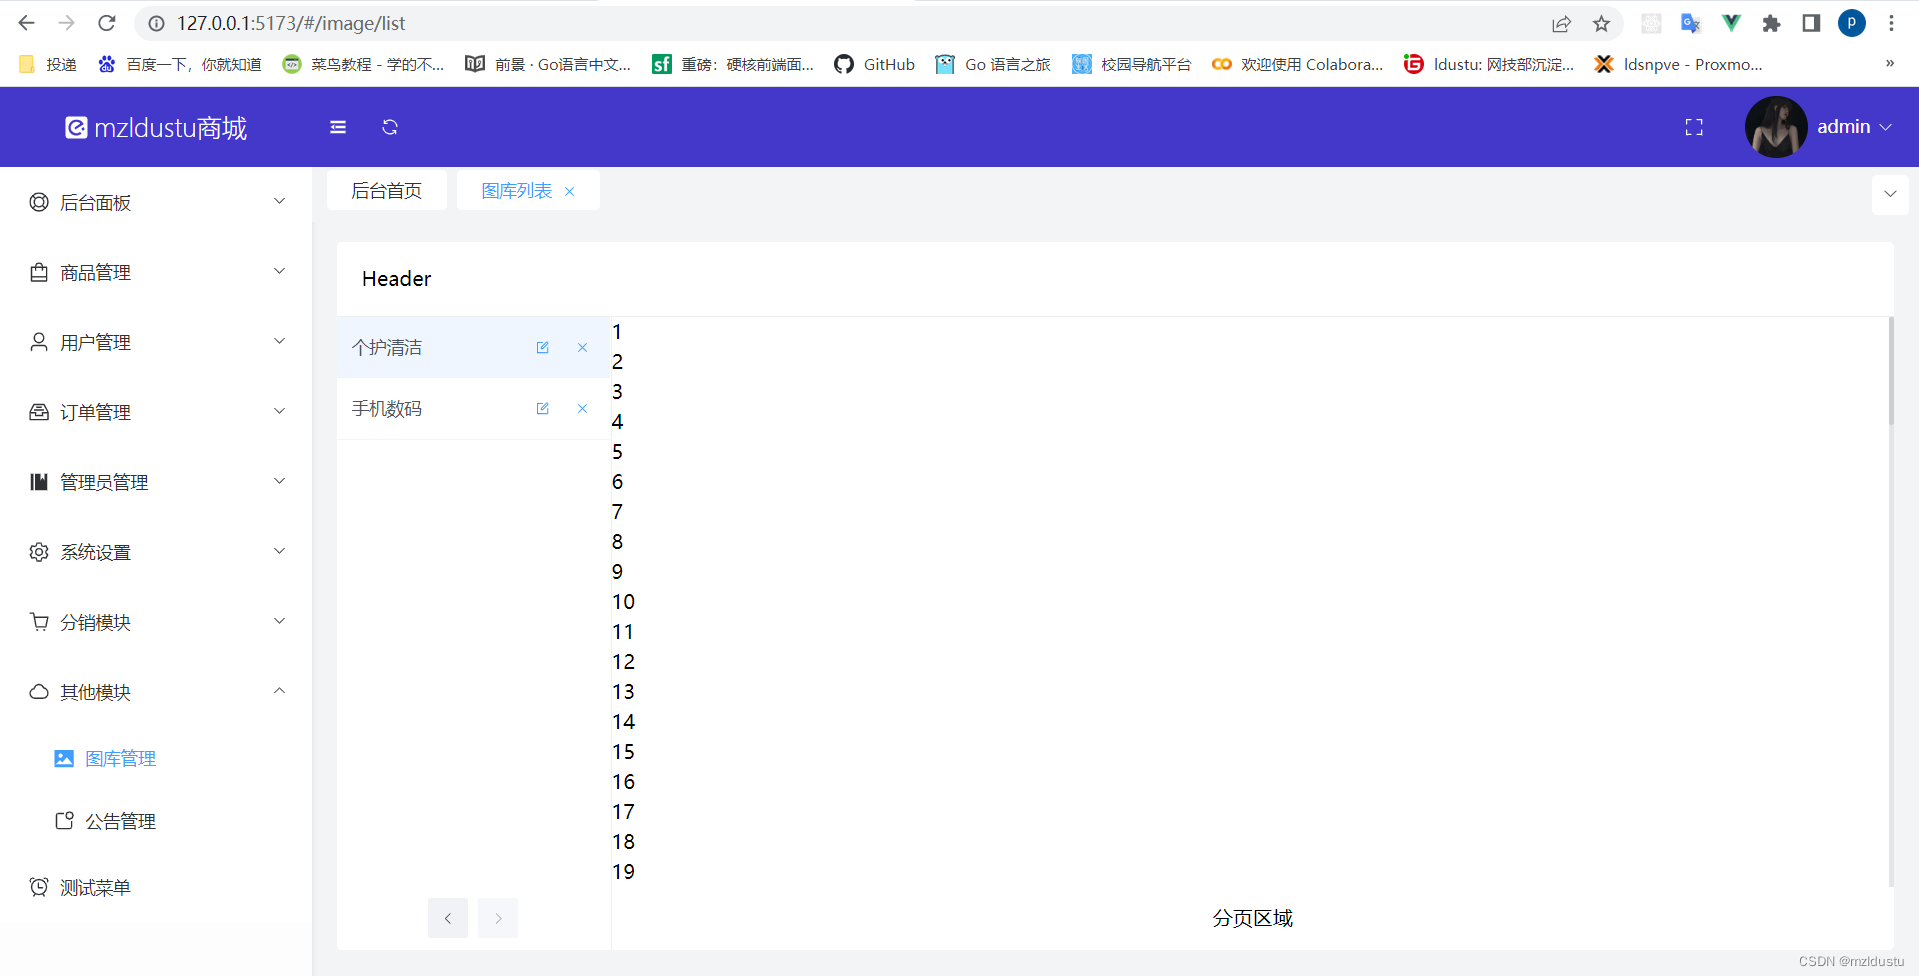
然后我们继续来进行新增图库分类的表单实现:
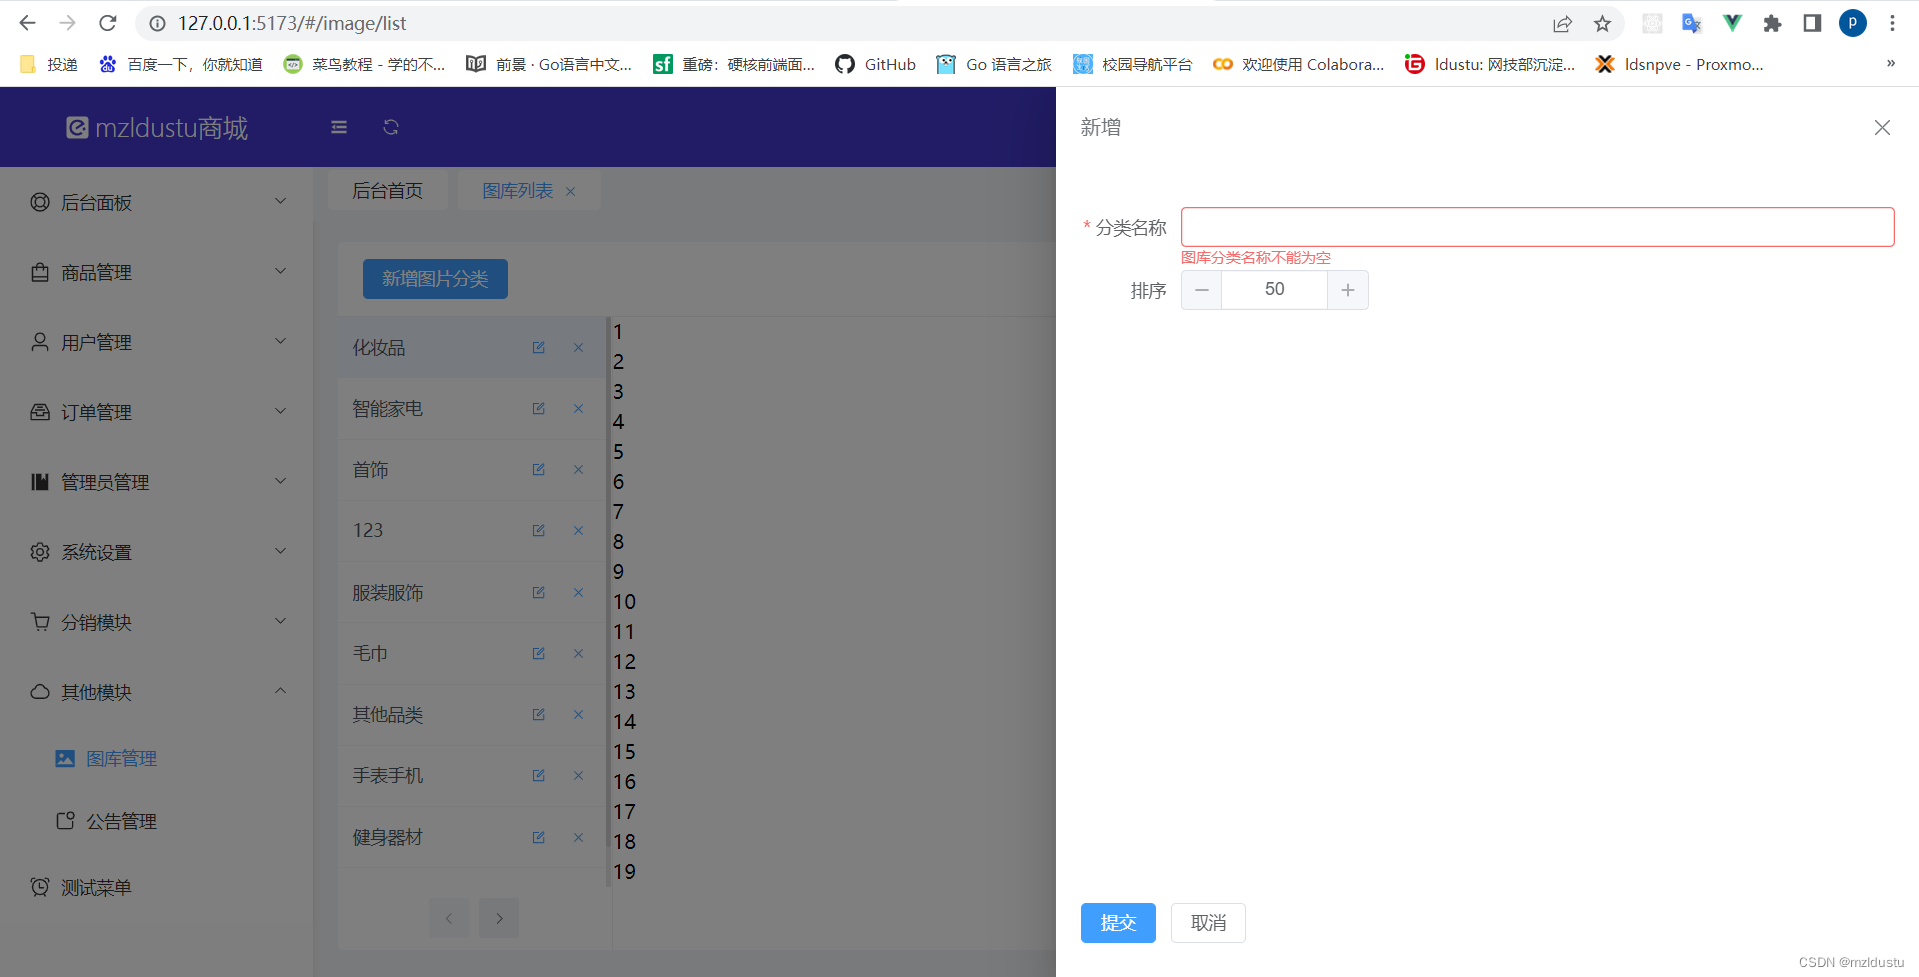
这主要是加上一个新增按钮以及引入抽屉组件:以及使用了element提供的input Number组件。
先来看image下面的list.vue
<template>
    <el-container class="bg-white rounded" :style="{ height: (h + 'px') }">
      <el-header class="image-header">
        <!-- 新增图片分类按钮 -->
        <el-button type="primary" size="samll" @click="handleOpenCreate">新增图片分类</el-button>

      </el-header>
      <el-container>
        <!-- <el-aside width="220px" class="image-aside">
            <div class="top">
                <div v-for="i in 100" :key="i">{{ i }}</div>
            </div>
            <div class="bottom">
                分页区域
            </div>
        </el-aside> -->
        <!-- 通过它拿到子组件节点 -->
        <ImageAside ref="ImageAsideRef"/>
        <!-- <el-main class="image-main">
            <div class="top">
                <div v-for="i in 100" :key="i">{{ i }}</div>
            </div>
            <div class="bottom">
                分页区域
            </div>
        </el-main> -->
        <ImageMain />
      </el-container>
    </el-container>
</template>

<script setup>
import { ref } from "vue";
// 引入公共侧边栏
import ImageAside from "~/components/ImageAside.vue"
// 引入公共主体部分
import ImageMain from "~/components/ImageMain.vue"
// 拿到浏览器高度
const windowHeight = window.innerHeight || document.body.clientHeight;
// 减去header高度+导肮栏高度+padding
const h = windowHeight - 64 - 44 -40;

const ImageAsideRef = ref(null)
// 增加选项卡方法,调用打开抽屉的方法
const handleOpenCreate = () => ImageAsideRef.value.handleCreate()
</script>

<style>
.image-header{
    border-bottom: 1px solid #eeeeee;
    @apply flex items-center;
}
</style>
imageAside.vue
<template>
    <!-- v-loading="loading"调用loading状态 -->
    <el-aside width="220px" class="image-aside" v-loading="loading">
        <div class="top">

            <AsideList :active="activeId == item.id" v-for="(item, index) in list" :key="index">
                {{ item.name }}
            </AsideList>

        </div>

        <!-- 分页 -->
        <div class="bottom">
            <el-pagination background layout="prev, next" :total="total" :current-page="currentPage" :page-size="limit"
                @current-change="getData" />
        </div>
    </el-aside>

    <!-- 抽屉部分 -->
    <FormDrawer title="新增" ref="formDrawerRef" @submit="handleSubmit">
        <!-- 表单部分 -->
        <el-form :model="form" ref="formRef" :rules="rules" label-width="80px" :inline="false">
            <!-- 字段属于name字段,便于验证规则 -->
            <el-form-item label="分类名称" prop="name">
                <el-input v-model="form.name"></el-input>
            </el-form-item>

            <!-- 属于order字段 -->
            <el-form-item label="排序" prop="order">
                <el-input-number v-model="form.order" :min="0" :max="1000" />
            </el-form-item>
        </el-form>

    </FormDrawer>

</template>
<!-- 公共侧边栏部分抽离 -->

<script setup>
import { reactive } from 'vue';
import { ref } from 'vue';
import AsideList from './AsideList.vue';
import { getImageClassList } from "~/api/image_class.js";
// 引入抽屉组件
import FormDrawer from "./FormDrawer.vue";

// 加载动画
const loading = ref(false)
// 保存列表数据
const list = ref([])
// 激活状态
const activeId = ref(0)
//分页部分
const currentPage = ref(1)
const total = ref(0)
// 每页默认显示10条
const limit = ref(10)

// 获取数据的方法
function getData(p = null) {
    // 拿到的页数,就是当前选中的页码
    // console.log(p)

    if (typeof p == "number") {
        currentPage.value = p
    }

    loading.value = true
    getImageClassList(currentPage.value)
        .then(res => {
            total.value = res.totalCount
            // console.log(res)
            // 拿到列表的值
            list.value = res.list
            // 默认选中第一个
            let item = list.value[0]
            if (item) {
                activeId.value = item.id
            }
        })
        .finally(() => {
            loading.value = false
        })
}

getData()

// 初始化
const formDrawerRef = ref(null);
// 拿到子组件的open方法打开抽屉组件
const handleCreate = () => formDrawerRef.value.open()


// 定义form,指定字段
const form = reactive({
    name: "",
    order: 50
})

// 验证规则
const rules = {
    name: [
        {
            required: true,
            message: "图库分类名称不能为空",
            // 失去焦点的时候触发
            trigger: "blur",
        },
    ]
}

// 定义表单的ref,因为要触发验证
const formRef = ref(null)

const handleSubmit = () => {
    // console.log("提交表单")
    formRef.value.validate((valid)=>{
        // 没有验证通过就直接返回
        if(!valid) return
        console.log("提交成功")
    })
}

// 暴露出去
defineExpose({
    handleCreate
});

</script>

<style>
.image-aside {
    border-right: 1px solid #eeeeee;
    position: relative;
}

.image-aside .top {
    /* 相对aside定义,撑满左右两边和上下 */
    position: absolute;
    top: 0;
    right: 0;
    left: 0;
    bottom: 50px;
    /* y轴方向上默认 */
    overflow-y: auto;
}

.image-aside .bottom {
    position: absolute;
    bottom: 0;
    height: 50px;
    left: 0;
    right: 0;
    @apply flex items-center justify-center;
}
</style>
直接看效果:
然后我们来进行新增图库分类功能的交互开发:
要用到api文档的增加图库分类接口:
在image_class.js里面书写接口
// 图片选项数据
import axios from "~/axios"
// 获取图库分类的选项
export function getImageClassList(page){
    return axios.get("/admin/image_class/" + page)
}

// 新增图库分类接口
export function createImageClass(data){
    return axios.post("/admin/image_class",data)
}
然后imageAside.vue
<template>
    <!-- v-loading="loading"调用loading状态 -->
    <el-aside width="220px" class="image-aside" v-loading="loading">
        <div class="top">

            <AsideList :active="activeId == item.id" v-for="(item, index) in list" :key="index">
                {{ item.name }}
            </AsideList>

        </div>

        <!-- 分页 -->
        <div class="bottom">
            <el-pagination background layout="prev, next" :total="total" :current-page="currentPage" :page-size="limit"
                @current-change="getData" />
        </div>
    </el-aside>

    <!-- 抽屉部分 -->
    <FormDrawer title="新增" ref="formDrawerRef" @submit="handleSubmit">
        <!-- 表单部分 -->
        <el-form :model="form" ref="formRef" :rules="rules" label-width="80px" :inline="false">
            <!-- 字段属于name字段,便于验证规则 -->
            <el-form-item label="分类名称" prop="name">
                <el-input v-model="form.name"></el-input>
            </el-form-item>

            <!-- 属于order字段 -->
            <el-form-item label="排序" prop="order">
                <el-input-number v-model="form.order" :min="0" :max="1000" />
            </el-form-item>
        </el-form>

    </FormDrawer>

</template>
<!-- 公共侧边栏部分抽离 -->

<script setup>
import { reactive } from 'vue';
import { ref } from 'vue';
import AsideList from './AsideList.vue';
import { getImageClassList, createImageClass } from "~/api/image_class.js";
// 引入抽屉组件
import FormDrawer from "./FormDrawer.vue";
// 引入util.js里面的消息提示方法
import { toast } from "~/composables/util.js"

// 加载动画
const loading = ref(false)
// 保存列表数据
const list = ref([])
// 激活状态
const activeId = ref(0)
//分页部分
const currentPage = ref(1)
const total = ref(0)
// 每页默认显示10条
const limit = ref(10)

// 获取数据的方法
function getData(p = null) {
    // 拿到的页数,就是当前选中的页码
    // console.log(p)

    if (typeof p == "number") {
        currentPage.value = p
    }

    loading.value = true
    getImageClassList(currentPage.value)
        .then(res => {
            total.value = res.totalCount
            // console.log(res)
            // 拿到列表的值
            list.value = res.list
            // 默认选中第一个
            let item = list.value[0]
            if (item) {
                activeId.value = item.id
            }
        })
        .finally(() => {
            loading.value = false
        })
}

getData()

// 初始化
const formDrawerRef = ref(null);
// 拿到子组件的open方法打开抽屉组件
const handleCreate = () => formDrawerRef.value.open()


// 定义form,指定字段
const form = reactive({
    name: "",
    order: 50
})

// 验证规则
const rules = {
    name: [
        {
            required: true,
            message: "图库分类名称不能为空",
            // 失去焦点的时候触发
            trigger: "blur",
        },
    ]
}

// 定义表单的ref,因为要触发验证
const formRef = ref(null)

const handleSubmit = () => {
    // console.log("提交表单")
    formRef.value.validate((valid)=>{
        // 没有验证通过就直接返回
        if(!valid) return
        // 提交按钮loading状态
        formDrawerRef.value.showLoading()
        // console.log("提交成功")
        // 验证通过之后调用接口方法
        // 要传的是name和order,而form里面有,我们直接放form就行
        createImageClass(form)
        .then(res=>{
            toast("新增成功")
            // 新增成功后重新加载数据
            getData(1)
            // 关闭弹框
            formDrawerRef.value.close()
        })
        .finally(()=>{
            formDrawerRef.value.hideLoading()
        })
    })
}

// 暴露出去
defineExpose({
    handleCreate
});

</script>

<style>
.image-aside {
    border-right: 1px solid #eeeeee;
    position: relative;
}

.image-aside .top {
    /* 相对aside定义,撑满左右两边和上下 */
    position: absolute;
    top: 0;
    right: 0;
    left: 0;
    bottom: 50px;
    /* y轴方向上默认 */
    overflow-y: auto;
}

.image-aside .bottom {
    position: absolute;
    bottom: 0;
    height: 50px;
    left: 0;
    right: 0;
    @apply flex items-center justify-center;
}
</style>
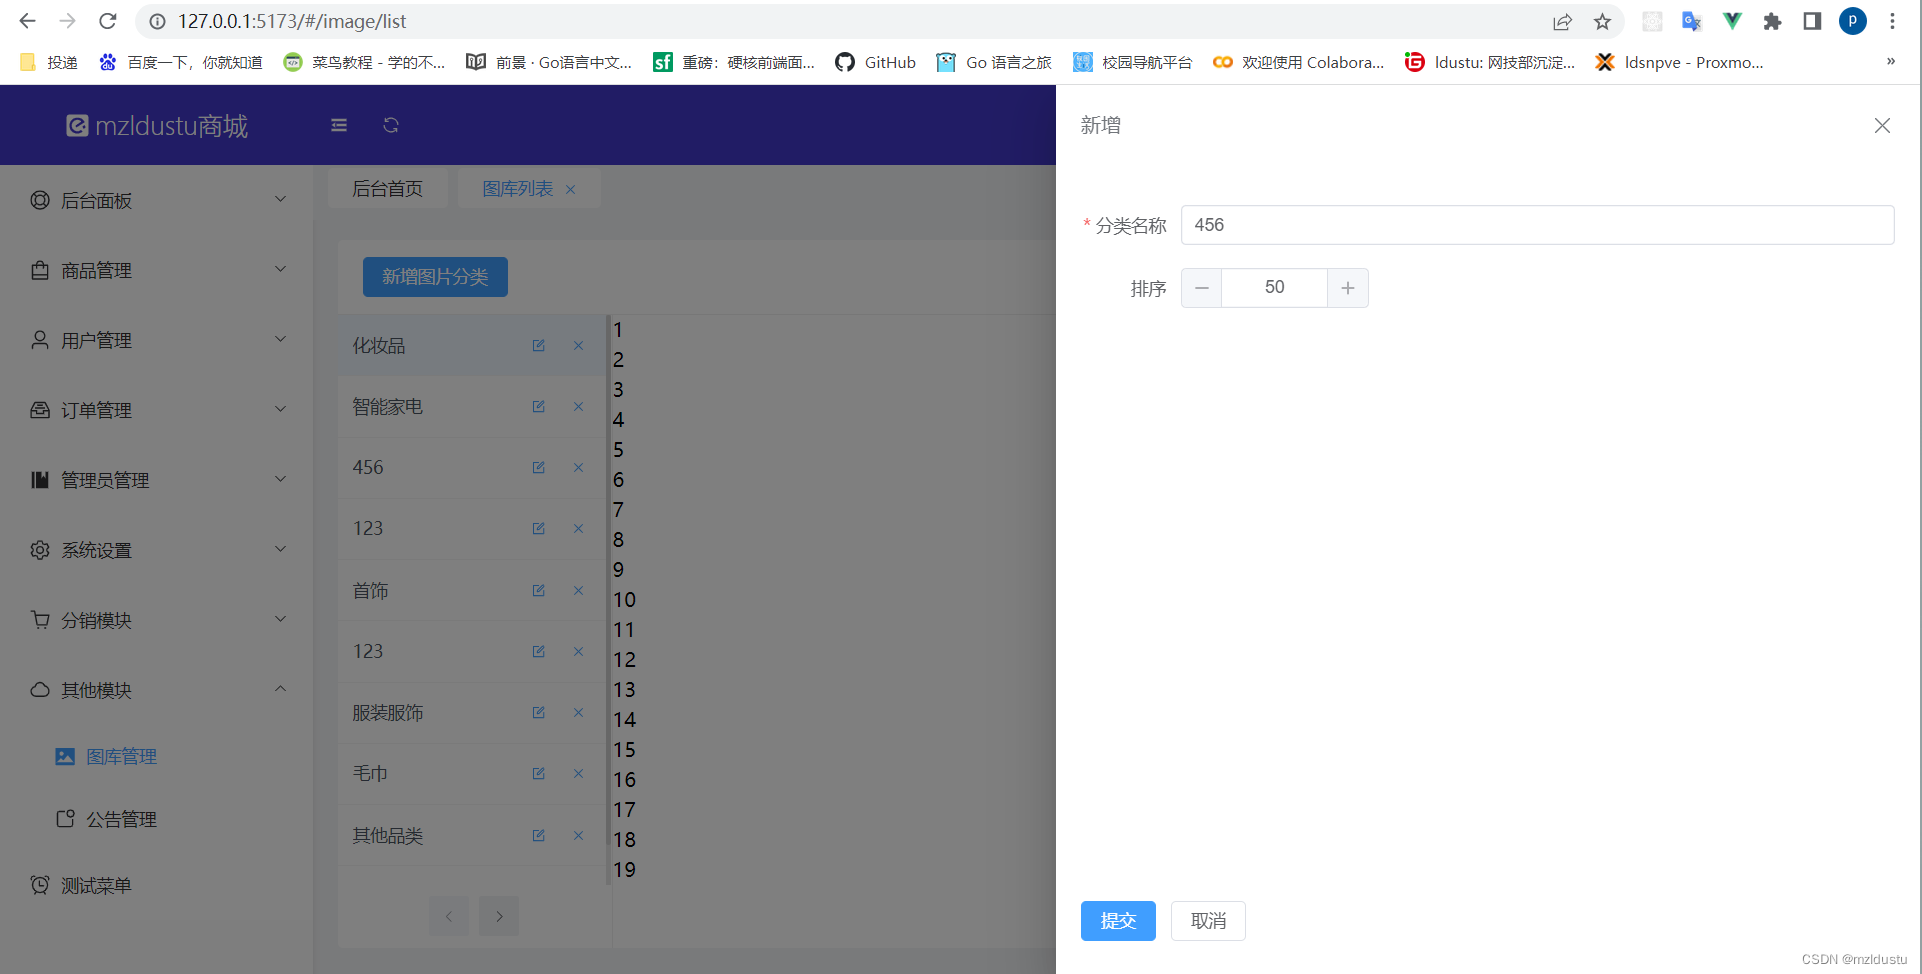
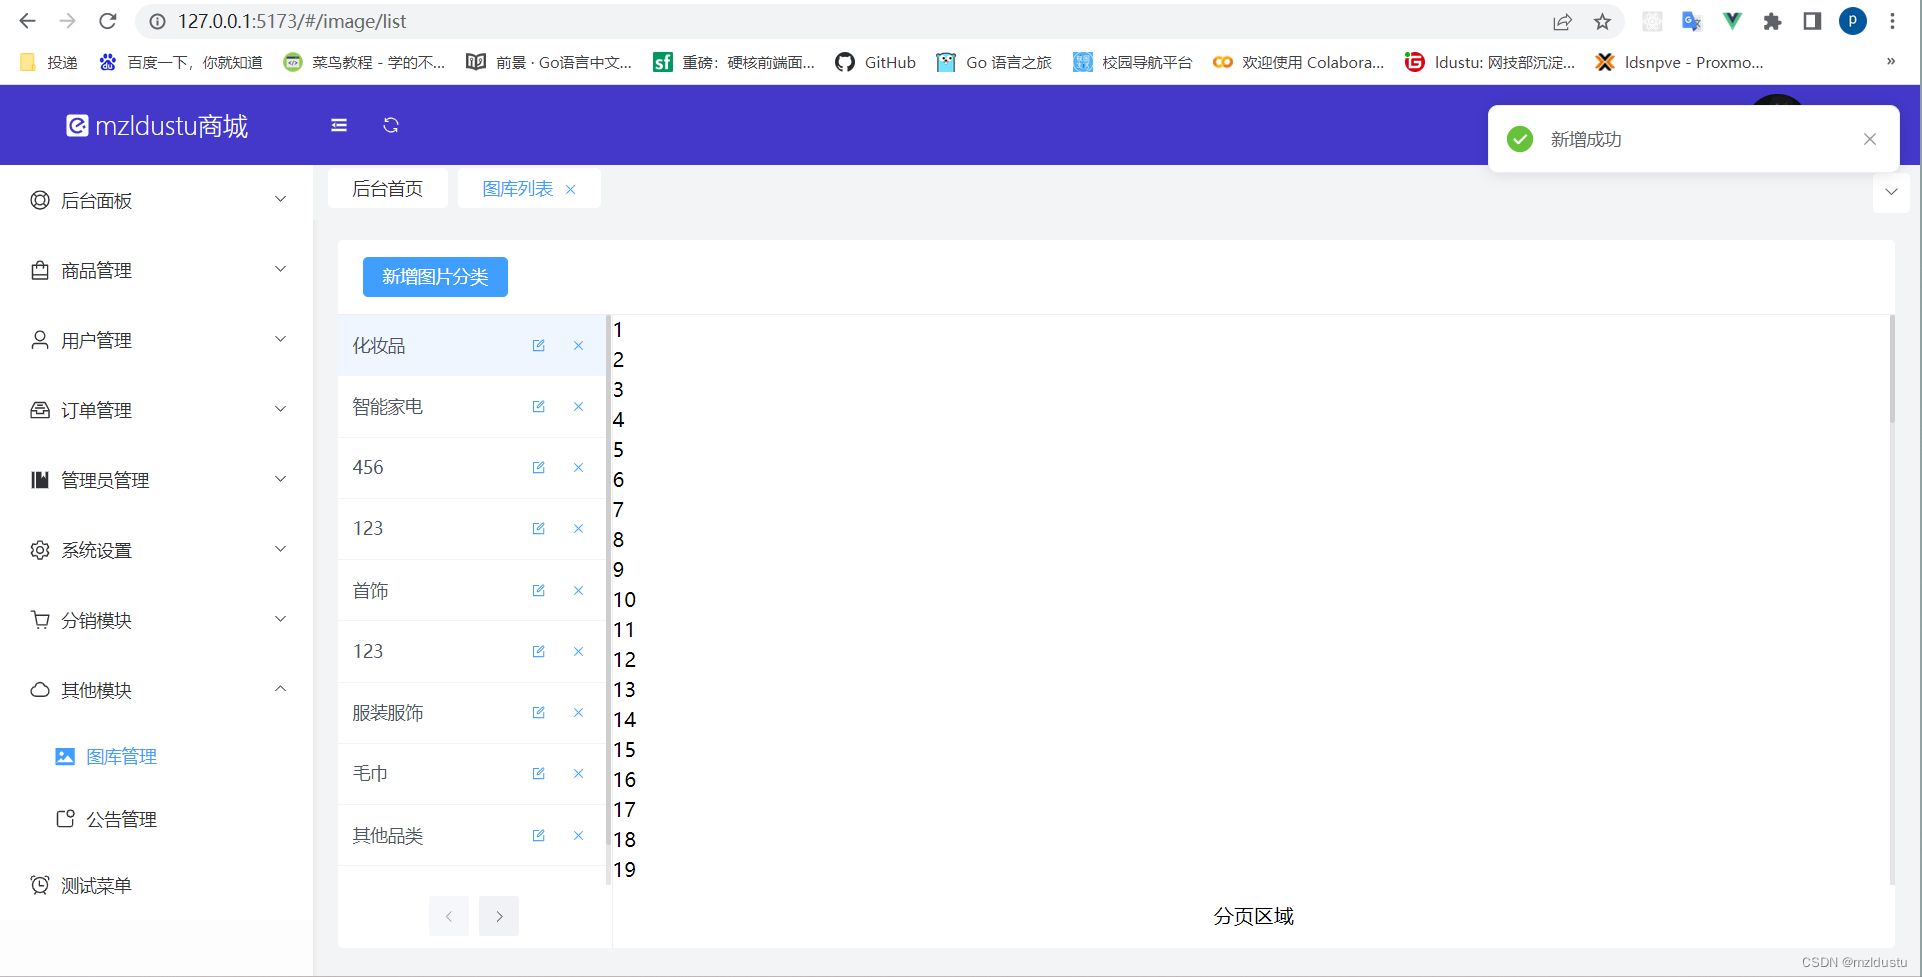
可以看到我们增加一项456之后就成功了。
然后我们来实现修改图库分类功能交互开发:
在image_class.js里面写上修改接口:
// 图片选项数据
import axios from "~/axios"
// 获取图库分类的选项
export function getImageClassList(page){
    return axios.get("/admin/image_class/" + page)
}

// 新增图库分类接口
export function createImageClass(data){
    return axios.post("/admin/image_class",data)
}

// 修改商品分类接口
export function updateImageClass(id,data){
    return axios.post("/admin/image_class/"+id, data)
}
然后在ImgeAside.vue里面加上handleEdit事件,因为前面已经通过$emit定义了。
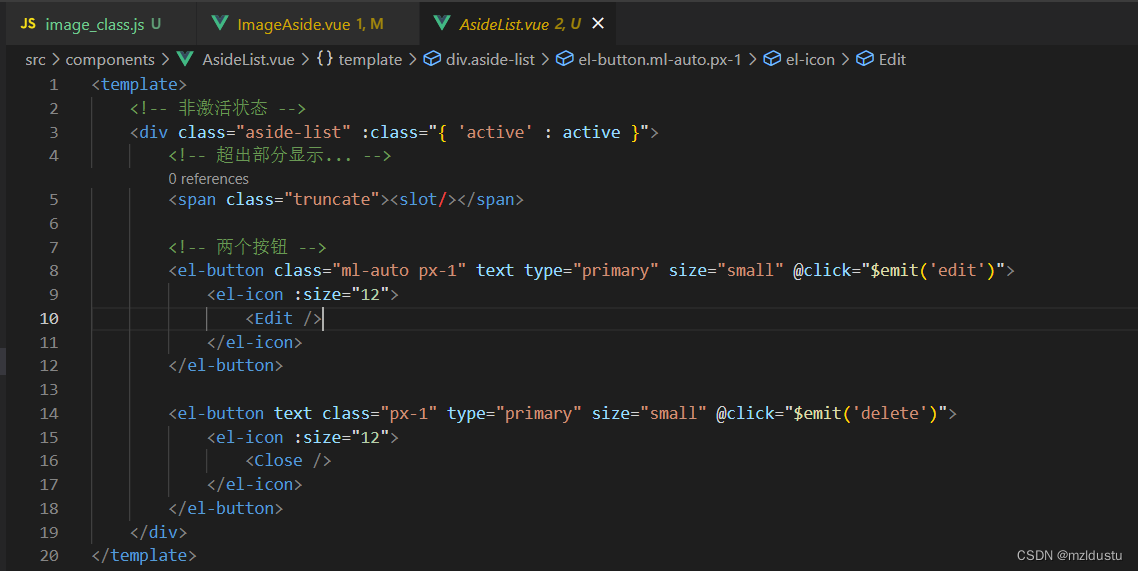
ImageAside.vue
<template>
    <!-- v-loading="loading"调用loading状态 -->
    <el-aside width="220px" class="image-aside" v-loading="loading">
        <div class="top">

            <!-- handleEdit是修改的绑定事件 -->
            <AsideList :active="activeId == item.id" v-for="(item, index) in list" :key="index" @edit="handleEdit(item)">
                {{ item.name }}
            </AsideList>

        </div>

        <!-- 分页 -->
        <div class="bottom">
            <el-pagination background layout="prev, next" :total="total" :current-page="currentPage" :page-size="limit"
                @current-change="getData" />
        </div>
    </el-aside>

    <!-- 抽屉部分 -->
    <!-- 标题动态绑定 -->
    <FormDrawer :title="drawerTitle" ref="formDrawerRef" @submit="handleSubmit">
        <!-- 表单部分 -->
        <el-form :model="form" ref="formRef" :rules="rules" label-width="80px" :inline="false">
            <!-- 字段属于name字段,便于验证规则 -->
            <el-form-item label="分类名称" prop="name">
                <el-input v-model="form.name"></el-input>
            </el-form-item>

            <!-- 属于order字段 -->
            <el-form-item label="排序" prop="order">
                <el-input-number v-model="form.order" :min="0" :max="1000" />
            </el-form-item>
        </el-form>

    </FormDrawer>

</template>
<!-- 公共侧边栏部分抽离 -->

<script setup>
import { reactive } from 'vue';
import { ref } from 'vue';
import AsideList from './AsideList.vue';
import { getImageClassList, createImageClass, updateImageClass } from "~/api/image_class.js";
// 引入抽屉组件
import FormDrawer from "./FormDrawer.vue";
// 引入util.js里面的消息提示方法
import { toast } from "~/composables/util.js"
import { computed } from '@vue/reactivity';

// 加载动画
const loading = ref(false)
// 保存列表数据
const list = ref([])
// 激活状态
const activeId = ref(0)
//分页部分
const currentPage = ref(1)
const total = ref(0)
// 每页默认显示10条
const limit = ref(10)

// 获取数据的方法
function getData(p = null) {
    // 拿到的页数,就是当前选中的页码
    // console.log(p)

    if (typeof p  == "number") {
        currentPage.value = p
    }

    loading.value = true
    getImageClassList(currentPage.value)
        .then(res => {
            total.value = res.totalCount
            // console.log(res)
            // 拿到列表的值
            list.value = res.list
            // 默认选中第一个
            let item = list.value[0]
            if (item) {
                activeId.value = item.id
            }
        })
        .finally(() => {
            loading.value = false
        })
}

getData()

// 当前图库分类的id,默认等于0
const editId = ref(0)

// 标题修改 >0是修改,否则是新增
const drawerTitle = computed(()=>editId.value ? "修改" : "新增")

// 初始化
const formDrawerRef = ref(null);

// 定义form,指定字段
const form = reactive({
    name: "",
    order: 50
})

// 验证规则
const rules = {
    name: [
        {
            required: true,
            message: "图库分类名称不能为空",
            // 失去焦点的时候触发
            trigger: "blur",
        },
    ]
}

// 定义表单的ref,因为要触发验证
const formRef = ref(null)

const handleSubmit = () => {
    // console.log("提交表单")
    formRef.value.validate((valid)=>{
        // 没有验证通过就直接返回
        if(!valid) return
        // 提交按钮loading状态
        formDrawerRef.value.showLoading()
        // console.log("提交成功")
        // 验证通过之后调用接口方法
        // 要传的是name和order,而form里面有,我们直接放form就行
        // createImageClass(form)

        // 如果>0,那么就是修改,如果不是,那么就是新增
        const fun = editId.value ? updateImageClass(editId.value,form) : createImageClass(form)

        fun.then(res=>{
            toast(drawerTitle.value + "成功")
            // 新增成功后重新加载数据
            // 如果是修改传当前页页码就行,否则就回到第一页
            getData(editId.value ? currentPage.value : 1)
            // 关闭弹框
            formDrawerRef.value.close()
        })
        .finally(()=>{
            formDrawerRef.value.hideLoading()
        })
    })
}

// 新增方法 拿到子组件的open方法打开抽屉组件
const handleCreate = () => {
    // 新增的方法肯定是没有顺序id的
    editId.value = 0
    // 新增这里每新增也要初始化,不然其他的名称和order就会每次显示在新增这里
    form.name = ""
    form.order = 50
    formDrawerRef.value.open()
}

// 编辑方法
const handleEdit = (row) =>{
    // 修改的value等于当前对象的id
    editId.value = row.id
    // row能拿到里面的name值,和order值
    // console.log(row)
    form.name = row.name
    form.order = row.order
    // 打开抽屉进行编辑修改选项
    formDrawerRef.value.open()
}

// 暴露出去
defineExpose({
    handleCreate
});

</script>

<style>
.image-aside {
    border-right: 1px solid #eeeeee;
    position: relative;
}

.image-aside .top {
    /* 相对aside定义,撑满左右两边和上下 */
    position: absolute;
    top: 0;
    right: 0;
    left: 0;
    bottom: 50px;
    /* y轴方向上默认 */
    overflow-y: auto;
}

.image-aside .bottom {
    position: absolute;
    bottom: 0;
    height: 50px;
    left: 0;
    right: 0;
    @apply flex items-center justify-center;
}
</style>
编辑前面新增的456为45678910,发现能修改成功。
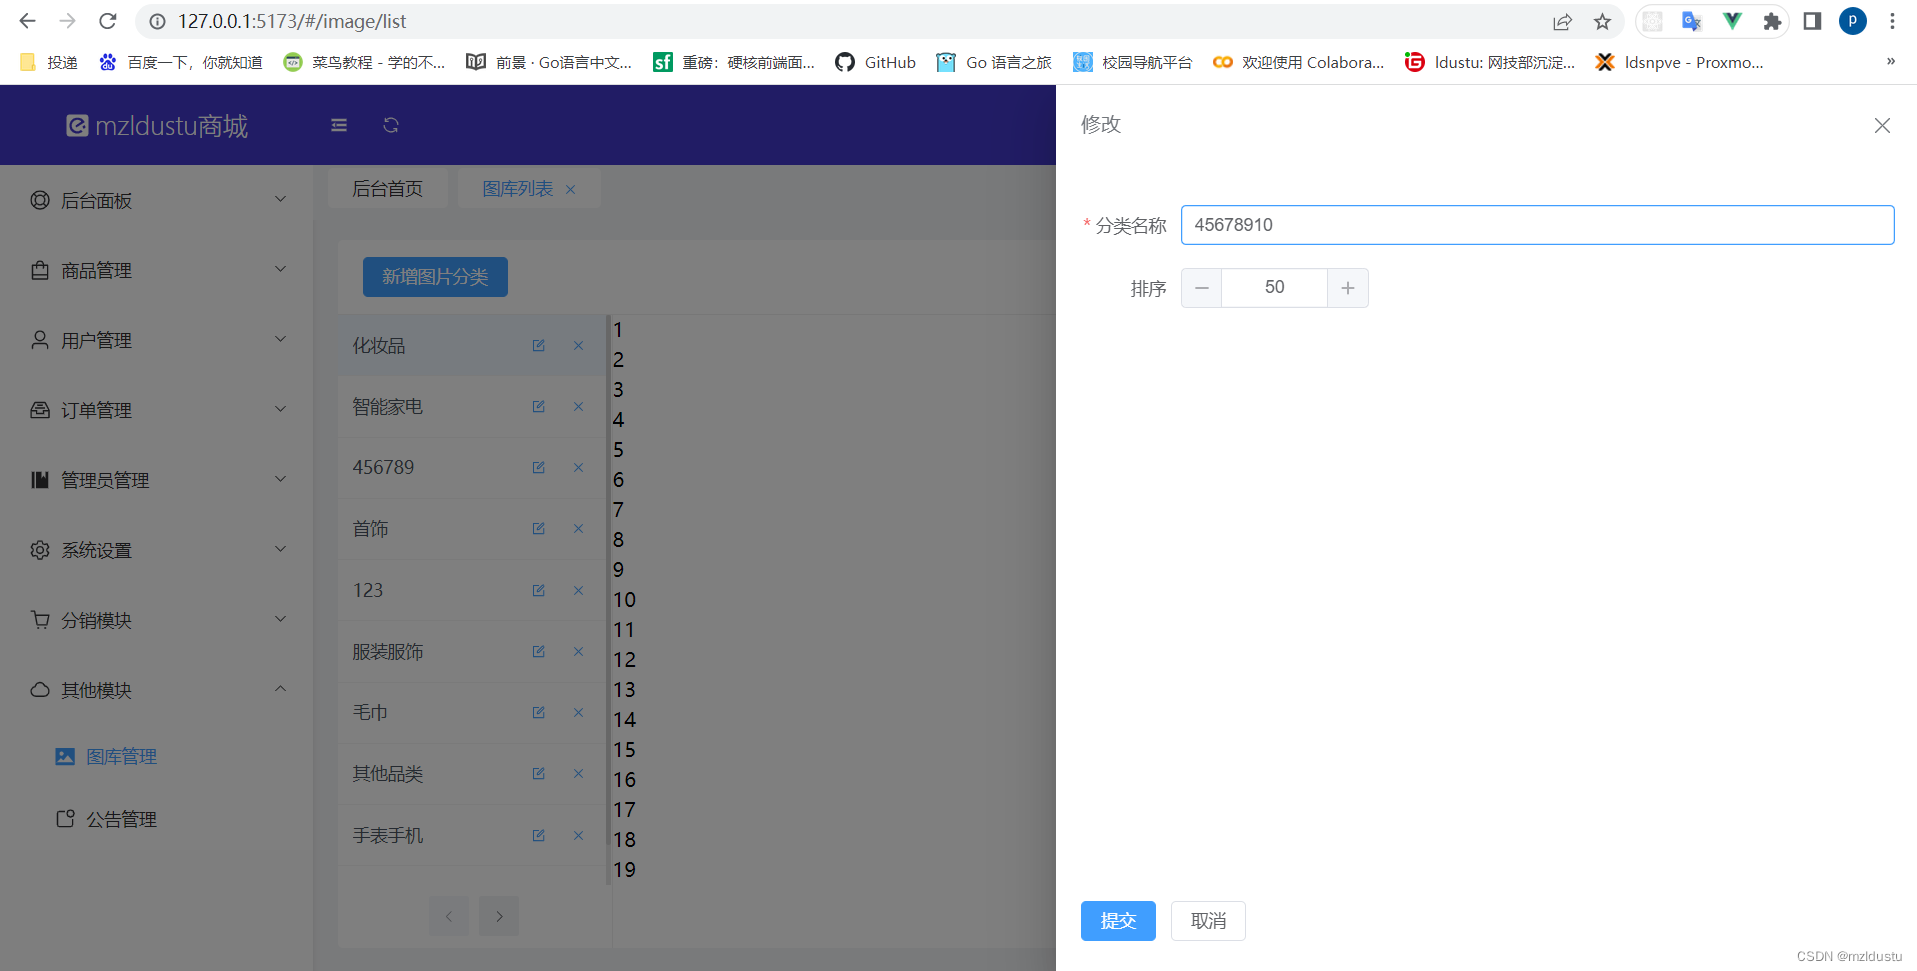
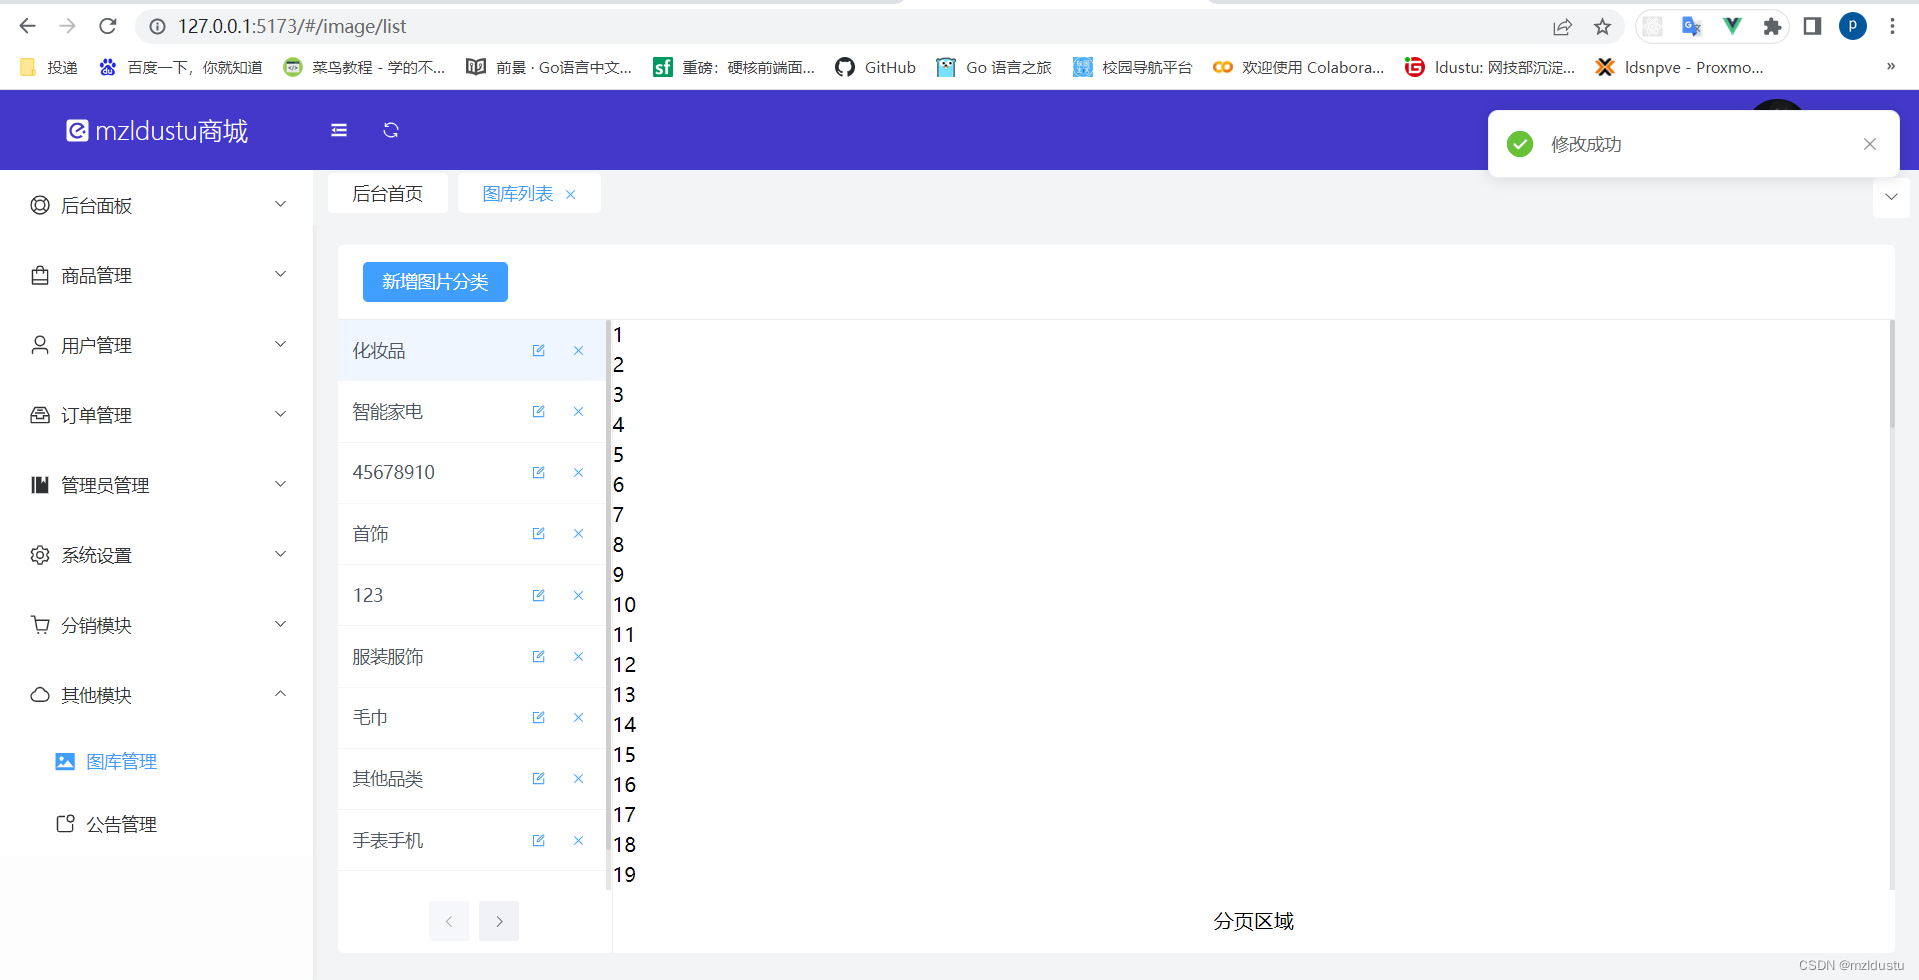
至此,修改功能书写结束。
我们继续进行删除功能书写:
先在image_class.js里面书写删除接口:
// 图片选项数据
import axios from "~/axios"
// 获取图库分类的选项
export function getImageClassList(page){
    return axios.get("/admin/image_class/" + page)
}

// 新增图库分类接口
export function createImageClass(data){
    return axios.post("/admin/image_class",data)
}

// 修改商品分类接口
export function updateImageClass(id,data){
    return axios.post("/admin/image_class/"+id, data)
}

// 删除商品分类接口
export function deleteImageClass(id){
    return axios.post(`/admin/image_class/${id}/delete`)
}
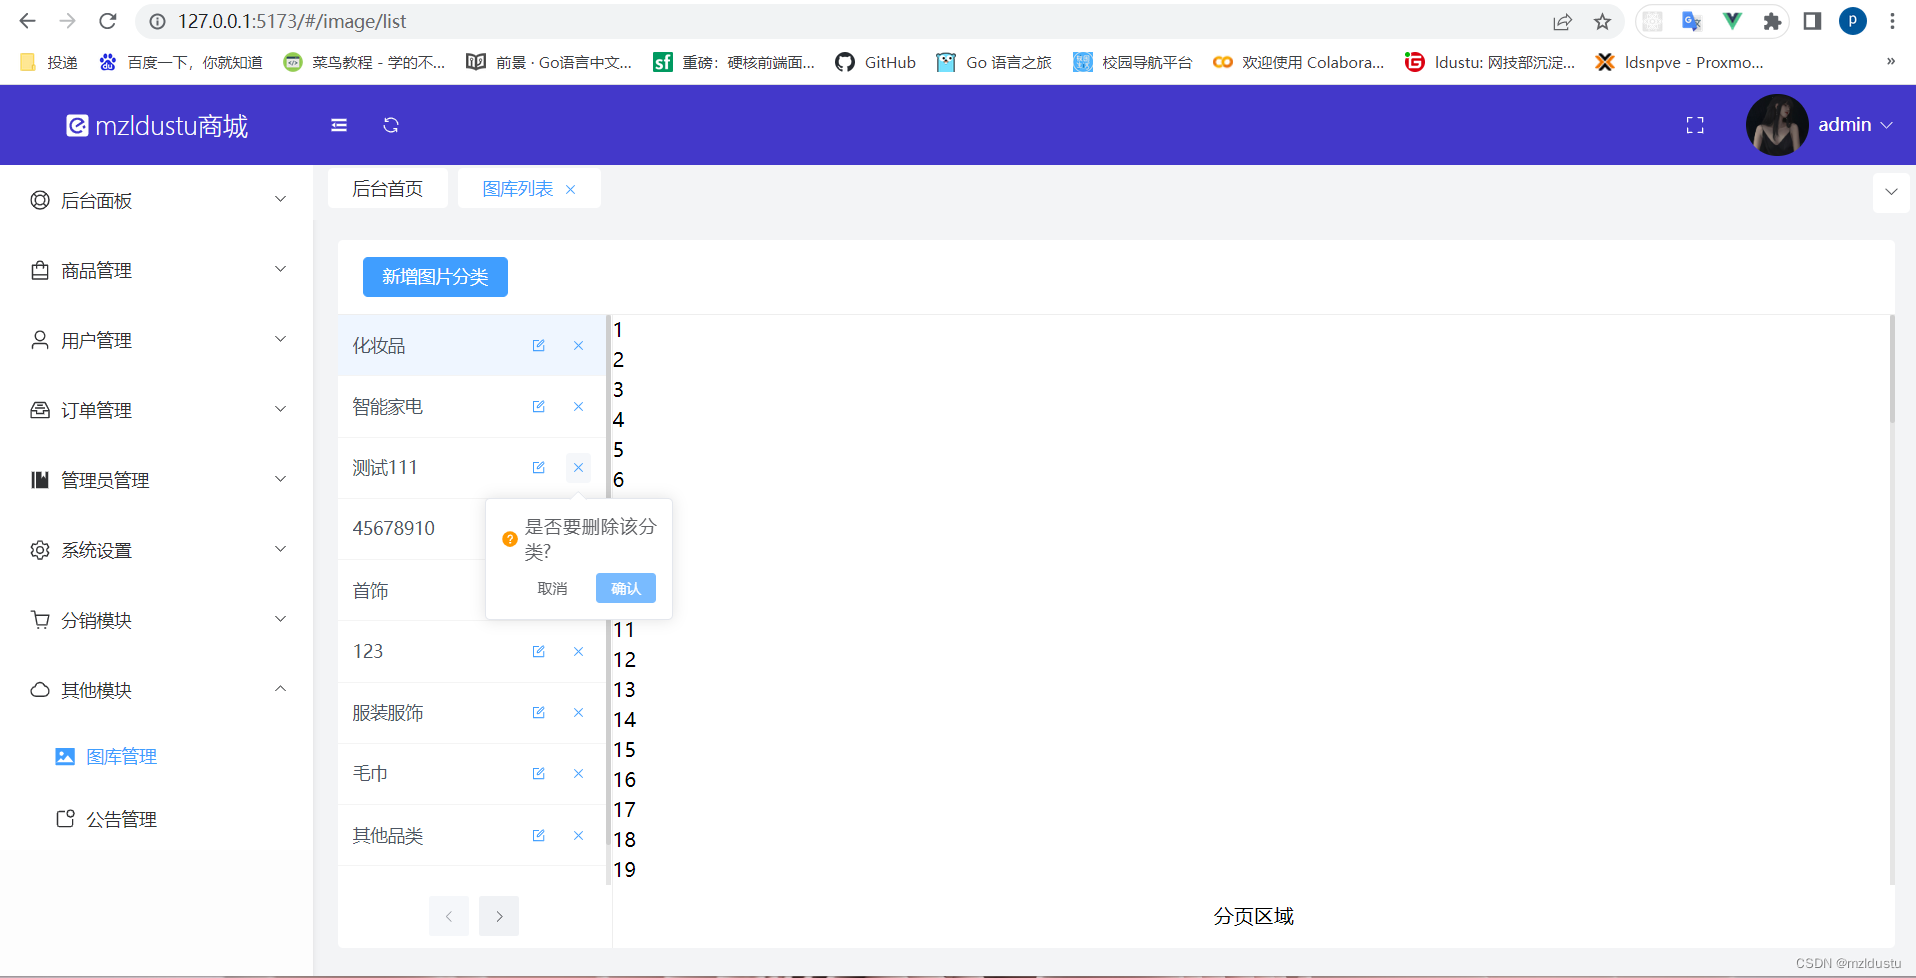
在AsideList.vue里面的删除按钮加上element提供的删除确认框

监听改成监听confirm,这是element里面删除确认框的规定用法:
<template>
    <!-- 非激活状态 -->
    <div class="aside-list" :class="{ 'active': active }">
        <!-- 超出部分显示... -->
        <span class="truncate">
            <slot />
        </span>

        <!-- 两个按钮 -->
        <el-button class="ml-auto px-1" text type="primary" size="small" @click="$emit('edit')">
            <el-icon :size="12">
                <Edit />
            </el-icon>
        </el-button>

        <!-- 加上了删除确认框 -->
        <el-popconfirm title="是否要删除该分类?" confirmButtonText="确认" cancelButtonText="取消" @confirm="$emit('delete')">
            <!-- 使用的是element里面的提示确认框基础用法插槽 -->
            <template #reference>
                <el-button text class="px-1" type="primary" size="small">
                    <el-icon :size="12">
                        <Close />
                    </el-icon>
                </el-button>
            </template>
        </el-popconfirm>
    </div>
</template>

<script setup>
defineProps({
    active: {
        type: Boolean,
        default: false
    }
})

// 暴露两个按钮
defineEmits(["edit", "delete"])
</script>

<style>
.aside-list {
    border-bottom: 1px solid #f4f4f4;
    cursor: pointer;
    @apply flex items-center p-3 text-sm text-gray-600;
}

.aside-list:hover,
.active {
    @apply bg-blue-50;
}
</style>
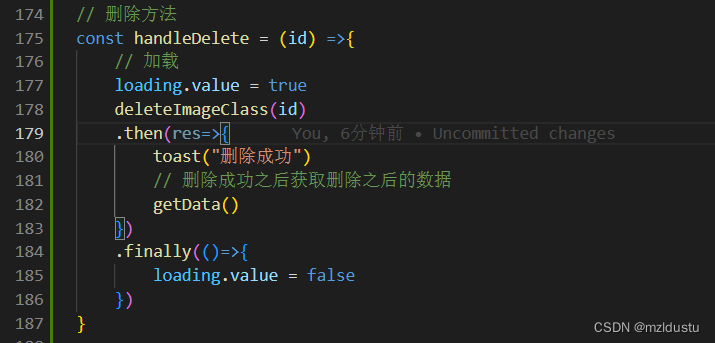
在ImageAside.vue里面:

加上handleDelete方法:
到这里删除模块就结束了。
来看效果:
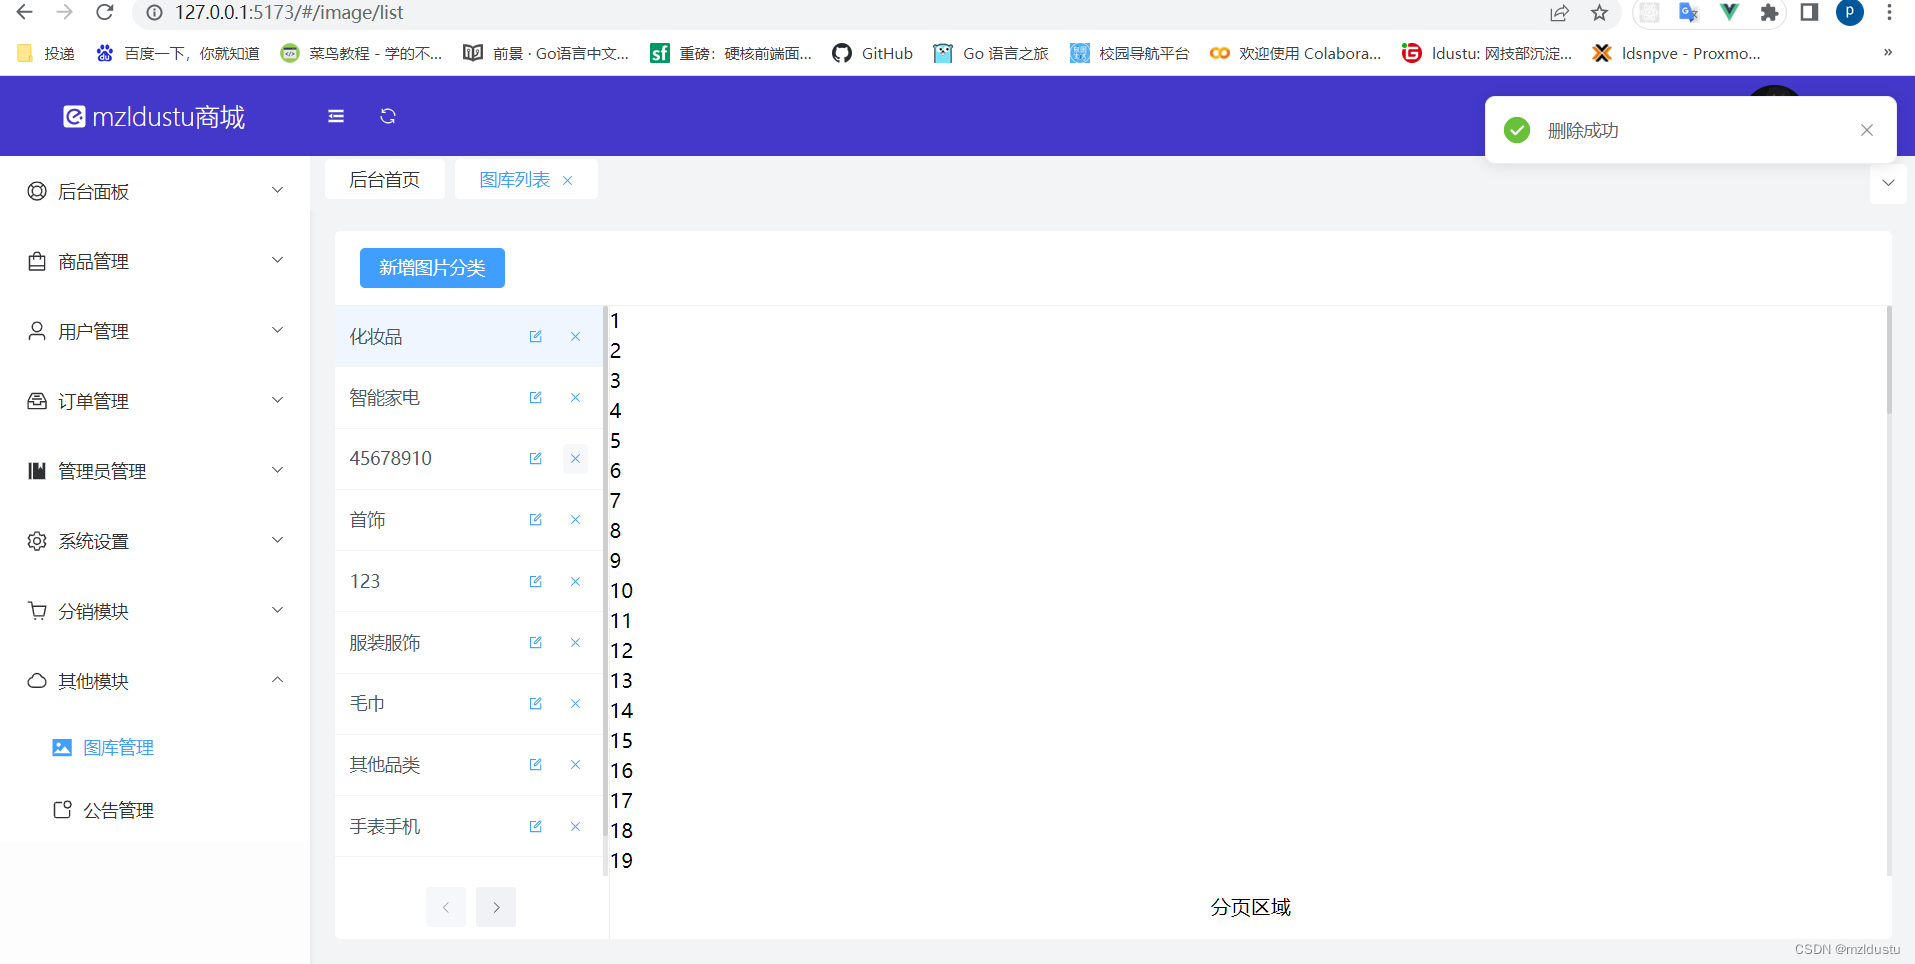
到此删除我们就已经完成了,今天先到这,明天继续。
项目gitee地址
