Python学习笔记-PyQt6对话框
对话框是界面编程中重要的窗体,一般用于提示或者一些其他特定操作。
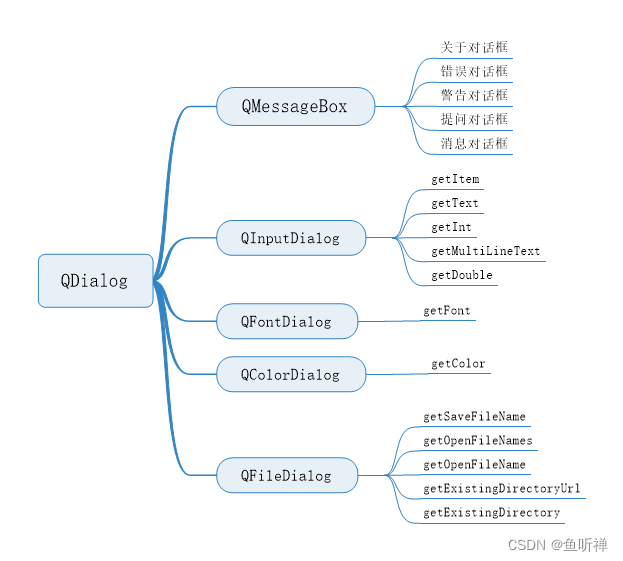
一、使用QDialog显示通用消息框
直接使用QDialog类,可以及通过对话框进行通用对话框显示,亦可以通过自定义设置自己需要的对话框。
# _*_ coding:utf-8 _*_

import sys

from PyQt6.QtWidgets import QWidget
from PyQt6.QtWidgets import QApplication
from PyQt6.QtWidgets import QMainWindow
from PyQt6.QtWidgets import QVBoxLayout
from PyQt6.QtWidgets import QHBoxLayout
from PyQt6.QtWidgets import QPushButton
from PyQt6.QtWidgets import QDialog
from PyQt6.QtGui import QIcon
from PyQt6.QtCore import Qt


class MainWindowView(QMainWindow):
    """主窗体界面"""

    def __init__(self):
        """构造函数"""
        super().__init__()

        self.setWindowTitle("MainWindow")
        self.setWindowIcon(QIcon(r"./res/folder_pictures.ico"))
        self.resize(300, 200)
        self.setMinimumSize(600, 400)


        self.center()
        self.initui()


    def initui(self):
        """初始函数"""

        self.vboxlayout = QVBoxLayout(self)
        self.main_widget = QWidget()
        self.main_widget.setLayout(self.vboxlayout)
        self.setCentralWidget(self.main_widget)

        self.hboxlayout = QHBoxLayout(self)
        self.btn = QPushButton(self)
        self.btn.setText("弹出对话框")
        self.btn.move(100,100)
        self.btn.clicked.connect(self.show_dialog)

    def center(self):
        """居中显示"""
        win_rect = self.frameGeometry()  # 获取窗口矩形
        screen_center = self.screen().availableGeometry().center()  # 屏幕中心
        win_rect.moveCenter(screen_center)      # 移动窗口矩形到屏幕中心
        self.move(win_rect.center())         # 移动窗口与窗口矩形重合

    def show_dialog(self):
        dialog = QDialog()
        button = QPushButton("确定", dialog)
        button.clicked.connect(dialog.close)
        button.move(50,50)
        dialog.setWindowTitle("QDialog")
        dialog.setWindowModality(Qt.WindowModality.ApplicationModal)
        dialog.exec()


if __name__ == "__main__":
    app = QApplication(sys.argv)
    view = MainWindowView()
    view.show()
    sys.exit(app.exec())
结果:
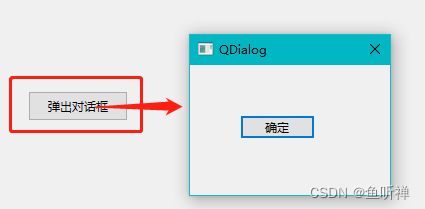
点击按钮可以弹出对话框,可以添加对应的按钮关联信号进行窗体关闭或控制。
二、使用QMessageBox显示不同的对话框
QMessageBox是通用的消息对话框,包括如下多种形式,不同的对话框有不同的图标和按钮,还可以根据自己需要微调样式。
# _*_ coding:utf-8 _*_

import sys

from PyQt6.QtWidgets import QWidget
from PyQt6.QtWidgets import QApplication
from PyQt6.QtWidgets import QMainWindow
from PyQt6.QtWidgets import QVBoxLayout
from PyQt6.QtWidgets import QPushButton
from PyQt6.QtWidgets import QMessageBox
from PyQt6.QtGui import QIcon
from PyQt6.QtCore import Qt


class DemoQMessageBox(QMainWindow):
    """主窗体界面"""

    def __init__(self):
        """构造函数"""
        super().__init__()

        self.setWindowTitle("MainWindow")
        self.setWindowIcon(QIcon(r"./res/20 (3).ico"))
        self.resize(300, 200)
        self.setMinimumSize(600, 400)

        self.center()
        self.initui()

    def initui(self):
        """初始函数"""

        self.vboxlayout = QVBoxLayout(self)
        self.vboxlayout.setAlignment(Qt.AlignmentFlag.AlignCenter)
        self.main_widget = QWidget()
        self.main_widget.setLayout(self.vboxlayout)
        self.setCentralWidget(self.main_widget)

        btns = ["关于对话框", "错误对话框", "警告对话框", "提问对话框", "消息对话框",]

        for btnname in btns:
            """添加button"""
            btn = QPushButton(btnname)
            self.vboxlayout.addWidget(btn)
            btn.clicked.connect(self.show_dialog)

    def center(self):
        """居中显示"""
        win_rect = self.frameGeometry()  # 获取窗口矩形
        screen_center = self.screen().availableGeometry().center()  # 屏幕中心
        win_rect.moveCenter(screen_center)      # 移动窗口矩形到屏幕中心
        self.move(win_rect.center())         # 移动窗口与窗口矩形重合

    def show_dialog(self):
        if type(self.sender()) is QPushButton:
            btn_text = self.sender().text()
            if btn_text == "关于对话框":
                QMessageBox.about(self, "关于", "这是关与对话框")
            elif btn_text == "错误对话框":
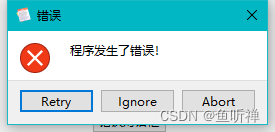
                QMessageBox.critical(self,"错误","程序发生了错误!",QMessageBox.StandardButton.Ignore | QMessageBox.StandardButton.Abort | QMessageBox.StandardButton.Retry,QMessageBox.StandardButton.Retry)
            elif btn_text == "警告对话框":
                QMessageBox.warning(
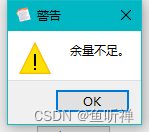
                    self, "警告", "余量不足。", QMessageBox.StandardButton.Ok, QMessageBox.StandardButton.Ok)
            elif btn_text == "提问对话框":
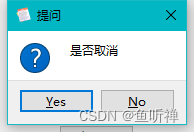
                QMessageBox.question(self, "提问", "是否取消" ,QMessageBox.StandardButton.Yes | QMessageBox.StandardButton.No,QMessageBox.StandardButton.Yes)
            elif btn_text == "消息对话框":
                QMessageBox.information(
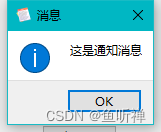
                    self, "消息", "这是通知消息", QMessageBox.StandardButton.Ok, QMessageBox.StandardButton.Ok)


if __name__ == "__main__":
    app = QApplication(sys.argv)
    view = DemoQMessageBox()
    view.show()
    sys.exit(app.exec())
结果:
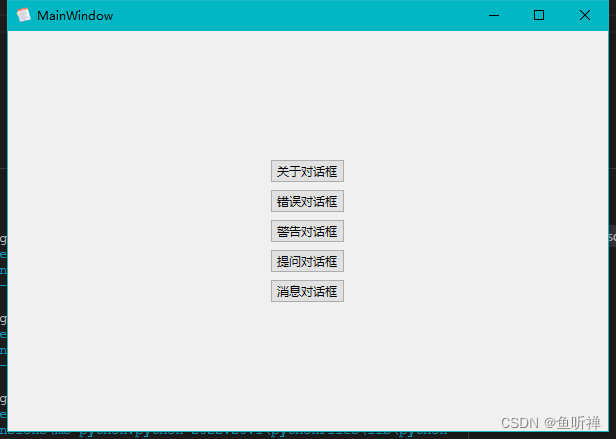
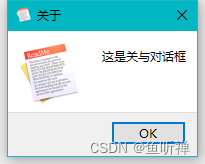
点击不同按钮,显示不同的消息窗口:
关于对话框:
错误对话框:
警告对话框:
提问对话框:
消息对话框:
三、输入对话框
输入对话框,用于弹窗获取用户的输入信息,包含输入列表,输入文本,输入数字等方式。
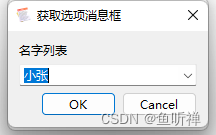
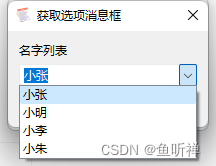
QInputDialog.getItem(self,"获取选项消息框", "名字列表", items),返回值Tuple[str, bool]
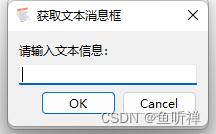
QInputDialog.getText(self,"获取文本消息框", "请输入文本信息:"),返回值Tuple[str, bool]
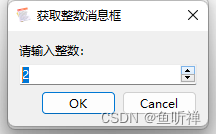
QInputDialog.getInt(self,"获取整数消息框", "请输入整数:"),返回值Tuple[int, bool]
QInputDialog.getMultiLineText(parent: QWidget, title: str, label: str, text: str = ..., flags: QtCore.Qt.WindowType = ..., inputMethodHints: QtCore.Qt.InputMethodHint = ...) -> typing.Tuple[str, bool]
QInputDialog.getDouble(parent: QWidget, title: str, label: str, value: float = ..., min: float = ..., max: float = ..., decimals: int = ..., flags: QtCore.Qt.WindowType = ..., step: float = ...) -> typing.Tuple[float, bool]
示例:
# _*_ coding:utf-8 _*_

import sys
from PyQt6.QtWidgets import QApplication
from PyQt6.QtWidgets import QWidget
from PyQt6.QtWidgets import QMainWindow
from PyQt6.QtWidgets import QFormLayout
from PyQt6.QtWidgets import QPushButton
from PyQt6.QtWidgets import QLineEdit
from PyQt6.QtWidgets import QInputDialog
from PyQt6.QtGui import QColor
from PyQt6.QtGui import QIcon
from PyQt6.QtCore import Qt


class QInputDialogDemoView(QMainWindow):
    """输入消息框类"""

    def __init__(self):
        """构造函数"""

        super().__init__()
        self.setWindowTitle("MainWindow")
        self.setWindowIcon(QIcon(r"./res/20 (3).ico"))
        self.resize(200, 100)
        self.center()
        self.initui()

    def center(self):
        """居中显示"""
        win_rect = self.frameGeometry()  # 获取窗口矩形
        screen_center = self.screen().availableGeometry().center()  # 屏幕中心
        # 移动窗口矩形到屏幕中心
        win_rect.moveCenter(screen_center)
        # 移动窗口与窗口矩形重合
        self.move(win_rect.center())

    def initui(self):
        """初始函数"""

        # 创建表单布局作为底层布局
        self.formlayout = QFormLayout(self)
        self.formlayout.setAlignment(Qt.AlignmentFlag.AlignCenter)
        self.main_widget = QWidget()
        self.main_widget.setLayout(self.formlayout)
        self.setCentralWidget(self.main_widget)

        # 添加获取选项按钮
        self.btn_getitem = QPushButton("Get Item")
        self.btn_getitem.clicked.connect(self.get_item)
        self.ledit_getitem = QLineEdit()
        self.formlayout.addRow(self.btn_getitem, self.ledit_getitem)

        # 添加获取文本按钮
        self.btn_gettext = QPushButton("Get Text")
        self.btn_gettext.clicked.connect(self.get_text)
        self.ledit_gettext = QLineEdit()
        self.formlayout.addRow(self.btn_gettext, self.ledit_gettext)

        # 添加获取整数按钮
        self.btn_getint = QPushButton("Get Int")
        self.btn_getint.clicked.connect(self.get_int)
        self.ledit_getint = QLineEdit()
        self.formlayout.addRow(self.btn_getint, self.ledit_getint)

    def get_item(self):
        """获取选项槽"""
        items = ("小张", "小明", "小李", "小朱")
        item,result = QInputDialog.getItem(self,"获取选项消息框", "名字列表", items)
        print(f"item : {item}, ok : {result}, tpye : {type(result)}")
        if item and result:
            self.ledit_getitem.setText(item)

    def get_text(self):
        """获取文本槽"""
        text,result = QInputDialog.getText(self,"获取文本消息框", "请输入文本信息:")
        print(f"item : {text}, ok : {result}, tpye : {type(result)}")
        if text and result:
            self.ledit_gettext.setText(text)


    def get_int(self):
        """获取文本槽"""
        num,result = QInputDialog.getInt(self,"获取整数消息框", "请输入整数:")
        print(f"item : {num}, ok : {result}, tpye : {type(result)}")
        if num and result:
            self.ledit_getint.setText(str(num))


if __name__ == "__main__":
    """主程序运行"""
    app = QApplication(sys.argv)
    window = QInputDialogDemoView()
    window.show()
    sys.exit(app.exec())
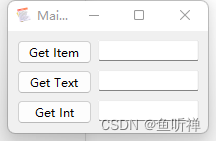
结果:
主界面:
输入选项:
输入文本:
输入整数:
四、字体对话框
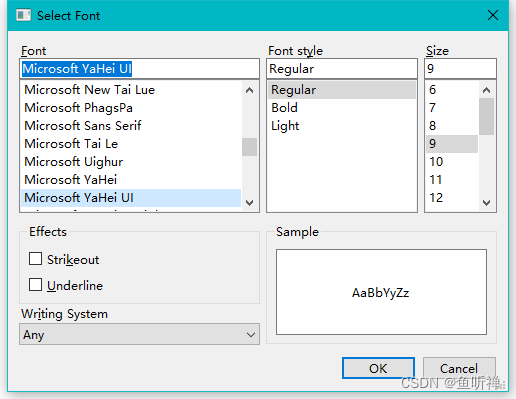
字体对话框(QFontDialog)可以用来交互选择系统中的字体然后通过返回的QFont类型数据来设置相关的字体。
font, ok = QFontDialog.getFont()示例:
# _*_ coding:utf-8 _*_

import sys
from PyQt6.QtWidgets import QApplication
from PyQt6.QtWidgets import QWidget
from PyQt6.QtWidgets import QMainWindow
from PyQt6.QtWidgets import QFontDialog
from PyQt6.QtWidgets import QPushButton
from PyQt6.QtWidgets import QLabel
from PyQt6.QtWidgets import QVBoxLayout
from PyQt6.QtGui import QFont
from PyQt6.QtCore import Qt


class QFontDialogDemo(QMainWindow):
    """字体对话框"""

    def __init__(self):
        """构造函数"""

        super(QFontDialogDemo,self).__init__()
        self.init_ui()

    def init_ui(self):
        self.setWindowTitle("QFontDialogDemo")
        self.resize(300, 200)

        # 获取中央控件
        self.centralwidget = QWidget()
        self.setCentralWidget(self.centralwidget)

        # 设置布局
        self.vboxlayout = QVBoxLayout()
        self.vboxlayout.setAlignment(Qt.AlignmentFlag.AlignCenter)
        self.centralwidget.setLayout(self.vboxlayout)

        # 添加标签和按钮
        self.label = QLabel("字体样式展示")
        self.vboxlayout.addWidget(self.label)
        self.label_fonttype = QLabel("字体类型")
        self.vboxlayout.addWidget(self.label_fonttype)
        self.btn_showfontdialog = QPushButton("选择字体")
        self.btn_showfontdialog.clicked.connect(self.getfont)
        self.vboxlayout.addWidget(self.btn_showfontdialog)


    def getfont(self):
        """获取字体"""
        font, ok = QFontDialog.getFont()
        if ok :
            self.label.setFont(font)
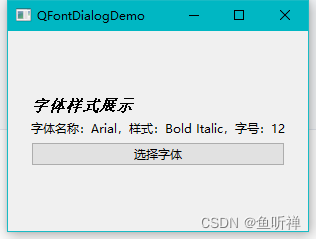
            self.label_fonttype.setText(f"字体名称:{font.family()},样式:{font.styleName()},字号:{font.pointSize()}")


if __name__ == "__main__":
    """主程序运行"""

    app = QApplication(sys.argv)
    main = QFontDialogDemo()
    main.show()
    sys.exit(app.exec())
结果:
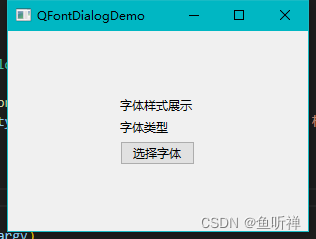
界面样式:
字体弹窗:
设置字体后:
五、颜色对话框
通过颜色对话框(QColorDialog)选择颜色,然后给给控件设置对应的颜色。
格式:
color, ok = QColorDialog.getColor()示例:
# _*_ coding:utf-8 _*_

import sys
from PyQt6.QtWidgets import QApplication
from PyQt6.QtWidgets import QWidget
from PyQt6.QtWidgets import QMainWindow
from PyQt6.QtWidgets import QColorDialog
from PyQt6.QtWidgets import QPushButton
from PyQt6.QtWidgets import QLabel
from PyQt6.QtWidgets import QVBoxLayout
from PyQt6.QtGui import QPalette
from PyQt6.QtCore import Qt


class QColorDialogDemo(QMainWindow):
    """字体对话框"""

    def __init__(self):
        """构造函数"""

        super(QColorDialogDemo, self).__init__()
        self.init_ui()

    def init_ui(self):
        self.setWindowTitle("QColorDialogDemo")
        self.resize(300, 200)

        # 获取中央控件
        self.centralwidget = QWidget()
        self.setCentralWidget(self.centralwidget)

        # 设置布局
        self.vboxlayout = QVBoxLayout()
        self.vboxlayout.setAlignment(Qt.AlignmentFlag.AlignCenter)
        self.centralwidget.setLayout(self.vboxlayout)

        # 添加标签和按钮
        self.label = QLabel("字体颜色展示")
        self.vboxlayout.addWidget(self.label)
        self.label_fonttype = QLabel("颜色:")
        self.vboxlayout.addWidget(self.label_fonttype)
        self.btn_showcolordialog = QPushButton("选择字体颜色")
        self.btn_showcolordialog.clicked.connect(self.getcolor)
        self.vboxlayout.addWidget(self.btn_showcolordialog)
        self.btn_showcolordialog_background = QPushButton("选择背景颜色")
        self.btn_showcolordialog_background.clicked.connect(
            self.getcolor_background)
        self.vboxlayout.addWidget(self.btn_showcolordialog_background)

    def getcolor(self):
        """获取颜色"""
        color = QColorDialog.getColor()

        palette = QPalette()
        palette.setColor(QPalette.ColorRole.WindowText, color)
        self.label.setPalette(palette)
        self.label_fonttype.setText("""颜色:{0:x}""".format(color.rgb()))

    def getcolor_background(self):
        """获取背景颜色"""
        color = QColorDialog.getColor()

        palette = QPalette()
        palette.setColor(QPalette.ColorRole.Window, color)
        self.label.setAutoFillBackground(True)
        self.label.setPalette(palette)
        self.label_fonttype.setText("""颜色:{0:x}""".format(color.rgb()))

if __name__ == "__main__":
    """主程序运行"""

    app = QApplication(sys.argv)
    main = QColorDialogDemo()
    main.show()
    sys.exit(app.exec())
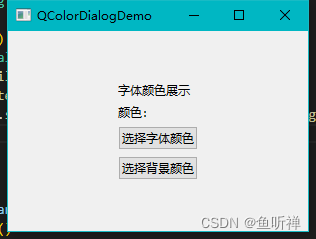
结果:
界面:
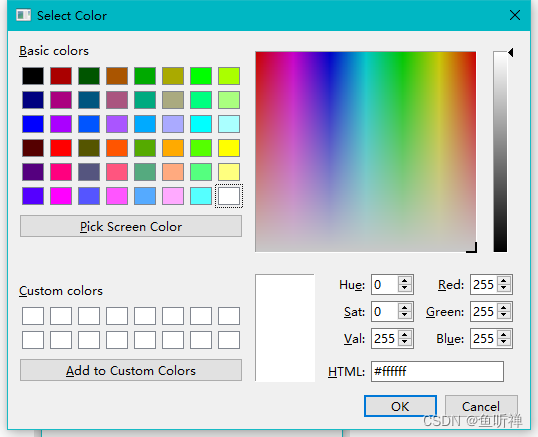
调色板:
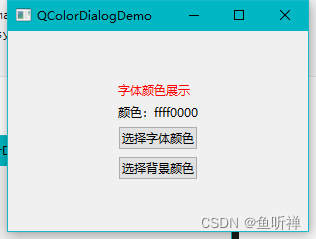
修改颜色字体:
修改背景颜色:
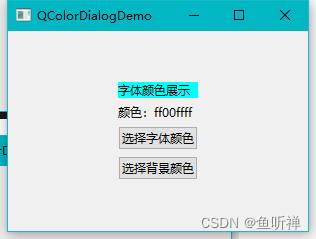
六、文件对话框
文件对话框(QFileDialog)用于浏览文件并获取文件路径。
- 使用静态方法获取文件路径
getSaveFileName(parent: typing.Optional[QWidget] = ..., caption: str = ..., directory: str = ..., filter: str = ..., initialFilter: str = ..., options: 'QFileDialog.Option' = ...) -> typing.Tuple[str, str]: ...
getOpenFileNames(parent: typing.Optional[QWidget] = ..., caption: str = ..., directory: str = ..., filter: str = ..., initialFilter: str = ..., options: 'QFileDialog.Option' = ...) -> typing.Tuple[typing.List[str], str]: ...
getOpenFileName(parent: typing.Optional[QWidget] = ..., caption: str = ..., directory: str = ..., filter: str = ..., initialFilter: str = ..., options: 'QFileDialog.Option' = ...) -> typing.Tuple[str, str]: ...
getExistingDirectoryUrl(parent: typing.Optional[QWidget] = ..., caption: str = ..., directory: QtCore.QUrl = ..., options: 'QFileDialog.Option' = ..., supportedSchemes: typing.Iterable[str] = ...) -> QtCore.QUrl: ...
getExistingDirectory(parent: typing.Optional[QWidget] = ..., caption: str = ..., directory: str = ..., options: 'QFileDialog.Option' = ...) -> str: ...
示例:
# _*_ coding:utf-8 _*_

import sys
from PyQt6.QtWidgets import QApplication
from PyQt6.QtWidgets import QWidget
from PyQt6.QtWidgets import QMainWindow
from PyQt6.QtWidgets import QFileDialog
from PyQt6.QtWidgets import QPushButton
from PyQt6.QtWidgets import QLabel
from PyQt6.QtWidgets import QLineEdit
from PyQt6.QtWidgets import QFormLayout
from PyQt6.QtGui import QPalette
from PyQt6.QtCore import Qt


class QFileDialogDemo(QMainWindow):
    """字体对话框"""

    def __init__(self):
        """构造函数"""

        super(QFileDialogDemo, self).__init__()
        self.init_ui()

    def init_ui(self):
        self.setWindowTitle("QColorDialogDemo")
        self.resize(400, 200)

        # 获取中央控件
        self.centralwidget = QWidget()
        self.setCentralWidget(self.centralwidget)

        # 设置布局
        self.formlayout = QFormLayout()
        self.formlayout.setAlignment(Qt.AlignmentFlag.AlignCenter)
        self.centralwidget.setLayout(self.formlayout)

        # 添加标签和按钮
        self.label = QLabel("文件路径:")
        self.ledit_filepath = QLineEdit()
        self.formlayout.addRow(self.label, self.ledit_filepath)

        self.btn_openfile = QPushButton("打开文件")
        self.btn_openfile.clicked.connect(self.openfile)
        self.formlayout.addWidget(self.btn_openfile)

    def openfile(self):
        """获取颜色"""
        # filename->返回的文件路径,filetypelist->设置的要打开的文件类型
        filename, filetypelist = QFileDialog.getOpenFileName(
            self, "Open File", r"D:\Desktop", "文本文件(*.txt *.csv)")
        self.ledit_filepath.setText(filename + ";" + filetypelist)

if __name__ == "__main__":
    """主程序运行"""

    app = QApplication(sys.argv)
    main = QFileDialogDemo()
    main.show()
    sys.exit(app.exec())
结果:
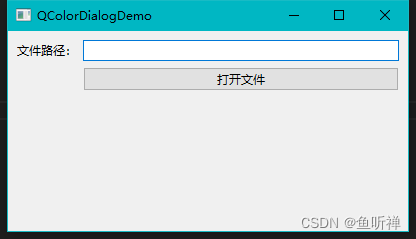
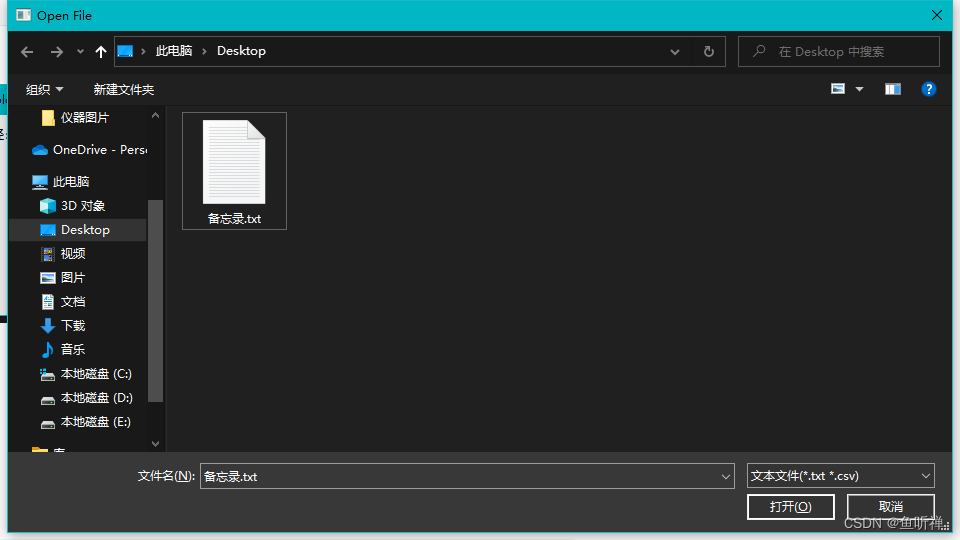
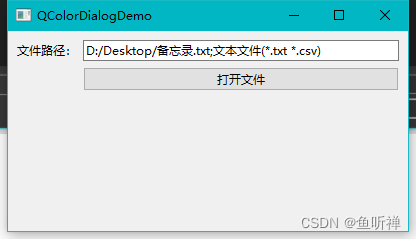
- 实例化对话框获取文件路径
实际使用过程中也可以通过自己需求实例化文件对话框后,配置文件对话框属性,然后再获取文件路径。
        filedialog = QFileDialog()
        filedialog.setFileMode(QFileDialog.FileMode.AnyFile)
        filedialog.setFilter(QDir.Filter.Files)

        if filedialog.exec():
            filenames = filedialog.selectedFiles()
            self.ledit_filepath.setText(filenames[0])