云原生之快速使用Nacos Spring Cloud
本文主要面向 Spring Cloud 的使用者,通过两个示例来介绍如何使用 Nacos 来实现分布式环境下的配置管理和服务注册发现。
- 通过 Nacos Server 和 spring-cloud-starter-alibaba-nacos-config 实现配置的动态变更。
- 通过 Nacos Server 和 spring-cloud-starter-alibaba-nacos-discovery 实现服务的注册与发现。
前提条件
您需要先下载 Nacos 并启动 Nacos server。
window系统启动命令,需要在nacos文件夹的bin命令行启动
startup.cmd -m standalone启动配置管理
启动了 Nacos server 后,您就可以参考以下示例代码,为你的 Spring Cloud 应用启动 Nacos 配置管理服务了
1.添加依赖:
<dependency>
    <groupId>com.alibaba.cloud</groupId>
    <artifactId>spring-cloud-starter-alibaba-nacos-config</artifactId>
    <version>${latest.version}</version>
</dependency>注意:版本 2.1.x.RELEASE 对应的是 Spring Boot 2.1.x 版本。版本 2.0.x.RELEASE 对应的是 Spring Boot 2.0.x 版本,版本 1.5.x.RELEASE 对应的是 Spring Boot 1.5.x 版本。
2.在 bootstrap.properties 中配置 Nacos server 的地址和应用名
spring.cloud.nacos.config.server-addr=127.0.0.1:8848

spring.application.name=example
说明:之所以需要配置
spring.application.name,是因为它是构成 Nacos 配置管理dataId字段的一部分。在 Nacos Spring Cloud 中,
dataId的完整格式如下:${prefix}-${spring.profiles.active}.${file-extension}
prefix 默认为 spring.application.name 的值,也可以通过配置项 spring.cloud.nacos.config.prefix来配置。
spring.profiles.active 即为当前环境对应的 profile,详情可以参考 Spring Boot文档。 注意:当 spring.profiles.active 为空时,对应的连接符 - 也将不存在,dataId 的拼接格式变成 ${prefix}.${file-extension}
file-exetension 为配置内容的数据格式,可以通过配置项 spring.cloud.nacos.config.file-extension 来配置。目前只支持 properties 和 yaml 类型。
3.通过 Spring Cloud 原生注解 @RefreshScope 实现配置自动更新:
@RestController
@RequestMapping("/config")
@RefreshScope
public class ConfigController {

    @Value("${useLocalCache:false}")
    private boolean useLocalCache;

    @RequestMapping("/get")
    public boolean get() {
        return useLocalCache;
    }
}
4. 首先通过调用 Nacos Open API 向 Nacos Server 发布配置
dataId 为example.properties,内容为useLocalCache=true
curl -X POST "http://127.0.0.1:8848/nacos/v1/cs/configs?dataId=example.properties&group=DEFAULT_GROUP&content=useLocalCache=true"5.运行 NacosConfigApplication
调用 curl http://localhost:8080/config/get,返回内容是 true。
6.再次调用 Nacos Open API 向 Nacos server 发布配置
dataId 为example.properties,内容为useLocalCache=false
curl -X POST "http://127.0.0.1:8848/nacos/v1/cs/configs?dataId=example.properties&group=DEFAULT_GROUP&content=useLocalCache=false
7.再次访问 http://localhost:8080/config/get
此时返回内容为false,说明程序中的useLocalCache值已经被动态更新了
启动服务发现
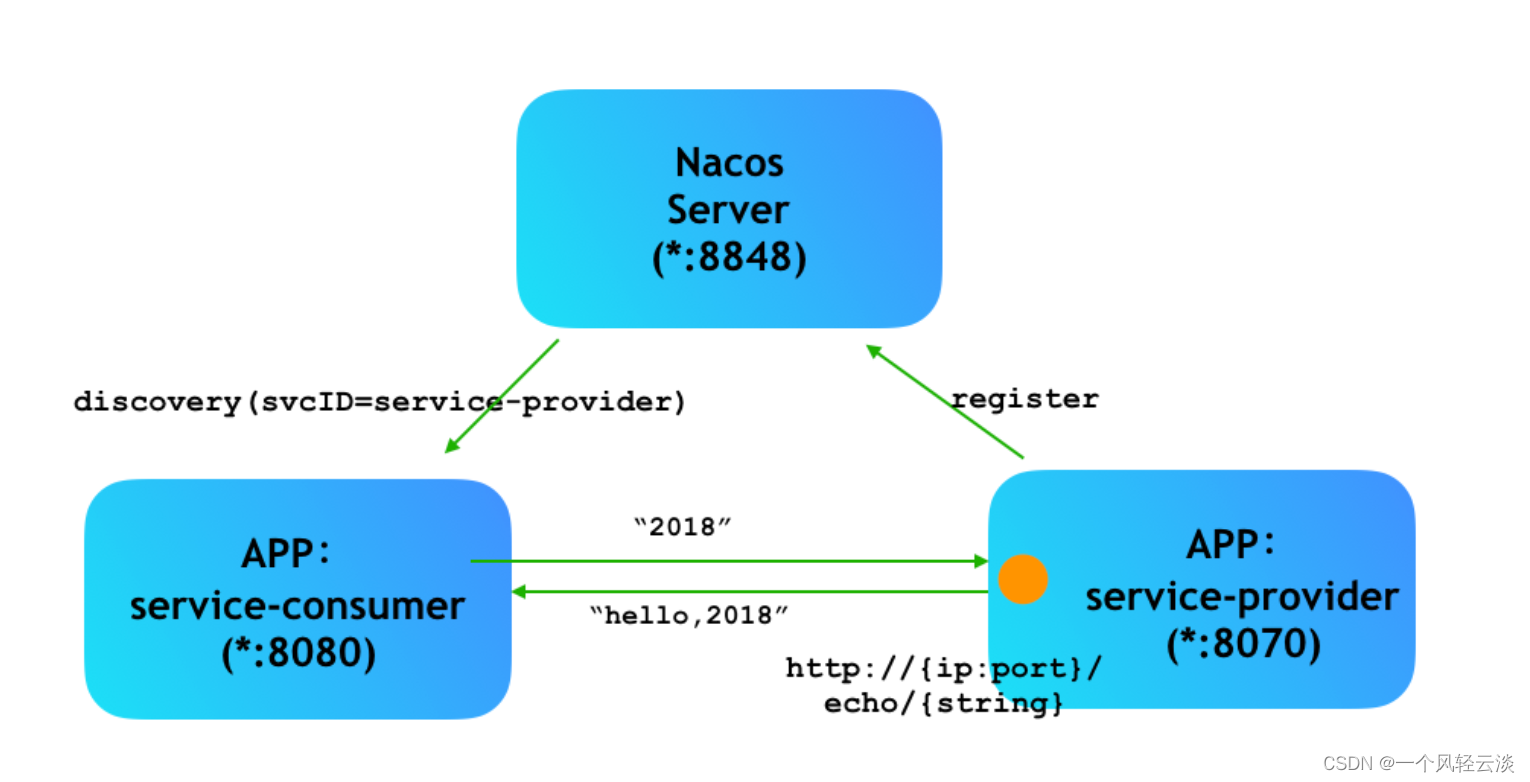
通过实现一个简单的 echo service 演示如何在您的 Spring Cloud 项目中启用 Nacos 的服务发现功能,如下图示:

1.添加依赖:
<dependency>
    <groupId>com.alibaba.cloud</groupId>
    <artifactId>spring-cloud-starter-alibaba-nacos-discovery</artifactId>
    <version>${latest.version}</version>
</dependency>注意:版本 2.1.x.RELEASE 对应的是 Spring Boot 2.1.x 版本。版本 2.0.x.RELEASE 对应的是 Spring Boot 2.0.x 版本,版本 1.5.x.RELEASE 对应的是 Spring Boot 1.5.x 版本。
更多版本对应关系参考:版本说明 Wiki
2.配置服务提供者
从而服务提供者可以通过 Nacos 的服务注册发现功能将其服务注册到 Nacos server 上。
i. 在 application.properties 中配置 Nacos server 的地址:
server.port=8070
spring.application.name=service-provider

spring.cloud.nacos.discovery.server-addr=127.0.0.1:8848
ii. 通过 Spring Cloud 原生注解 @EnableDiscoveryClient 开启服务注册发现功能:
@SpringBootApplication
@EnableDiscoveryClient
public class NacosProviderApplication {

	public static void main(String[] args) {
		SpringApplication.run(NacosProviderApplication.class, args);
	}

	@RestController
	class EchoController {
		@RequestMapping(value = "/echo/{string}", method = RequestMethod.GET)
		public String echo(@PathVariable String string) {
			return "Hello Nacos Discovery " + string;
		}
	}
}
3.配置服务消费者
从而服务消费者可以通过 Nacos 的服务注册发现功能从 Nacos server 上获取到它要调用的服务。
i. 在 application.properties 中配置 Nacos server 的地址:
server.port=8080
spring.application.name=service-consumer

spring.cloud.nacos.discovery.server-addr=127.0.0.1:8848
ii. 通过 Spring Cloud 原生注解 @EnableDiscoveryClient 开启服务注册发现功能。给 RestTemplate 实例添加 @LoadBalanced 注解,开启 @LoadBalanced 与 Ribbon 的集成:
@SpringBootApplication
@EnableDiscoveryClient
public class NacosConsumerApplication {

    @LoadBalanced
    @Bean
    public RestTemplate restTemplate() {
        return new RestTemplate();
    }

    public static void main(String[] args) {
        SpringApplication.run(NacosConsumerApplication.class, args);
    }

    @RestController
    public class TestController {

        private final RestTemplate restTemplate;

        @Autowired
        public TestController(RestTemplate restTemplate) {this.restTemplate = restTemplate;}

        @RequestMapping(value = "/echo/{str}", method = RequestMethod.GET)
        public String echo(@PathVariable String str) {
            return restTemplate.getForObject("http://service-provider/echo/" + str, String.class);
        }
    }
}
4.启动 ProviderApplication 和 ConsumerApplication
调用 http://localhost:8080/echo/2018,返回内容为 Hello Nacos Discovery 2018。
