Java 基础之线程
线程是 cpu 可以调度的最小单元,多线程可以利用 cpu 轮询时间片的特点,在一个线程进入阻塞状态时,快速切换到其余线程执行其余操作,减少用户的等待响应时间。所以我们需要了解线程的基本概念,如何启动线程以及怎么去控制线程等。
一、线程模型
首先什么是线程模型?Java 作为一种跨平台语言,这一特性得益于它运行在 JVM 中,不同的系统有不同的 JVM,JVM 是需要与系统进行相互调用的,因此当 JVM 需要对线程进行各种操作时,也是需要调用操作系统的相关接口,所以 JVM 线程和操作系统线程存在一种映射关系,这其中的对应关系就是 Java 的线程模型。
常见的线程模型有三种:
1.内核线程模型
一对一,一个用户线程对应一个内核线程,JVM 大多是这种线程模型。
- 优点:实现简单、易用。
- 缺点:用户态线程的阻塞和唤醒会直接反应到操作系统上,导致内核态的频繁切换,降低性能。
2.用户线程模型
多对一,多个用户线程对应一个内核线程。
- 优点:用户线程的调度由用户空间完成,这样能够有效提供并发量上限,而且在用户空间完成的调度能有效提升性能,
- 缺点:如果一个用户线程进行了内核调用并且阻塞的话,其他线程在此期间都无法进行内核调用。
3.混合线程模型
多对多,多个用户线程对应多个内核线程。
- 优点:解决了上述两种模型的问题。
- 缺点:实现复杂。
二、线程的创建方式
1.继承 Thread 类
package com.qinshou.resume.thread;

public class NewThreadDemo {
	private static class MyThread extends Thread {
		private int mCount = 0;

		@Override
		public void run() {
			super.run();
			mCount++;
			System.out.println("MyThread running,count is " + mCount);
		}
	}

	public static void main(String[] args) throws InterruptedException {
		new MyThread().start();
		Thread.sleep(100);
		new MyThread().start();
	}
}
这种方式简单,但如果想要共享资源需要写额外逻辑。
2.实现 Runnable 接口
package com.qinshou.resume.thread;

public class NewThreadDemo {
	private static class MyRunnable implements Runnable {
		private int mCount = 0;

		@Override
		public void run() {
			mCount++;
			System.out.println("MyRunnable running,count is " + mCount);
		}
	}

	public static void main(String[] args) throws InterruptedException {
		MyRunnable myRunnable = new MyRunnable();
		new Thread(myRunnable).start();
		Thread.sleep(100);
		new Thread(myRunnable).start();
	}
}
这种方式相较于 Thread 更容易实现资源共享,因为 Runnable 会作为 Thread 的参数传入,使用同一个 Runnable 对象就可以实现资源共享。
3.FutureTask 包装 Callable
package com.qinshou.resume.thread;

import java.util.concurrent.Callable;
import java.util.concurrent.ExecutionException;
import java.util.concurrent.FutureTask;

public class NewThreadDemo {
	public static void main(String[] args) throws InterruptedException, ExecutionException {
		FutureTask<String> futureTask = new FutureTask<>(new Callable<String>() {

			@Override
			public String call() throws Exception {
				System.out.println("FutureTask running.");
				Thread.sleep(3000);
				return "Hello World";
			}
		});
		new Thread(futureTask).start();
		// 接收 Callable 的返回值,阻塞接收。
		String string = futureTask.get();
		System.out.println("futureTask.get()--->" + string);
	}
}
前两种方式可以看到 run() 方法的返回值都是 void,所以无法获取线程执行的结果,这种方式相较于前两种可以获取返回值,可以更好的观察线程。Callable 是 JDK 1.5 新增接口,但它并不是 Runnable 的子接口,所以无法直接作为 Thread 的参数传递,于是就需要用 FutureTask 包装一下。可以通过 FutureTask 的 get() 方法获取 Callable 的返回值,需要注意的是 get() 方法是阻塞的。
4.线程池
package com.qinshou.resume.thread;

import java.util.concurrent.ExecutorService;
import java.util.concurrent.Executors;

public class NewThreadDemo {
	private static class MyRunnable implements Runnable {
		private int mCount = 0;

		@Override
		public void run() {
			mCount++;
			System.out.println("MyRunnable running,count is " + mCount);
		}
	}

	public static void main(String[] args) {
		MyRunnable myRunnable = new MyRunnable();
		ExecutorService executorService = Executors.newFixedThreadPool(5);
		executorService.submit(myRunnable);
	}
}
线程池是 Java 为了减少频繁创建新线程造成的系统开销,而设计封装的类,本质还是通过 new Thread().start() 的方式。
三、线程的状态
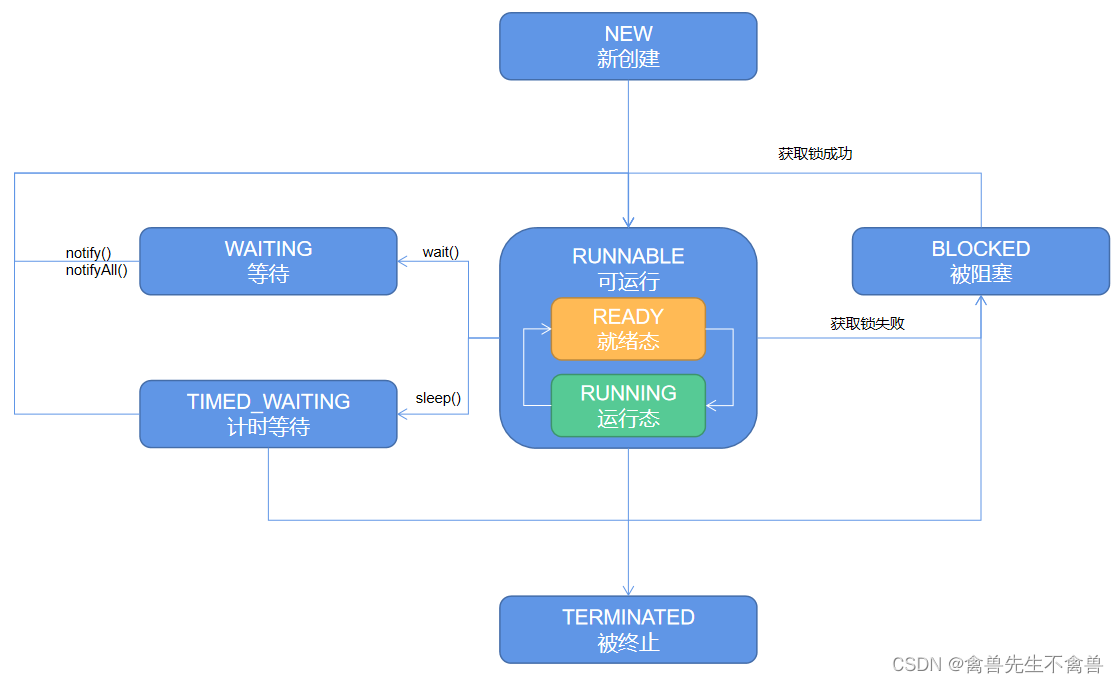
可以通过线程的 getState() 方法获取线程的当前状态,返回的是一个枚举值,该枚举有六个可选值,对应线程的六种状态:
- NEW:创建新线程,还没有调用 start() 方法之前,线程处于新创建状态。
- RUNNABLE:调用 start() 方法后线程即处于可运行状态,需要注意的是,调用 start() 方法只是开始调度,但不一定开始执行,所以该状态包含就绪态和运行态两种状态。
- WAITING:当前线程调用了 wait() 方法后,线程进入等待状态,只能等待其他线程唤醒。
- TIME_WAITING:当前线程调用了 Thread.sleep(); 方法后,线程开始休眠,进入计时等待状态,休眠时间结束后,会自动进入调度队列,等待 cpu 分配时间片后重新执行。
- BLOCKED:当线程尝试获取同步锁失败时,线程会进入阻塞队列变成阻塞态,直到获取到同步锁。
- TERMINATED:线程运行完成后变成被终止状态。变成该状态有两种情况,一是线程中的代码正常执行完成,二是线程执行过程中遇到没有捕获的异常而异常中止。

package com.qinshou.resume.thread;

import java.lang.Thread.State;

public class ThreadStateDemo {
	public static void main(String[] args) throws InterruptedException {
		Thread thread1 = new Thread(new Runnable() {

			@Override
			public void run() {
				// 调用 wait 方法,进入 WAIT 状态
				synchronized (Thread.currentThread()) {
					try {
						Thread.currentThread().wait();
					} catch (InterruptedException e) {
						e.printStackTrace();
					}
				}
				// 调用 Thread.sleep() 方法,进入 TIMED_WAITING 状态
				synchronized (Thread.currentThread()) {
					try {
						Thread.sleep(100);
					} catch (InterruptedException e) {
						e.printStackTrace();
					}
				}
				System.out.println("thread1 finished.");
			}
		});
		// NEW
		System.out.println("thread1.getState()--->" + thread1.getState());
		thread1.start();
		// RUNNABLE
		System.out.println("thread1.getState()--->" + thread1.getState());
		Thread.sleep(10);
		// WAITING
		System.out.println("thread1.getState()--->" + thread1.getState());
		Thread thread2 = new Thread(new Runnable() {

			@Override
			public void run() {
				// 唤醒 thread1,使其处于 RUNNABLE 状态,重新进入调度队列
				synchronized (thread1) {
					thread1.notify();
				}
				try {
					Thread.sleep(1);
				} catch (InterruptedException e) {
					e.printStackTrace();
				}
				// TIMED_WAITING
				System.out.println("thread1.getState()--->" + thread1.getState());
				// 与 thread1 抢锁,如果 thread1 先抢到锁,则 thread2 会进入阻塞态
				synchronized (thread1) {
				}
				try {
					Thread.sleep(1);
				} catch (InterruptedException e) {
					e.printStackTrace();
				}
				// TERMINATED
				System.out.println("thread1.getState()--->" + thread1.getState());
				System.out.println("thread2 finished.");
			}
		});
		thread2.start();
		Thread thread3 = new Thread(new Runnable() {

			@Override
			public void run() {
				while (thread2.getState() != State.BLOCKED) {
					try {
						Thread.sleep(1);
					} catch (InterruptedException e) {
						e.printStackTrace();
					}
				}
				// BLOCKED
				System.out.println("thread2.getState()--->" + thread2.getState());
				System.out.println("thread3 finished.");
			}
		});
		thread3.start();
	}
}
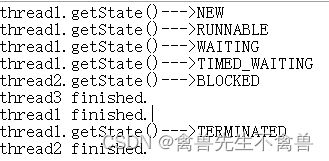
运行上述代码,可以看到线程的各种状态

四、join()
网上很多说可以调用 wait() 或者 join() 方法让线程进入阻塞态,诚然,这种说法是对的,它确实会让线程进入阻塞态,但说得又不完整,因为没有说明白到底是让哪个线程进入阻塞态。以上面代码为例,如果调用 thread1.wait() 则是让 thread1 线程进入阻塞态,而调用 thread1.join() 的话,则是让调用者所在当前线程进入阻塞态,而非 thread1,这一个区别如果不弄清楚就乱用,那多线程的控制可真会乱成一团还找不到问题。
wait() 方法让指定线程进入等待状态这一点应该没有疑问,那 join() 方法为什么是让调用者所在线程进入等待状态呢?这个问题其实看看 join() 的源码就可以找到答案。
public final synchronized void join(final long millis) throws InterruptedException {
    if (millis > 0) {
        if (isAlive()) {
            final long startTime = System.nanoTime();
            long delay = millis;
            do {
                wait(delay);
            } while (isAlive() && (delay = millis -
                    TimeUnit.NANOSECONDS.toMillis(System.nanoTime() - startTime)) > 0);
        }
    } else if (millis == 0) {
        while (isAlive()) {
            wait(0);
        }
    } else {
        throw new IllegalArgumentException("timeout value is negative");
    }
}
join() 方法的逻辑并不复杂,可以看到它里面调用了 wait() 方法,然后我们结合一段示例代码分析:
package com.qinshou.resume.thread;

public class WaitJoinDemo {
	public static void main(String[] args) throws InterruptedException {
		join();
	}

	public static void join() throws InterruptedException {
		Thread thread1 = new Thread(new Runnable() {

			@Override
			public void run() {
				for (int i = 0; i < 10; i++) {
					System.out.println("CurrentThread: " + Thread.currentThread().getName() + ",i: " + i);
				}
			}
		});
		thread1.start();
		thread1.join();
		System.out.println("程序结束");
	}
}
main() 方法运行在主线程中,main() 方法执行了 thread1.join() 这行代码,join() 方法中调用了 wait() 方法,这个 wait() 方法的调用者是谁呢?自然也是执行 thread1.join() 的线程,即主线程。所以,join() 方法是让调用者进入了等待状态。
上面的示例代码等价于下面代码:
package com.qinshou.resume.thread;

public class WaitJoinDemo {
	public static void main(String[] args) throws InterruptedException {
		waitNotify();
	}

	public static void waitNotify() throws InterruptedException {
		Thread mainThread = Thread.currentThread();
		Thread thread1 = new Thread(new Runnable() {

			@Override
			public void run() {
				for (int i = 0; i < 10; i++) {
					System.out.println("CurrentThread: " + Thread.currentThread().getName() + ",i: " + i);
				}
				synchronized (mainThread) {
					mainThread.notify();
				}
			}
		});
		thread1.start();
		synchronized (mainThread) {
			mainThread.wait();
		}
		System.out.println("程序结束");
	}
}
那问题又来了,有 wait() 就应该有 notify() 或者 notifyAll(),那 join() 方法是如何实现唤醒调用者线程的呢?这个问题我还没有找到很明确的答案,只是在查看 Thread 源码 debug 时跟踪到了 exit() 方法:
/**
 * This method is called by the system to give a Thread
 * a chance to clean up before it actually exits.
 */
private void exit() {
    if (threadLocals != null && TerminatingThreadLocal.REGISTRY.isPresent()) {
        TerminatingThreadLocal.threadTerminated();
    }
    if (group != null) {
        group.threadTerminated(this);
        group = null;
    }
    /* Aggressively null out all reference fields: see bug 4006245 */
    target = null;
    /* Speed the release of some of these resources */
    threadLocals = null;
    inheritableThreadLocals = null;
    inheritedAccessControlContext = null;
    blocker = null;
    uncaughtExceptionHandler = null;
}
该方法注释中提到它是系统在真正退出线程之前给线程一个机会清理资源的,其中 group.threadTerminated(this); 里有唤醒线程的相关操作:
/**
 * Notifies the group that the thread {@code t} has terminated.
 *
 * <p> Destroy the group if all of the following conditions are
 * true: this is a daemon thread group; there are no more alive
 * or unstarted threads in the group; there are no subgroups in
 * this thread group.
 *
 * @param  t
 *         the Thread that has terminated
 */
void threadTerminated(Thread t) {
    synchronized (this) {
        remove(t);

        if (nthreads == 0) {
            notifyAll();
        }
        if (daemon && (nthreads == 0) &&
            (nUnstartedThreads == 0) && (ngroups == 0))
        {
            destroy();
        }
    }
}
如果调用 join() 方法让调用者进入等待状态,那子线程执行完成后,这个 exit() 方法会调用两次,且第二次 nthreads 为 0,因此也就唤醒了整个线程组中其他等待的线程了。具体原理还有待研究。
由此可见,join() 方法主要是让调用者所在线程进入阻塞状态,让指定线程先执行完成的一种方式,也就是让异步变成同步的一种手段。
五、线程的三大特性
1.可见性
可见性是指一个线程对共享变量的值做了修改,其他线程都将马上收到通知,立即获得最新值。
但是变量默认是没有可见性的,下面是示例代码:
package com.qinshou.resume.thread;

public class VolatileDemo {
	private boolean mStart = true;

	public static void main(String[] args) throws InterruptedException {
		visibility();
	}

	public static void visibility() {
		VolatileDemo volatileDemo = new VolatileDemo();
		new Thread(new Runnable() {

			@Override
			public void run() {
				try {
					Thread.sleep(1000);
				} catch (InterruptedException e) {
					e.printStackTrace();
				}
				volatileDemo.mStart = false;
				System.out.println("Thread set start finish.");
			}
		}).start();
		while (volatileDemo.mStart) {
		}
		System.out.println("Finish.");
	}
}
上述代码中,while 循环的执行条件是 mStart 为 true,我们在 Thread1 中已经将 mStart 修改为 false,但是 while 循环并不会停止。这是因为 JVM 会在使用变量时会创建一个副本放在属于自己的线程栈中,所以即使 Thread1 修改了 mStart,但是主线程在使用 mStart 变量时一直是刚开始拷贝的副本,而不是主内存区中修改后的 mStart,所以 while 循环一直不会退出。
2.有序性
有序性是代码的执行顺序应该和编写顺序是一样的。但是实际上编译器为了提高程序的运行效率,提高并行效率,可能会对没有依赖关系的代码进行优化。这样一来,代码的执行顺序就未必是编写代码时候的顺序了,在单线程的时候并没有上面影响,在多线程的情况下就可能会出错。
下面是示例代码:
package com.qinshou.resume.thread;

public class VolatileDemo {
	private static int a;
	private static int b;
	private static int x;
	private static int y;

	public static void main(String[] args) throws InterruptedException {
		resort();
	}

	public static void resort() throws InterruptedException {
		while (true) {
			Thread thread1 = new Thread(new Runnable() {

				@Override
				public void run() {
					a = 1;
					x = b;
				}
			});
			Thread thread2 = new Thread(new Runnable() {

				@Override
				public void run() {
					b = 1;
					y = a;
				}
			});
			thread1.start();
			thread2.start();
			thread1.join();
			thread2.join();
			if (x == 0 && y == 0) {
				System.out.println("发送了指令重排序,a--->" + a + ",b--->" + b + ",x--->" + x + ",y--->" + y);
				break;
			}
			a = 0;
			b = 0;
			x = 0;
			y = 0;
		}
	}
}
上述代码中,thread1 和 thread2 是两个子线程,等待两个线程执行完成后去判断 x 和 y 的值,按理说按照写的代码的顺序,要么是 x=1、y=0,要么是 x=0、y=1,反正不应该 x 和 y 同时为 0,如果出现这种情况,那一定是发生指令重排序了。
3.原子性
原子性是指线程在执行一个操作时,要么全部执行且执行的过程是不会被任何因素打断的,要么全部不执行。
六、总结
了解了线程的基本概念后,我们才知道怎么去更好的控制线程,了解了线程的三大特性后,我们才能应对多线程编程时可能遇到的一些问题,下一文再介绍并发编程时控制线程同步的锁机制。
