02-nginx环境准备
二、Nginx环境准备
1、Nginx版本介绍
Nginx的官方网站为: http://nginx.org
打开源码可以看到如下的页面内容
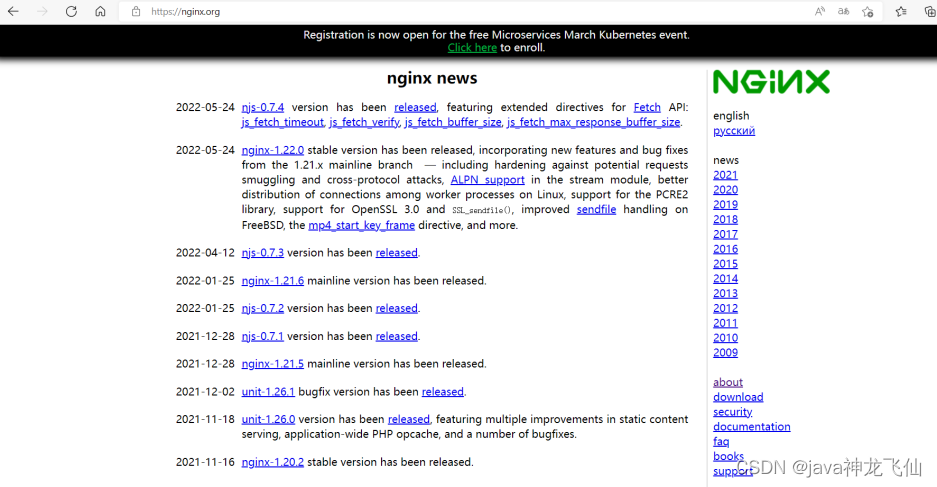
Nginx的官方下载网站为http://nginx.org/en/download.html,当然你也可以之间在首页选中右边的download进入版本下载网页。在下载页面我们会看到如下内容:
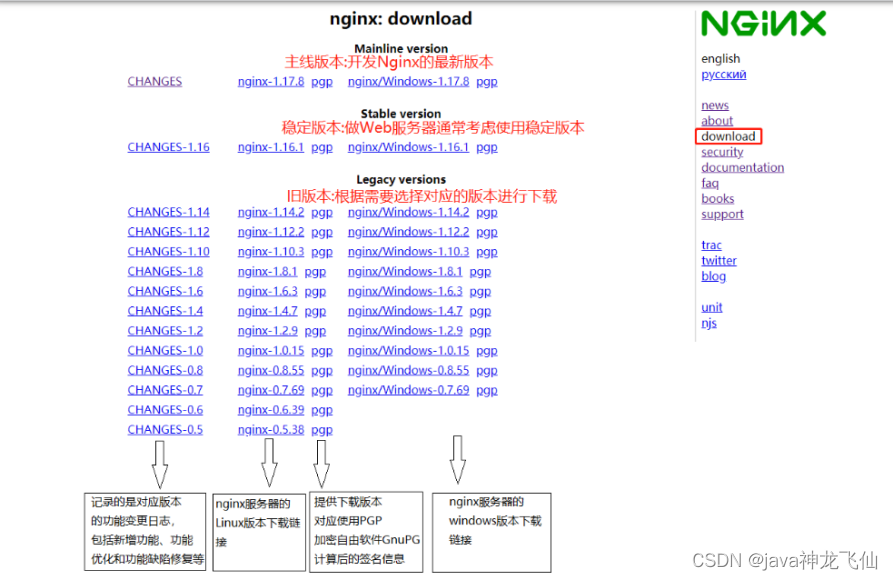
2、获取Nginx源码
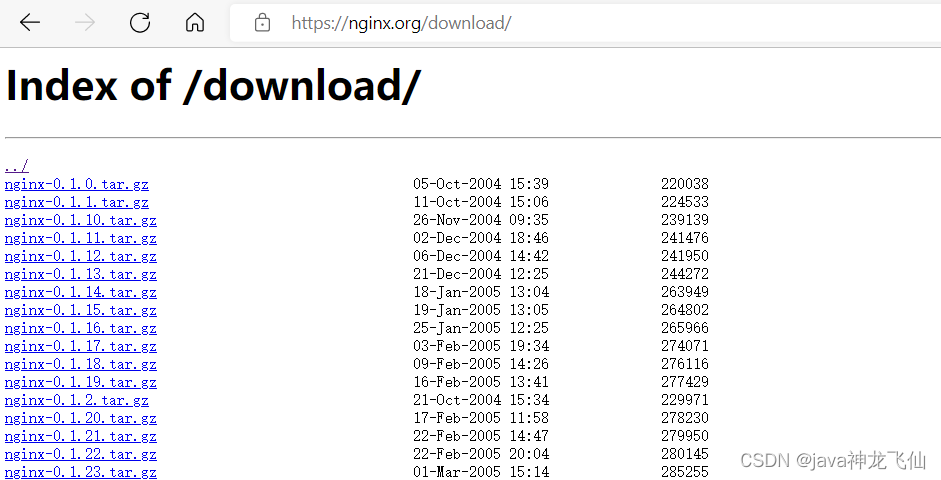
https://nginx.org/download/
打开上述网站,就可以查看到Nginx的所有版本,选中自己需要的版本进行下载。下载我们可以直接在windows上下载然后上传到服务器,也可以直接从服务器上下载,这个时候就需要准备一台服务器。
3、准备服务器系统
环境准备
VMware WorkStation
Centos7
MobaXterm
	xsheel,SecureCRT
网络
(1)确认centos的内核
准备一个内核为2.6及以上版本的操作系统,因为linux2.6及以上内核才支持epoll,而Nginx需要解决高并发压力问题是需要用到epoll,所以我们需要有这样的版本要求。
我们可以使用uname -a命令来查询linux的内核版本。
[root@zqf opt]# uname -a
Linux zqf 3.10.0-1160.el7.x86_64 #1 SMP Mon Oct 19 16:18:59 UTC 2020 x86_64 x86_64 x86_64 GNU/Linux
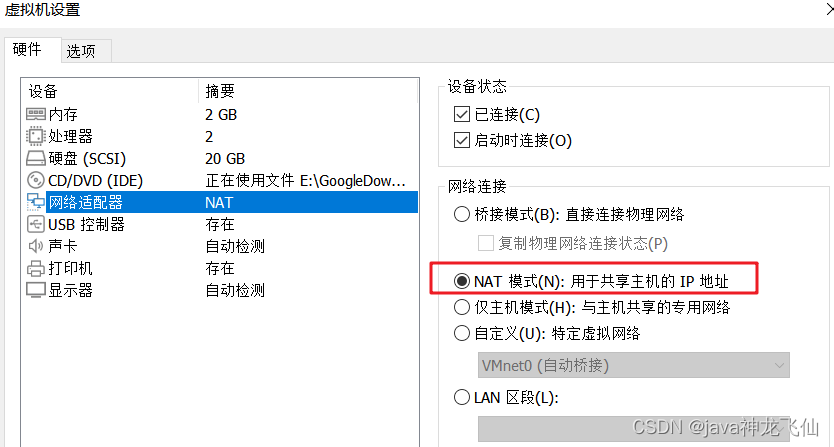
(2)确保centos能联网
[root@zqf opt]# ping www.baidu.com
PING www.baidu.com (183.232.231.172) 56(84) bytes of data.
64 bytes from 183.232.231.172 (183.232.231.172): icmp_seq=1 ttl=128 time=13.1 ms

使用NAT模式:主机与虚拟机共享网络
(3)确认关闭防火墙
这一项的要求仅针对于那些对linux系统的防火墙设置规则不太清楚的,建议大家把防火墙都关闭掉,因为我们此次课程主要的内容是对Nginx的学习,把防火墙关闭掉,可以省掉后续Nginx学习过程中遇到的诸多问题。
关闭的方式有如下两种:
systemctl stop firewalld      关闭运行的防火墙,系统重新启动后,防火墙将重新打开
systemctl disable firewalld   永久关闭防火墙,,系统重新启动后,防火墙依然关闭
systemctl status firewalld	 查看防火墙状态
(4)确认停用selinux
selinux(security-enhanced linux),美国安全局对于强制访问控制的实现,在linux2.6内核以后的版本中,selinux已经成功内核中的一部分。可以说selinux是linux史上最杰出的新安全子系统之一。虽然有了selinux,我们的系统会更安全,但是对于我们的学习Nginx的历程中,会多很多设置,所以这块建议大家将selinux进行关闭。
sestatus查看状态
[root@zqf opt]# sestatus
SELinux status:                 enabled
SELinuxfs mount:                /sys/fs/selinux
SELinux root directory:         /etc/selinux
Loaded policy name:             targeted
Current mode:                   enforcing
Mode from config file:          enforcing
Policy MLS status:              enabled
Policy deny_unknown status:     allowed
Max kernel policy version:      31
如果查看不是disabled状态,我们可以通过修改配置文件来进行设置,修改SELINUX=disabled,然后重启下系统即可生效。
[root@zqf opt]# cat /etc/selinux/config

# This file controls the state of SELinux on the system.
# SELINUX= can take one of these three values:
#     enforcing - SELinux security policy is enforced.
#     permissive - SELinux prints warnings instead of enforcing.
#     disabled - No SELinux policy is loaded.
SELINUX=disabled
# SELINUXTYPE= can take one of three values:
#     targeted - Targeted processes are protected,
#     minimum - Modification of targeted policy. Only selected processes are protected.
#     mls - Multi Level Security protection.
SELINUXTYPE=targeted
4、Nginx安装方式介绍
Nginx的安装方式有两种分别是:
通过Nginx源码
	通过Nginx源码简单安装 (1)
	通过Nginx源码复杂安装 (3)
通过yum安装 (2)
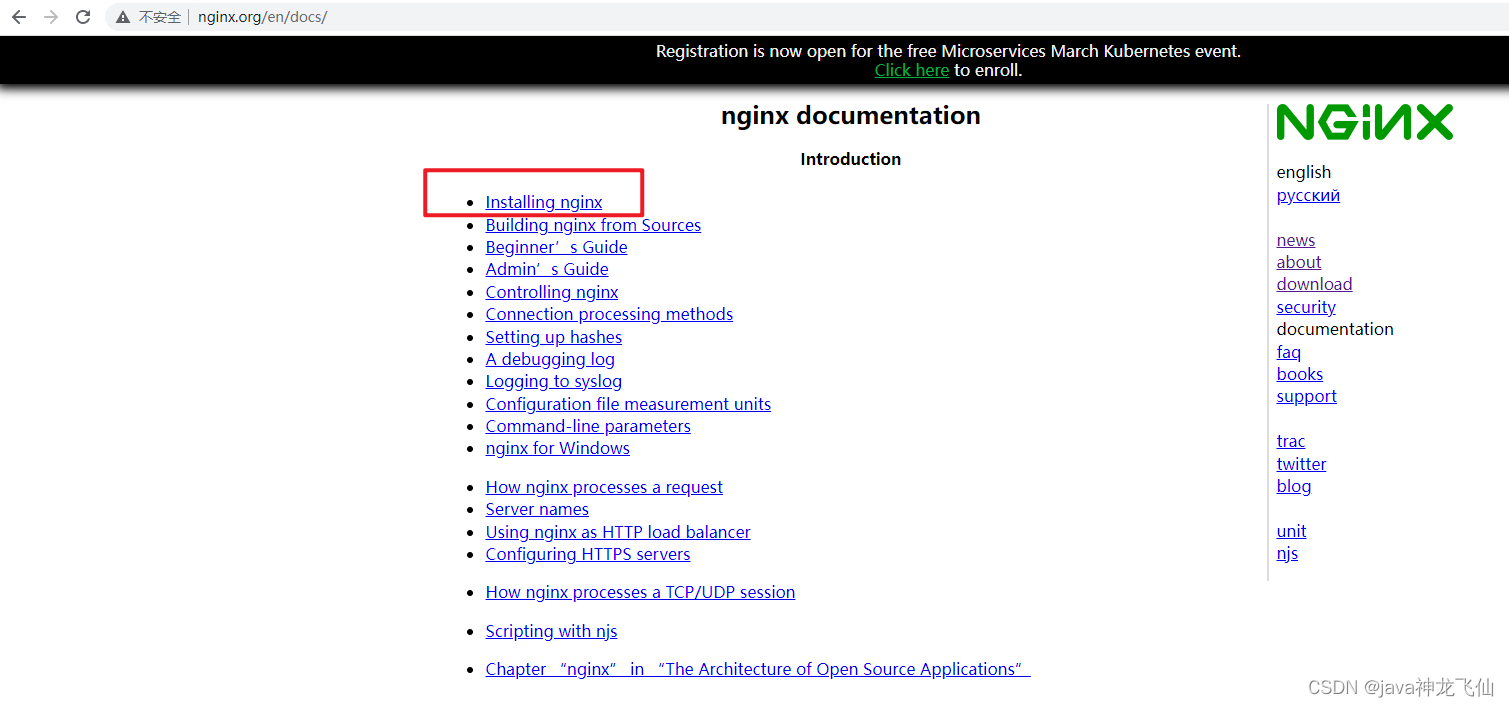
官方文档:http://nginx.org/en/docs/install.html
4.1 准备工作
如果通过Nginx源码安装需要提前准备的内容:
GCC编译器
Nginx是使用C语言编写的程序,因此想要运行Nginx就需要安装一个编译工具。GCC就是一个开源的编译器集合,用于处理各种各样的语言,其中就包含了C语言。
使用命令yum install -y gcc来安装
安装成功后,可以通过gcc --version来查看gcc是否安装成功
PCRE
Nginx在编译过程中需要使用到PCRE库(perl Compatible Regular Expressoin 兼容正则表达式库),因为在Nginx的Rewrite模块和http核心模块都会使用到PCRE正则表达式语法。
可以使用命令yum install -y pcre pcre-devel来进行安装
安装成功后,可以通过rpm -qa pcre pcre-devel来查看是否安装成功
zlib
zlib库提供了开发人员的压缩算法,在Nginx的各个模块中需要使用gzip压缩,所以我们也需要提前安装其库及源代码zlib和zlib-devel
可以使用命令yum install -y zlib zlib-devel来进行安装
安装成功后,可以通过rpm -qa zlib zlib-devel来查看是否安装成功
OpenSSL
OpenSSL是一个开放源代码的软件库包,应用程序可以使用这个包进行安全通信,并且避免被窃听。
SSL:Secure Sockets Layer安全套接协议的缩写,可以在Internet上提供秘密性传输,其目标是保证两个应用间通信的保密性和可靠性。在Nginx中,如果服务器需要提供安全网页时就需要用到OpenSSL库,所以我们需要对OpenSSL的库文件及它的开发安装包进行一个安装。
可以使用命令yum install -y openssl openssl-devel来进行安装
安装成功后,可以通过rpm -qa openssl openssl-devel来查看是否安装成功
上述命令,一个个来的话比较麻烦,我们也可以通过一条命令来进行安装
yum install -y gcc pcre pcre-devel zlib zlib-devel openssl openssl-devel
4.2 方案一:Nginx的源码简单安装
(1)进入官网查找需要下载版本的链接地址,然后使用wget命令进行下载
cd /opt
wget http://nginx.org/download/nginx-1.16.1.tar.gz
(2)解压缩
tar -xzf nginx-1.16.1.tar.gz
(3)进入资源文件中,发现configure
cd nginx-1.16.1
./configure
(4)编译
make
(5)安装
make install
c语言的默认安装目录
[root@k8snode2 nginx-1.16.1]# cd /usr/local/nginx/
[root@k8snode2 nginx]# pwd
/usr/local/nginx
[root@k8snode2 nginx]# ll
total 0
drwxr-xr-x 2 root root 333 Jun  3 07:43 conf
drwxr-xr-x 2 root root  40 Jun  3 07:43 html
drwxr-xr-x 2 root root   6 Jun  3 07:43 logs
drwxr-xr-x 2 root root  19 Jun  3 07:43 sbin
[root@k8snode2 nginx]# cd sbin/
[root@k8snode2 sbin]# ll
total 3736
-rwxr-xr-x 1 root root 3825504 Jun  3 07:43 nginx
[root@k8snode2 sbin]# ./nginx
[root@k8snode2 sbin]# curl localhost
<!DOCTYPE html>
<html>
<head>
<title>Welcome to nginx!</title>
<style>
    body {
        width: 35em;
        margin: 0 auto;
        font-family: Tahoma, Verdana, Arial, sans-serif;
    }
</style>
</head>
<body>
<h1>Welcome to nginx!</h1>
<p>If you see this page, the nginx web server is successfully installed and
working. Further configuration is required.</p>

<p>For online documentation and support please refer to
<a href="http://nginx.org/">nginx.org</a>.<br/>
Commercial support is available at
<a href="http://nginx.com/">nginx.com</a>.</p>

<p><em>Thank you for using nginx.</em></p>
</body>
</html>
如果不能访问,查看防火墙:
[root@k8snode2 sbin]# systemctl status firewalld
● firewalld.service - firewalld - dynamic firewall daemon
   Loaded: loaded (/usr/lib/systemd/system/firewalld.service; disabled; vendor preset: enabled)
   Active: inactive (dead)
     Docs: man:firewalld(1)
4.3 方案二:yum安装
http://nginx.org/en/linux_packages.html#RHEL-CentOS
使用源码进行简单安装,我们会发现安装的过程比较繁琐,需要提前准备GCC编译器、PCRE兼容正则表达式库、zlib压缩库、OpenSSL安全通信的软件库包,然后才能进行Nginx的安装。
(1)安装yum-utils
sudo yum install -y yum-utils
(2)添加yum源文件
vim /etc/yum.repos.d/nginx.repo
[nginx-stable]
name=nginx stable repo
baseurl=http://nginx.org/packages/centos/$releasever/$basearch/
gpgcheck=1
enabled=1
gpgkey=https://nginx.org/keys/nginx_signing.key
module_hotfixes=true

[nginx-mainline]
name=nginx mainline repo
baseurl=http://nginx.org/packages/mainline/centos/$releasever/$basearch/
gpgcheck=1
enabled=0
gpgkey=https://nginx.org/keys/nginx_signing.key
module_hotfixes=true
默认安装稳定版本的镜像源
(3)查看是否安装成功
[root@k8snode2 opt]# yum list | grep nginx
nginx.x86_64                              1:1.20.2-1.el7.ngx           @nginx
nginx-release-centos.noarch               7-0.el7.ngx                  installed
nginx.x86_64                              1:1.22.0-1.el7.ngx           nginx
nginx-debug.x86_64                        1:1.8.0-1.el7.ngx            nginx
nginx-debuginfo.x86_64                    1:1.22.0-1.el7.ngx           nginx
nginx-module-geoip.x86_64                 1:1.22.0-1.el7.ngx           nginx
nginx-module-geoip-debuginfo.x86_64       1:1.22.0-1.el7.ngx           nginx
nginx-module-image-filter.x86_64          1:1.22.0-1.el7.ngx           nginx
nginx-module-image-filter-debuginfo.x86_64
                                          1:1.22.0-1.el7.ngx           nginx
nginx-module-njs.x86_64                   1:1.22.0+0.7.4-1.el7.ngx     nginx
nginx-module-njs-debuginfo.x86_64         1:1.22.0+0.7.4-1.el7.ngx     nginx
nginx-module-perl.x86_64                  1:1.22.0-1.el7.ngx           nginx
nginx-module-perl-debuginfo.x86_64        1:1.22.0-1.el7.ngx           nginx
nginx-module-xslt.x86_64                  1:1.22.0-1.el7.ngx           nginx
nginx-module-xslt-debuginfo.x86_64        1:1.22.0-1.el7.ngx           nginx
nginx-nr-agent.noarch                     2.0.0-12.el7.ngx             nginx
pcp-pmda-nginx.x86_64                     4.3.2-13.el7_9               updates
(4)使用yum进行安装
yum install -y nginx
(5)查看nginx的安装位置
[root@k8snode2 opt]# whereis nginx
nginx: /usr/sbin/nginx /usr/lib64/nginx /etc/nginx /usr/share/nginx /usr/share/man/man8/nginx.8.gz
(6)启动测试
[root@aubin sbin]# cd /usr/sbin/
[root@aubin sbin]# ./nginx
[root@aubin sbin]# curl localhost
<!DOCTYPE html>
<html>
<head>
<title>Welcome to nginx!</title>
<style>
html { color-scheme: light dark; }
body { width: 35em; margin: 0 auto;
font-family: Tahoma, Verdana, Arial, sans-serif; }
</style>
</head>
<body>
<h1>Welcome to nginx!</h1>
<p>If you see this page, the nginx web server is successfully installed and
working. Further configuration is required.</p>

<p>For online documentation and support please refer to
<a href="http://nginx.org/">nginx.org</a>.<br/>
Commercial support is available at
<a href="http://nginx.com/">nginx.com</a>.</p>

<p><em>Thank you for using nginx.</em></p>
</body>
</html>
源码简单安装和yum安装的差异:
这里先介绍一个命令: ./nginx -V,通过该命令可以查看到所安装Nginx的版本及相关配置信息。
简单安装
[root@k8snode2 sbin]# ./nginx -V
nginx version: nginx/1.16.1
built by gcc 4.8.5 20150623 (Red Hat 4.8.5-44) (GCC)
configure arguments:
yum安装
[root@aubin sbin]# ./nginx -V
nginx version: nginx/1.22.0
built by gcc 4.8.5 20150623 (Red Hat 4.8.5-44) (GCC)
built with OpenSSL 1.0.2k-fips  26 Jan 2017
TLS SNI support enabled
configure arguments: --prefix=/etc/nginx --sbin-path=/usr/sbin/nginx --modules-path=/usr/lib64/nginx/modules --conf-path=/etc/nginx/nginx.conf --error-log-path=/var/log/nginx/error.log --http-log-path=/var/log/nginx/access.log --pid-path=/var/run/nginx.pid --lock-path=/var/run/nginx.lock --http-client-body-temp-path=/var/cache/nginx/client_temp --http-proxy-temp-path=/var/cache/nginx/proxy_temp --http-fastcgi-temp-path=/var/cache/nginx/fastcgi_temp --http-uwsgi-temp-path=/var/cache/nginx/uwsgi_temp --http-scgi-temp-path=/var/cache/nginx/scgi_temp --user=nginx --group=nginx --with-compat --with-file-aio --with-threads --with-http_addition_module --with-http_auth_request_module --with-http_dav_module --with-http_flv_module --with-http_gunzip_module --with-http_gzip_static_module --with-http_mp4_module --with-http_random_index_module --with-http_realip_module --with-http_secure_link_module --with-http_slice_module --with-http_ssl_module --with-http_stub_status_module --with-http_sub_module --with-http_v2_module --with-mail --with-mail_ssl_module --with-stream --with-stream_realip_module --with-stream_ssl_module --with-stream_ssl_preread_module --with-cc-opt='-O2 -g -pipe -Wall -Wp,-D_FORTIFY_SOURCE=2 -fexceptions -fstack-protector-strong --param=ssp-buffer-size=4 -grecord-gcc-switches -m64 -mtune=generic -fPIC' --with-ld-opt='-Wl,-z,relro -Wl,-z,now -pie'
解压Nginx目录
执行tar -zxvf nginx-1.16.1.tar.gz对下载的资源进行解压缩,进入压缩后的目录,可以看到如下结构
[root@k8snode2 sbin]# cd /opt/nginx-1.16.1/
[root@k8snode2 nginx-1.16.1]# ll
total 752
drwxr-xr-x 6 1001 1001    326 Jun  3 07:34 auto
-rw-r--r-- 1 1001 1001 296463 Aug 13  2019 CHANGES
-rw-r--r-- 1 1001 1001 452171 Aug 13  2019 CHANGES.ru
drwxr-xr-x 2 1001 1001    168 Jun  3 07:34 conf
-rwxr-xr-x 1 1001 1001   2502 Aug 13  2019 configure
drwxr-xr-x 4 1001 1001     72 Jun  3 07:34 contrib
drwxr-xr-x 2 1001 1001     40 Jun  3 07:34 html
-rw-r--r-- 1 1001 1001   1397 Aug 13  2019 LICENSE
-rw-r--r-- 1 root root    376 Jun  3 07:42 Makefile
drwxr-xr-x 2 1001 1001     21 Jun  3 07:34 man
drwxr-xr-x 3 root root    174 Jun  3 07:43 objs
-rw-r--r-- 1 1001 1001     49 Aug 13  2019 README
drwxr-xr-x 9 1001 1001     91 Jun  3 07:34 src
内容解释:
auto:存放的是编译相关的脚本
CHANGES:版本变更记录
CHANGES.ru:俄罗斯文的版本变更记录
conf:nginx默认的配置文件
configure:nginx软件的自动脚本程序,是一个比较重要的文件,作用如下:
(1)检测环境及根据环境检测结果生成C代码
(2)生成编译代码需要的Makefile文件
contrib:存放的是几个特殊的脚本文件,其中README中对脚本有着详细的说明
html:存放的是Nginx自带的两个html页面,访问Nginx的首页和错误页面
LICENSE:许可证的相关描述文件
man:nginx的man手册
README:Nginx的阅读指南
src:Nginx的源代码
4.4 方案三:Nginx的源码复杂安装
这种方式和简单的安装配置不同的地方在第一步,通过./configure来对编译参数进行设置,需要我们手动来指定。那么都有哪些参数可以进行设置,接下来我们进行一个详细的说明。
[root@k8snode2 nginx-1.16.1]# ./configure --help

  --help                             print this message

  --prefix=PATH                      set installation prefix
  --sbin-path=PATH                   set nginx binary pathname
  --modules-path=PATH                set modules path
  --conf-path=PATH                   set nginx.conf pathname
  --error-log-path=PATH              set error log pathname
  --pid-path=PATH                    set nginx.pid pathname
...
PATH:是和路径相关的配置信息
with:是启动模块,默认是关闭的
without:是关闭模块,默认是开启的
我们先来认识一些简单的路径配置已经通过这些配置来完成一个简单的编译:
–prefix=PATH
指向Nginx的安装目录,默认值为/usr/local/nginx
–sbin-path=PATH
指向(执行)程序文件(nginx)的路径,默认值为<prefix>/sbin/nginx
–modules-path=PATH
指向Nginx动态模块安装目录,默认值为<prefix>/modules
–conf-path=PATH
指向配置文件(nginx.conf)的路径,默认值为<prefix>/conf/nginx.conf
–error-log-path=PATH
指向错误日志文件的路径,默认值为<prefix>/logs/error.log
–http-log-path=PATH
指向访问日志文件的路径,默认值为<prefix>/logs/access.log
–pid-path=PATH
指向Nginx启动后进行ID的文件路径,默认值为<prefix>/logs/nginx.pid
–lock-path=PATH
指向Nginx锁文件的存放路径,默认值为<prefix>/logs/nginx.lock
要想使用可以通过如下命令
./configure --prefix=/usr/local/nginx \
--sbin-path=/usr/local/nginx/sbin/nginx \
--modules-path=/usr/local/nginx/modules \
--conf-path=/usr/local/nginx/conf/nginx.conf \
--error-log-path=/usr/local/nginx/logs/error.log \
--http-log-path=/usr/local/nginx/logs/access.log \
--pid-path=/usr/local/nginx/logs/nginx.pid \
--lock-path=/usr/local/nginx/logs/nginx.lock
在使用上述命令之前,需要将之前服务器已经安装的nginx进行卸载,卸载的步骤分为三步骤:
步骤一:需要将nginx的进程关闭
cd /usr/local/nginx/sbin
./nginx -s stop
步骤二:将安装的nginx进行删除
rm -rf /usr/local/nginx
步骤三:将安装包之前编译的环境清除掉,并进行安装
[root@k8snode2 nginx-1.16.1]# pwd
/opt/nginx-1.16.1
[root@k8snode2 nginx-1.16.1]# make clean
rm -rf Makefile objs
[root@k8snode2 nginx-1.16.1]# ./configure --prefix=/usr/local/nginx \
> --sbin-path=/usr/local/nginx/sbin/nginx \
> --modules-path=/usr/local/nginx/modules \
> --conf-path=/usr/local/nginx/conf/nginx.conf \
> --error-log-path=/usr/local/nginx/logs/error.log \
> --http-log-path=/usr/local/nginx/logs/access.log \
> --pid-path=/usr/local/nginx/logs/nginx.pid \
> --lock-path=/usr/local/nginx/logs/nginx.lock

[root@k8snode2 nginx-1.16.1]# make && make install
make -f objs/Makefile
make[1]: Entering directory `/opt/nginx-1.16.1'

[root@k8snode2 nginx-1.16.1]# cd /usr/local/nginx/sbin/
[root@k8snode2 sbin]# ./nginx -V
nginx version: nginx/1.16.1
built by gcc 4.8.5 20150623 (Red Hat 4.8.5-44) (GCC)
configure arguments: --prefix=/usr/local/nginx --sbin-path=/usr/local/nginx/sbin/nginx --modules-path=/usr/local/nginx/modules --conf-path=/usr/local/nginx/conf/nginx.conf --error-log-path=/usr/local/nginx/logs/error.log --http-log-path=/usr/local/nginx/logs/access.log --pid-path=/usr/local/nginx/logs/nginx.pid --lock-path=/usr/local/nginx/logs/nginx.lock
[root@k8snode2 sbin]#
5、Nginx目录结构分析
在使用Nginx之前,我们先对安装好的Nginx目录文件进行一个分析,在这块给大家介绍一个工具tree,通过tree我们可以很方面的去查看centos系统上的文件目录结构,当然,如果想使用tree工具,就得先通过yum install -y tree来进行安装,安装成功后,可以通过执行tree /usr/local/nginx(tree后面跟的是Nginx的安装目录),获取的结果如下:
[root@k8snode2 sbin]# tree /usr/local/nginx
/usr/local/nginx
├── conf
│   ├── fastcgi.conf
│   ├── fastcgi.conf.default
│   ├── fastcgi_params
│   ├── fastcgi_params.default
│   ├── koi-utf
│   ├── koi-win
│   ├── mime.types
│   ├── mime.types.default
│   ├── nginx.conf
│   ├── nginx.conf.default
│   ├── scgi_params
│   ├── scgi_params.default
│   ├── uwsgi_params
│   ├── uwsgi_params.default
│   └── win-utf
├── html
│   ├── 50x.html
│   └── index.html
├── logs
└── sbin
    └── nginx

4 directories, 18 files
conf:nginx所有配置文件目录
CGI(Common Gateway Interface)通用网关【接口】,主要解决的问题是从客户端发送一个请求和数据,服务端获取到请求和数据后可以调用调用CGI【程序】处理及相应结果给客户端的一种标准规范。
fastcgi.conf:fastcgi相关配置文件
fastcgi.conf.default:fastcgi.conf的备份文件
fastcgi_params:fastcgi的参数文件
fastcgi_params.default:fastcgi的参数备份文件
scgi_params:scgi的参数文件
scgi_params.default:scgi的参数备份文件
uwsgi_params:uwsgi的参数文件
uwsgi_params.default:uwsgi的参数备份文件
mime.types:记录的是HTTP协议中的Content-Type的值和文件后缀名的对应关系
mime.types.default:mime.types的备份文件
nginx.conf:这个是Nginx的核心配置文件,这个文件非常重要,也是我们即将要学习的重点
nginx.conf.default:nginx.conf的备份文件
koi-utf、koi-win、win-utf这三个文件都是与编码转换映射相关的配置文件,用来将一种编码转换成另一种编码
html:存放nginx自带的两个静态的html页面
50x.html:访问失败后的失败页面
** index.html:成功访问的默认首页**
logs:记录入门的文件,当nginx服务器启动后,这里面会有 access.log error.log 和nginx.pid三个文件出现。
sbin:是存放执行程序文件nginx
nginx是用来控制Nginx的启动和停止等相关的命令。
6、Nginx服务器启停命令
Nginx安装完成后,接下来我们要学习的是如何启动、重启和停止Nginx的服务。
对于Nginx的启停在linux系统中也有很多种方式,我们本次课程介绍两种方式:
- Nginx服务的信号控制
- Nginx的命令行控制
6.1 方式一:Nginx服务的信号控制
Nginx中的master和worker进程?
Nginx的工作方式?
如何获取进程的PID?
信号有哪些?
如何通过信号控制Nginx的启停等相关操作?
前面在提到Nginx的高性能,其实也和它的架构模式有关。Nginx默认采用的是多进程的方式来工作的,当将Nginx启动后,我们通过ps -ef | grep nginx命令可以查看到如下内容:
[root@k8snode2 sbin]# ps -ef|grep nginx
root      54934      1  0 12:13 ?        00:00:00 nginx: master process ./nginx
nobody    54935  54934  0 12:13 ?        00:00:00 nginx: worker process
root      55954   2858  0 12:14 pts/0    00:00:00 grep --color=auto nginx
从上图中可以看到,Nginx后台进程中包含一个master进程和多个worker进程,master进程主要用来管理worker进程,包含接收外界的信息,并将接收到的信号发送给各个worker进程,监控worker进程的状态,当worker进程出现异常退出后,会自动重新启动新的worker进程。而worker进程则是专门用来处理用户请求的,各个worker进程之间是平等的并且相互独立,处理请求的机会也是一样的。nginx的进程模型,我们可以通过下图来说明下:
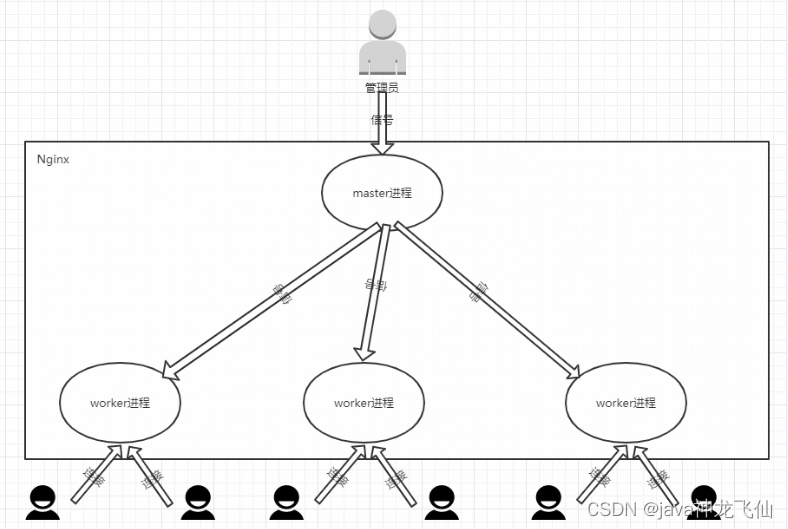
我们现在作为管理员,只需要通过给master进程发送信号就可以来控制Nginx,这个时候我们需要有两个前提条件,一个是要操作的master进程,一个是信号。
(1)要想操作Nginx的master进程,就需要获取到master进程的进程号ID。获取方式简单介绍两个,
方式一:通过ps -ef | grep nginx;
方式二:在讲解nginx的./configure的配置参数的时候,有一个参数是–pid-path=PATH默认是/usr/local/nginx/logs/nginx.pid,所以可以通过查看该文件来获取nginx的master进程ID.
[root@k8snode2 sbin]# ps -ef|grep nginx
root      54934      1  0 12:13 ?        00:00:00 nginx: master process ./nginx
nobody    54935  54934  0 12:13 ?        00:00:00 nginx: worker process
root      55954   2858  0 12:14 pts/0    00:00:00 grep --color=auto nginx
[root@k8snode2 sbin]# cat /usr/local/nginx/logs/nginx.pid
54934
(2)信号
| 信号 | 作用 |
|---|---|
| TERM/INT | 立即关闭整个服务 |
| QUIT | "优雅"地关闭整个服务 |
| HUP | 重读配置文件并使用服务对新配置项生效 |
| USR1 | 重新打开日志文件,可以用来进行日志切割 |
| USR2 | 平滑升级到最新版的nginx |
| WINCH | 所有子进程不在接收处理新连接,相当于给work进程发送QUIT指令 |
调用命令为kill -signal PID
signal:即为信号;PID即为获取到的master线程ID
- 发送TERM/INT信号给master进程,会将Nginx服务立即关闭。
kill -TERM PID / kill -TERM `cat /usr/local/nginx/logs/nginx.pid`
kill -INT PID / kill -INT `cat /usr/local/nginx/logs/nginx.pid`
- 发送QUIT信号给master进程,master进程会控制所有的work进程不再接收新的请求,等所有请求处理完后,在把进程都关闭掉。
kill -QUIT PID / kill -TERM `cat /usr/local/nginx/logs/nginx.pid`
- 发送HUP信号给master进程,master进程会把控制旧的work进程不再接收新的请求,等处理完请求后将旧的work进程关闭掉,然后根据nginx的配置文件重新启动新的work进程
kill -HUP PID / kill -TERM `cat /usr/local/nginx/logs/nginx.pid`
[root@k8snode2 sbin]# ./nginx
[root@k8snode2 sbin]# ps -ef|grep nginx
root      60424      1  0 12:22 ?        00:00:00 nginx: master process ./nginx
nobody    60425  60424  0 12:22 ?        00:00:00 nginx: worker process
root      60576   2858  0 12:22 pts/0    00:00:00 grep --color=auto nginx
[root@k8snode2 sbin]# kill -HUP 60424
[root@k8snode2 sbin]# ps -ef|grep nginx
root      60424      1  0 12:22 ?        00:00:00 nginx: master process ./nginx
nobody    60698  60424  0 12:22 ?        00:00:00 nginx: worker process
root      60723   2858  0 12:22 pts/0    00:00:00 grep --color=auto nginx
- 发送USR1信号给master进程,告诉Nginx重新开启日志文件
kill -USR1 PID / kill -USR1 `cat /usr/local/nginx/logs/nginx.pid`
[root@k8snode2 logs]# pwd
/usr/local/nginx/logs
[root@k8snode2 logs]# ll
total 8
-rw-r--r-- 1 root root 86 Jun  3 12:13 access.log
-rw-r--r-- 1 root root  0 Jun  3 12:13 error.log
-rw-r--r-- 1 root root  6 Jun  3 12:22 nginx.pid
[root@k8snode2 logs]# rm  -rf access.log error.log
[root@k8snode2 logs]# ll
total 4
-rw-r--r-- 1 root root 6 Jun  3 12:22 nginx.pid
[root@k8snode2 logs]# kill -USR1 `cat /usr/local/nginx/logs/nginx.pid`
[root@k8snode2 logs]# ll
total 4
-rw-r--r-- 1 nobody root 0 Jun  3 12:25 access.log
-rw-r--r-- 1 nobody root 0 Jun  3 12:25 error.log
-rw-r--r-- 1 root   root 6 Jun  3 12:22 nginx.pid
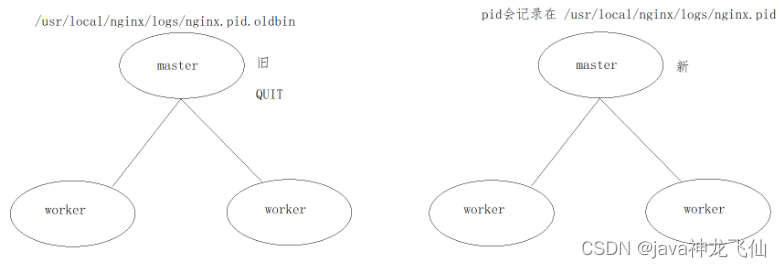
- 发送USR2信号给master进程,告诉master进程要平滑升级,这个时候,会重新开启对应的master进程和work进程,整个系统中将会有两个master进程,并且新的master进程的PID会被记录在
/usr/local/nginx/logs/nginx.pid而之前的旧的master进程PID会被记录在/usr/local/nginx/logs/nginx.pid.oldbin文件中,接着再次发送QUIT信号给旧的master进程,让其处理完请求后再进行关闭
kill -USR2 PID / kill -USR2 `cat /usr/local/nginx/logs/nginx.pid`

kill -QUIT PID / kill -QUIT `cat /usr/local/nginx/logs/nginx.pid.oldbin`
[root@k8snode2 sbin]# ./nginx
[root@k8snode2 sbin]# ps -ef|grep nginx
root      64715      1  0 12:29 ?        00:00:00 nginx: master process ./nginx
nobody    64716  64715  0 12:29 ?        00:00:00 nginx: worker process
root      64773   2858  0 12:29 pts/0    00:00:00 grep --color=auto nginx
[root@k8snode2 sbin]# kill -USR2 64715
[root@k8snode2 sbin]# ps -ef|grep nginx
root      64715      1  0 12:29 ?        00:00:00 nginx: master process ./nginx
nobody    64716  64715  0 12:29 ?        00:00:00 nginx: worker process
root      65511  64715  0 12:30 ?        00:00:00 nginx: master process ./nginx
nobody    65512  65511  0 12:30 ?        00:00:00 nginx: worker process
root      65539   2858  0 12:30 pts/0    00:00:00 grep --color=auto nginx
[root@k8snode2 sbin]# cd ../logs/
[root@k8snode2 logs]# ll
total 12
-rw-r--r-- 1 nobody root  0 Jun  3 12:25 access.log
-rw-r--r-- 1 nobody root 72 Jun  3 12:30 error.log
-rw-r--r-- 1 root   root  6 Jun  3 12:30 nginx.pid
-rw-r--r-- 1 root   root  6 Jun  3 12:29 nginx.pid.oldbin
[root@k8snode2 logs]# kill -QUIT 64715
[root@k8snode2 logs]# ps -ef|grep nginx
root      65511      1  0 12:30 ?        00:00:00 nginx: master process ./nginx
nobody    65512  65511  0 12:30 ?        00:00:00 nginx: worker process
root      66037   2858  0 12:31 pts/0    00:00:00 grep --color=auto nginx
- 发送WINCH信号给master进程,让master进程控制不让所有的work进程在接收新的请求了,请求处理完后关闭work进程。注意master进程不会被关闭掉
kill -WINCH PID /kill -WINCH`cat /usr/local/nginx/logs/nginx.pid`
[root@k8snode2 logs]# ps -ef|grep nginx
root      60424      1  0 12:22 ?        00:00:00 nginx: master process ./nginx
nobody    60698  60424  0 12:22 ?        00:00:00 nginx: worker process
root      63226   2858  0 12:26 pts/0    00:00:00 grep --color=auto nginx
[root@k8snode2 logs]# kill -WINCH `cat /usr/local/nginx/logs/nginx.pid`
[root@k8snode2 logs]# ps -ef|grep nginx
root      60424      1  0 12:22 ?        00:00:00 nginx: master process ./nginx
root      63382   2858  0 12:26 pts/0    00:00:00 grep --color=auto nginx
6.2 方式二:Nginx的命令行控制
此方式是通过Nginx安装目录下的sbin下的可执行文件nginx来进行Nginx状态的控制,我们可以通过nginx -h来查看都有哪些参数可以用:
[root@k8snode2 sbin]# ./nginx -h
nginx version: nginx/1.16.1
Usage: nginx [-?hvVtTq] [-s signal] [-c filename] [-p prefix] [-g directives]

Options:
  -?,-h         : this help
  -v            : show version and exit
  -V            : show version and configure options then exit
  -t            : test configuration and exit
  -T            : test configuration, dump it and exit
  -q            : suppress non-error messages during configuration testing
  -s signal     : send signal to a master process: stop, quit, reopen, reload
  -p prefix     : set prefix path (default: /usr/local/nginx/)
  -c filename   : set configuration file (default: /usr/local/nginx/conf/nginx.conf)
  -g directives : set global directives out of configuration file
-?和-h:显示帮助信息
-v:打印版本号信息并退出
-V:打印版本号信息和配置信息并退出
-t:测试nginx的配置文件语法是否正确并退出
-T:测试nginx的配置文件语法是否正确并列出用到的配置文件信息然后退出
-q:在配置测试期间禁止显示非错误消息
-s:signal信号,后面可以跟 :
** stop[快速关闭,类似于TERM/INT信号的作用]
quit[优雅的关闭,类似于QUIT信号的作用]
reopen[重新打开日志文件类似于USR1信号的作用]
reload[类似于HUP信号的作用]**
-p:prefix,指定Nginx的prefix路径,(默认为: /usr/local/nginx/)
-c:filename,指定Nginx的配置文件路径,(默认为: conf/nginx.conf)
-g:用来补充Nginx配置文件,向Nginx服务指定启动时应用全局的配置
7、Nginx服务器版本升级和新增模块
如果想对Nginx的版本进行更新,或者要应用一些新的模块,最简单的做法就是停止当前的Nginx服务,然后开启新的Nginx服务。但是这样会导致在一段时间内,用户是无法访问服务器。为了解决这个问题,我们就需要用到Nginx服务器提供的平滑升级功能。这个也是Nginx的一大特点,使用这种方式,就可以使Nginx在7*24小时不间断的提供服务了。接下来我们分析下需求:
需求:Nginx的版本最开始使用的是Nginx-1.14.2,由于服务升级,需要将Nginx的版本升级到Nginx-1.16.1,要求Nginx不能中断提供服务。
为了应对上述的需求,这里我们给大家提供两种解决方案:
方案一:使用Nginx服务信号完成Nginx的升级
方案二:使用Nginx安装目录的make命令完成升级
7.1 环境准备
(1)先准备两个版本的Nginx分别是 1.14.2和1.16.1
[root@zqf opt]# pwd
/opt
[root@zqf opt]# ll
drwxr-xr-x.  9 1001 1001       186 Jun  3 16:17 nginx-1.14.2
-rw-r--r--.  1 root root   1015384 Dec  4  2018 nginx-1.14.2.tar.gz
drwxr-xr-x.  8 1001 1001       158 Jun  3 16:20 nginx-1.16.1
-rw-r--r--.  1 root root   1032630 Aug 14  2019 nginx-1.16.1.tar.gz
(2)使用Nginx源码安装的方式将1.14.2版本安装成功并正确访问
cd /opt
wget http://nginx.org/download/nginx-1.14.2.tar.gz
tar -xzf nginx-1.14.2.tar.gz
进入安装目录
cd nginx-1.14.2
./configure
make && make install

[root@zqf nginx-1.14.2]# cd /usr/local/nginx/sbin/
[root@zqf sbin]# ./nginx
[root@zqf sbin]# ./nginx -v
nginx version: nginx/1.14.2
(3)将Nginx1.16.1进行参数配置和编译,不需要进行安装。
在编译之后的obj目录下存在nginx可执行文件
进入安装目录
./configure
make

[root@zqf nginx-1.16.1]# pwd
/opt/nginx-1.16.1
[root@zqf nginx-1.16.1]# ll
total 756
drwxr-xr-x. 6 1001 1001   4096 May 30 22:09 auto
-rw-r--r--. 1 1001 1001 296463 Aug 13  2019 CHANGES
-rw-r--r--. 1 1001 1001 452171 Aug 13  2019 CHANGES.ru
drwxr-xr-x. 2 1001 1001    168 May 30 22:09 conf
-rwxr-xr-x. 1 1001 1001   2502 Aug 13  2019 configure
drwxr-xr-x. 4 1001 1001     72 May 30 22:09 contrib
drwxr-xr-x. 2 1001 1001     40 May 30 22:09 html
-rw-r--r--. 1 1001 1001   1397 Aug 13  2019 LICENSE
-rw-r--r--. 1 root root    376 Jun  3 16:24 Makefile
drwxr-xr-x. 2 1001 1001     21 May 30 22:09 man
drwxr-xr-x. 3 root root    174 Jun  3 16:25 objs
-rw-r--r--. 1 1001 1001     49 Aug 13  2019 README
drwxr-xr-x. 9 1001 1001     91 May 30 22:09 src
[root@zqf nginx-1.16.1]# cd objs/
[root@zqf objs]# ll
total 3856
-rw-r--r--. 1 root root   17107 Jun  3 16:24 autoconf.err
-rw-r--r--. 1 root root   40144 Jun  3 16:24 Makefile
-rwxr-xr-x. 1 root root 3825504 Jun  3 16:25 nginx
-rw-r--r--. 1 root root    5341 Jun  3 16:25 nginx.8
-rw-r--r--. 1 root root    6872 Jun  3 16:24 ngx_auto_config.h
-rw-r--r--. 1 root root     657 Jun  3 16:24 ngx_auto_headers.h
-rw-r--r--. 1 root root    5856 Jun  3 16:24 ngx_modules.c
-rw-r--r--. 1 root root   32320 Jun  3 16:25 ngx_modules.o
drwxr-xr-x. 9 root root      91 Jun  3 16:24 src
7.2 方案一:使用Nginx服务信号进行升级
第一步:将1.14.2版本的sbin目录下的nginx进行备份
cd /usr/local/nginx/sbin
mv nginx nginxold
第二步:将Nginx1.16.1安装目录编译后的objs目录下的nginx文件,拷贝到原来/usr/local/nginx/sbin目录下
[root@zqf sbin]# cp /opt/nginx-1.16.1/objs/nginx /usr/local/nginx/sbin
[root@zqf sbin]# ll
total 7396
-rwxr-xr-x. 1 root root 3825504 Jun  3 16:27 nginx
-rwxr-xr-x. 1 root root 3746752 Jun  3 16:22 nginxold
第三步:发送信号USR2给Nginx的1.14.2版本对应的master进程
[root@zqf sbin]# ps -ef|grep nginx
root      32019      1  0 16:22 ?        00:00:00 nginx: master process ./nginx
nobody    32020  32019  0 16:22 ?        00:00:00 nginx: worker process
root      34626  26759  0 16:30 pts/1    00:00:00 grep --color=auto nginx
[root@zqf sbin]# kill -USR2  `more /usr/local/nginx/logs/nginx.pid`
[root@zqf sbin]# ps -ef|grep nginx
root      32019      1  0 16:22 ?        00:00:00 nginx: master process ./nginx
nobody    32020  32019  0 16:22 ?        00:00:00 nginx: worker process
root      34641  32019  0 16:31 ?        00:00:00 nginx: master process ./nginx
nobody    34642  34641  0 16:31 ?        00:00:00 nginx: worker process
root      34644  26759  0 16:31 pts/1    00:00:00 grep --color=auto nginx
第四步:发送信号QUIT给Nginx的1.14.2版本对应的master进程
kill -QUIT `more /usr/local/logs/nginx.pid.oldbin`

[root@zqf sbin]# cd ../logs/
[root@zqf logs]# ll
total 16
-rw-r--r--. 1 root root 86 Jun  3 16:23 access.log
-rw-r--r--. 1 root root 72 Jun  3 16:31 error.log
-rw-r--r--. 1 root root  6 Jun  3 16:31 nginx.pid
-rw-r--r--. 1 root root  6 Jun  3 16:22 nginx.pid.oldbin
[root@zqf logs]# kill -QUIT `more /usr/local/nginx/logs/nginx.pid.oldbin`
[root@zqf logs]# ps -ef|grep nginx
root      34641      1  0 16:31 ?        00:00:00 nginx: master process ./nginx
nobody    34642  34641  0 16:31 ?        00:00:00 nginx: worker process
root      34658  26759  0 16:32 pts/1    00:00:00 grep --color=auto nginx
[root@zqf logs]# cd ../sbin/
[root@zqf sbin]# ./nginx -v
nginx version: nginx/1.16.1
7.3 方案二:使用Nginx安装目录的make命令完成升级
第一步:将1.14.2版本的sbin目录下的nginx进行备份
cd /usr/local/nginx/sbin
mv nginx nginxold
第二步:将Nginx1.16.1安装目录编译后的objs目录下的nginx文件,拷贝到原来/usr/local/nginx/sbin目录下
cp /opt/nginx-1.16.1/objs/nginx /usr/local/nginx/sbin
第三步:进入到安装目录,执行make upgrade
[root@zqf nginx-1.16.1]# pwd
/opt/nginx-1.16.1
[root@zqf nginx-1.16.1]# make upgrade
/usr/local/nginx/sbin/nginx -t
nginx: the configuration file /usr/local/nginx/conf/nginx.conf syntax is ok
nginx: configuration file /usr/local/nginx/conf/nginx.conf test is successful
kill -USR2 `cat /usr/local/nginx/logs/nginx.pid`
sleep 1
test -f /usr/local/nginx/logs/nginx.pid.oldbin
kill -QUIT `cat /usr/local/nginx/logs/nginx.pid.oldbin`
第四步:查看是否更新成功
./nginx -v

[root@zqf nginx-1.16.1]# cd /usr/local/nginx/sbin/
[root@zqf sbin]# ll
total 7396
-rwxr-xr-x. 1 root root 3825504 Jun  3 16:42 nginx
-rwxr-xr-x. 1 root root 3746752 Jun  3 16:39 nginxold
[root@zqf sbin]# ./nginx -v
nginx version: nginx/1.16.1
在整个过程中,其实Nginx是一直对外提供服务的。并且当Nginx的服务器启动成功后,我们是可以通过浏览器进行直接访问的,同时我们可以通过更改html目录下的页面来修改我们在页面上所看到的内容,那么问题来了,为什么我们要修改html目录下的文件,能不能多添加一些页面是Nginx的功能更加丰富,还有前面聊到Nginx的前端功能又是如何来实现的,这就需要我们对Nginx的核心配置文件进行一个详细的学习。
