智牛股_第9章_CEPH_Swift+文件上传与下载
智牛股_第9章_CEPH_Swift+文件上传与下载
文章目录
- 智牛股_第9章_CEPH_Swift+文件上传与下载
- 学习目标
- 第1章 CEPH Swift Api实践
- 1. 目标
- 2. 步骤
- 3. 实现
- 3.1 Ceph Swift Api 实践说明
- 3.2 Ceph Swift Api 特点
- 3.3 Ceph RGW 介绍
- 3.4 Ceph 存储结构
- 3.5 Ceph Swift Api 服务端的配置
- 3.6 Ceph Swift Api 调用验证
- 2. 总结
- 第2章 用户资料上传与下载功能
- 1. 目标
- 2. 步骤
- 3. 实现
- 3.1 功能流程
- 3.2 Ceph封装与自动化装配
- 3.3 基于snowflake的全局分布式唯一ID
- 3.4 文件上传功能
- 3.5 利用增强Token高效获取信息
- 3.6 上传功能使用验证
- 3.7 文件下载功能
- 3.8 文件下载功能验证
- 4. 总结
- 第3章 Spring Boot 多环境配置与打包发布
- 1. 目标
- 2. 步骤
- 3. 实现
- 3.1 Spring Boot 多环境配置介绍
- 3.2 Spring Boot 多配置规则
- 3.3 本地的开发环境配置使用
- 3.4 多环境打包配置
- 4. 总结
学习目标
目标1:CEPH Swift 服务配置与实践
目标2:CEPH文件操作接口封装与集成使用
目标3:基于SnowFlake算法的全局唯一ID的使用
目标4:统一认证的高性能方案Token增强技术使用
目标5:文件上传与下载接口实现
目标6:Spring Boot多环境配置与打包实践
第1章 CEPH Swift Api实践
1. 目标
-
掌握Ceph Swift Api 特点与存储结构
-
掌握Ceph Swift Api 的配置与使用, 完成文件的上传与下载接口, 为下面的项目集成使用与封装做预热。
2. 步骤
- Ceph Swift Api 实践说明
- Ceph Swift Api 特点
- Ceph RGW 介绍
- Ceph 存储结构
- Ceph Swift Api 服务配置
- Ceph Swift Api 调用验证
3. 实现
3.1 Ceph Swift Api 实践说明
前面我们讲过ceph的集群安装与使用,集群有一定操作难度,大家要通过集群安装加强对Ceph的理解与运用,ceph是一个分布式文件存储系统,需要至少准备三至四台虚拟机, 之前有过详细介绍,可参考之前的讲义, 就不再赘述。
在ceph的使用上, 之前我们是采用fs文件系统, 并编写了相应的api来操作演示。 但互联网大规模的文件场景下, fs并不能满足生产的使用要求,rados本地化操作也不便于服务的接入与使用, 这里我们就要采用Ceph Swift Api 来实现文件的存储管理。
3.2 Ceph Swift Api 特点
Swift是由Rackspace开发的用来为云计算提供可扩展存储的项目。专注于对象存储, 并提供一套REST风格的Api来访问, 与Ceph强一致性不同, 它是最终一致性。两者都是优秀的开源项目, 并无明显优劣之分,在使用场景上有所不同, 如果是专注于对象存储, 那么可以选择swift即可满足需要, 如果还有块存储要求, 那么选择Ceph更为合适。这里选择Ceph, 因为通过网关可以适配兼容swift api, 同时在数据访问上具有较强的扩展性:
- Ceph可通过Rados网关用兼容S3的RESTful API访问,对AWS云环境下的其他内容也能很好的兼容, 比如OpenStack Swift的对象存储访问接口。
- CephFS:是一个POSIX兼容的文件系统,可以在任何Linux发行版上运行,操作系统可直接访问Ceph存储。
- RDB:RBD是一个Linux内核级的块设备,允许用户像任何其他Linux块设备一样访问Ceph。
- ISCSI 网关: 这一增加的功能是SUSE加上去的,它允许管理员在Ceph之上运行iSCSI网关,从而将其转变为任何操作系统都可以访问的SAN文件管理器。
在一些大型互联网公司也开始采用 Ceph Swift 接口来处理海量文件信息, 参考:携程网的Ceph实践之路
3.3 Ceph RGW 介绍
Ceph可以提供块、文件和对象三种形态的存储。RGW就是提供对象存储的网关,也即对象存储网关。所谓对象存储网关,也就是对象存储的入口,本质上是一个HTTP服务器,与Nginx和Apache无特殊差别。通过这个网关入口,用户可以采用HTTP协议,以RESTful的方式访问Ceph的对象存储。Ceph网关能够适配兼容AWS S3和OpenStack Swift 的API接口。
3.4 Ceph 存储结构
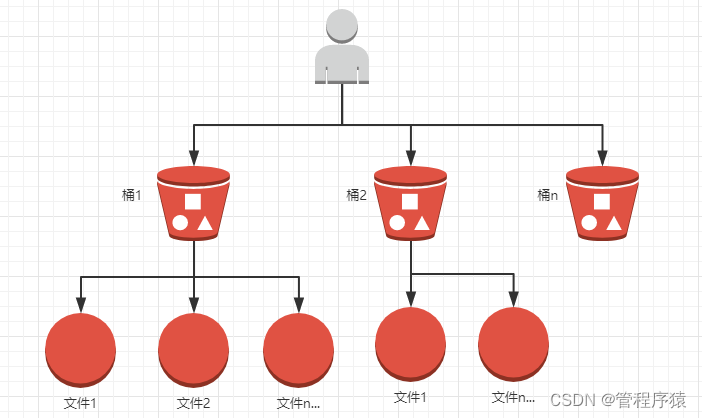
在使用对象存储之前, 先要了解桶(container容器)概念及其存储结构:
Ceph Swift Api的调用, 需要先创建相应用户进行认证才能操作, 每个用户下面可以创建多个桶, 桶里面可以存储对象,对象就是各种数据文件, 包括文档, 图片等。传统上传文件的使用, 我们往往会指定路径信息, 在这里, 桶和对象的关系好比文件夹与文件的概念, 不同之处是桶不能再嵌套桶, 也就是没有层级路径的概念。
Ceph存储结构:
3.5 Ceph Swift Api 服务端的配置
- 确保集群正常安装并启动:
[root@CENTOS7-1 ceph-cluster]# ceph -s
  cluster:
    id:     0ec99aa9-e97e-43d3-b5b9-90eb21c4abff
    health: HEALTH_OK

  services:
    mon: 3 daemons, quorum CENTOS7-1,CENTOS7-2,CENTOS7-3
    mgr: centos7-1(active), standbys: centos7-3, centos7-2
    mds: fs_test-1/1/1 up  {0=centos7-1=up:active}
    osd: 3 osds: 3 up, 3 in
    rgw: 3 daemons active

  data:
    pools:   9 pools, 128 pgs
    objects: 257  objects, 166 KiB
    usage:   3.0 GiB used, 57 GiB / 60 GiB avail
    pgs:     128 active+clean
-
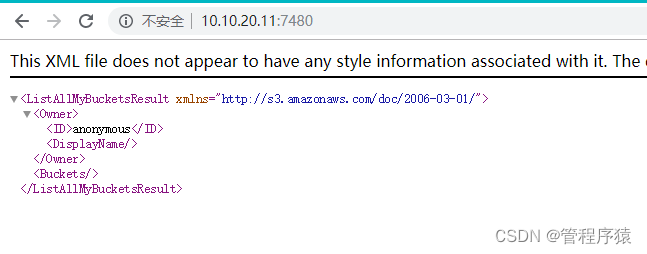
验证网关是否正常
访问地址,http://10.10.20.11:7480
出现以下提示代表正常
- 创建Swift用户, 用于接口请求认证
sudo radosgw-admin user create --subuser="cephtester:subtester" --uid="cephtester" --display-name="cephtester" --key-type=swift --secret="654321" --access=full
uid 为主用户, subuser为子用户信息, secret指定密钥, 不指定则随机生成, access拥有权限设定。
返回结果:
{
    "user_id": "cephtester",
    "display_name": "cephtester",
    "email": "",
    "suspended": 0,
    "max_buckets": 1000,
    "auid": 0,
    "subusers": [
        {
            "id": "cephtester:subtester",
            "permissions": "full-control"
        }
    ],
    "keys": [],
    "swift_keys": [
        {
            "user": "cephtester:subtester",
            "secret_key": "654321"
        }
    ],
    "caps": [],
    "op_mask": "read, write, delete",
    "default_placement": "",
    "placement_tags": [],
    "bucket_quota": {
        "enabled": false,
        "check_on_raw": false,
        "max_size": -1,
        "max_size_kb": 0,
        "max_objects": -1
    },
    "user_quota": {
        "enabled": false,
        "check_on_raw": false,
        "max_size": -1,
        "max_size_kb": 0,
        "max_objects": -1
    },
    "temp_url_keys": [],
    "type": "rgw",
    "mfa_ids": []
}
记住swift_keys下面的user和secret_key信息, 代码中需使用。
-
激活管理后台的对象存储模块:
-
创建一个管理用户:
radosgw-admin user create --uid=mgruser --display-name=mgruser --system返回结果:
{
    "user_id": "mgruser",
    "display_name": "mgruser",
    "email": "",
    "suspended": 0,
    "max_buckets": 1000,
    "auid": 0,
    "subusers": [],
    "keys": [
        {
            "user": "mgruser",
            "access_key": "XZDC4Y0AORE01NMYU3VV",
            "secret_key": "me0Z80HLvctkzzBs74ufXS0Wi947NBe6Wpj3MxKP"
        }
    ],
    "swift_keys": [],
    "caps": [],
    "op_mask": "read, write, delete",
    "system": "true",
    "default_placement": "",
    "placement_tags": [],
    "bucket_quota": {
        "enabled": false,
        "check_on_raw": false,
        "max_size": -1,
        "max_size_kb": 0,
        "max_objects": -1
    },
    "user_quota": {
        "enabled": false,
        "check_on_raw": false,
        "max_size": -1,
        "max_size_kb": 0,
        "max_objects": -1
    },
    "temp_url_keys": [],
    "type": "rgw",
    "mfa_ids": []
}
根据生成的access_key与secret_key, 执行:
ceph dashboard set-rgw-api-access-key XZDC4Y0AORE01NMYU3VV
ceph dashboard set-rgw-api-secret-key me0Z80HLvctkzzBs74ufXS0Wi947NBe6Wpj3MxKP
打开管理界面,http://10.10.20.11:18843 可以查看到我们刚才创建的两个用户:

3.6 Ceph Swift Api 调用验证
-
修改ceph-demo工程:
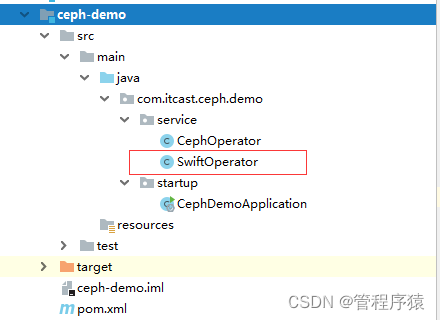
增加SwiftOperator接口:
@Component
@Log4j2
public class SwiftOperator {

    /**
     * 用户名信息, 格式: 主用户名:子用户名
     */
    private String username ="cephtester:subtester";

    /**
     * 用户密码
     */
    private String password = "654321";

    /**
     * 接口访问地址
     */
    private String authUrl = "http://10.10.20.11:7480/auth/1.0";

    /**
     * 默认存储的容器名称
     */
    private String defaultContainerName = "user_datainfo";

    /**
     * Ceph的账户信息
     */
    private Account account = null;

    /**
     * Ceph的容器信息
     */
    private Container container;

    /**
     * 进行Ceph的初始化配置
     */
    public SwiftOperator() {
        // 1. Ceph的账户信息配置
        AccountConfig config = new AccountConfig();
        config.setUsername(username);
        config.setPassword(password);
        config.setAuthUrl(authUrl);
        config.setAuthenticationMethod(AuthenticationMethod.BASIC);
        account = new AccountFactory(config).createAccount();

        // 2.获取容器信息
        Container newContainer = account.getContainer(defaultContainerName);
        if(!newContainer.exists()) {
            container = newContainer.create();
            log.info("container create ==> " + defaultContainerName);
        }else {
            container = newContainer;
        }

    }

    /**
     * 文件上传处理
     * @param remoteName
     * @param filePath
     */
    public void createObject(String remoteName, String filePath) {
        // 1. 从容器当中获取远程存储对象信息
        StoredObject object = container.getObject(remoteName);
        // 2. 执行文件上传处理
        object.uploadObject(new File(filePath));
    }


    /**
     * 文件的下载处理
     * @param objectName
     * @param outPath
     */
    public void retrieveObject(String objectName, String outPath) {
        // 1. 从容器当中获取远程存储对象信息
        StoredObject object = container.getObject(objectName);
        // 2. 执行文件的下载方法
        object.downloadObject(new File(outPath));

    }

    /**
     * 获取用户下面的所有容器信息
     * @return
     */
    public List listContainer() {
        List list = new ArrayList();
        Collection<Container> containers = account.list();
        for(Container container : containers) {
            list.add(container.getName());
            log.info("current container name : " + container.getName());
     }
        return list;
    }


}
这里的用户名和密码填写上面我们所生成的信息。注意路径地址后缀为: /auth/1.0
CephDemoApplication启动类重新封装:
@SpringBootApplication @ComponentScan(basePackages = {"com.itcast"}) public class CephDemoApplication { public static void main(String[] args) throws Exception { // Swift Api接口调用验证 swiftApi(); } /** * Rados Api的封装处理 * @throws Exception */ public static void radosApi(String[] args) throws Exception { System.out.println("start...."); String username = "admin"; String monIp = "10.10.20.11:6789;10.10.20.12:6789;10.10.20.13:6789"; String userKey = "AQBZBypdMchvBRAAbWVnIGyYNvxWQZ2UkuiYew=="; String mountPath = "/"; CephOperator cephOperate = null; try { String opt = (args == null || args.length < 1)? "" : args[0]; cephOperate = new CephOperator(username, monIp, userKey, mountPath); if("upload".equals(opt)) { cephOperate.uploadFileByPath("/temp_upload_fs", args[1]); }else if("download".equals(opt)) { cephOperate.downloadFileByPath("/temp_download_fs", args[1]); }else { System.out.println("Unrecognized Command! Usage opt[upload|download] filename[path]!"); } }catch(Exception e) { e.printStackTrace(); }finally { if(null != cephOperate) { cephOperate.umount(); } } System.out.println("end...."); } /** * 通过Swift接口操作ceph集群 * @throws Exception */ public static void swiftApi() throws Exception { ConfigurableApplicationContext appContext = SpringApplication.run(CephDemoApplication.class); // 1. 先打印出用户的容器信息 SwiftOperator swiftOperator = appContext.getBean(SwiftOperator.class); swiftOperator.listContainer(); String objName = "test_ceph"; // 2. 上传指定的文件 swiftOperator.createObject(objName, "d:/test_swift_ceph.txt"); // 3. 从ceph下载文件到指定的路径下面 swiftOperator.retrieveObject(objName, "e:/test.txt"); System.out.println("complete"); } } -
测试验证
测试思路, 在d盘创建一个文件, 并上传到ceph系统, 然后从ceph系统下载到指定路径下面。
这里要注意,我们默认的容器配置的是”user_datainfo“, 从ceph系统上传和下载的文件名称要一致, 启动打印"complete" , 无异常代表执行成功。

这里简要演示, 接下来会讲解如何在项目中集成使用。
2. 总结
- Ceph提供了多种API调用方式, 这里采用了兼容性较强的Ceph Swift Api调用方式,了解Ceph RGW的功能作用, 在API调用之前, 必须要做好对应的服务配置, 从该案例中, 对Ceph Api的使用要有一定了解, 接下来会在项目中做具体集成使用。
第2章 用户资料上传与下载功能
1. 目标
- 掌握Ceph的封装与自动化装配
- 掌握基于snowflake的全局ID使用
- 完成上传与下载功能
2. 步骤
- 用户资料上传与下载的业务功能流程
- Ceph封装与自动化装配
- 文件上传功能实现
- Snowflake全局分布式ID实现
- 利用增强token技术获取上传用户信息
- 上传功能的使用验证
- 文件下载功能的实现
- 文件下载功能验证
3. 实现
3.1 功能流程
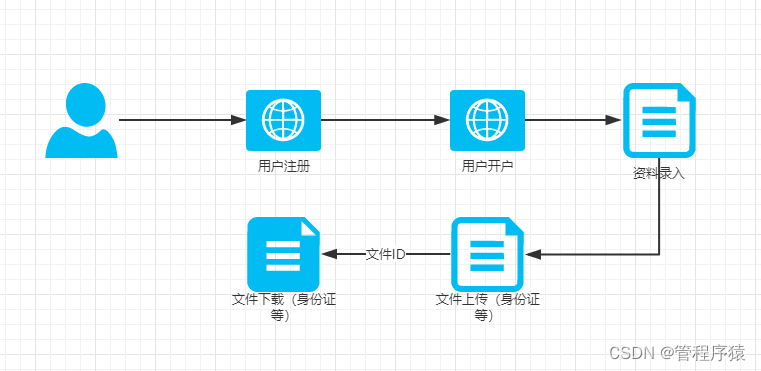
在用户开户功能中, 需要填写用户资料, 上传身份证等证明文件, 业务上步骤是分离处理, 系统需提供用户的文件上传 与下载接口。
3.2 Ceph封装与自动化装配
-
新建stock-starter工程, 用于封装自动化组件。
-
创建ceph自动化工程:
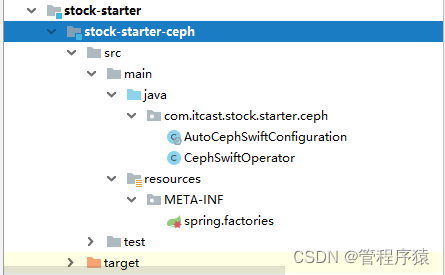
-
pom文件依赖:
<dependencies>
        <!-- ceph 依赖 -->
        <dependency>
            <groupId>com.ceph</groupId>
            <artifactId>rados</artifactId>
            <version>0.6.0</version>
        </dependency>

        <!-- ceph fs 操作依赖 -->
        <dependency>
            <groupId>com.ceph</groupId>
            <artifactId>libcephfs</artifactId>
            <version>0.80.5</version>
        </dependency>

        <!-- ceph swift 依赖 -->
        <dependency>
            <groupId>org.javaswift</groupId>
            <artifactId>joss</artifactId>
            <version>0.10.2</version>
        </dependency>
    </dependencies>
直接采用目前的最新版, 加入以上三个依赖, fs依赖不需要也可以去除。
-
代码实现
封装Ceph操作接口, CephSwiftOperator类:
public class CephSwiftOperator { private static final Logger log = LoggerFactory.getLogger(MethodHandles.lookup().lookupClass()); /** * 用户名 */ private String username; /** * 密码 */ private String password; /** * 认证接入地址 */ private String authUrl; /** * 默认容器名称 */ private String defaultContainerName; /** * Ceph账户对象 */ private Account account; /** * Ceph容器对象 */ private Container container; public CephSwiftOperator(String username, String password, String authUrl, String defaultContainerName) { // 初始化配置信息 this.username = username; this.password = password; this.authUrl = authUrl; this.defaultContainerName = defaultContainerName; init(); } /** * 初始化建立连接 */ public void init() { try { // Ceph用户认证配置 AccountConfig config = new AccountConfig(); config.setUsername(username); config.setPassword(password); config.setAuthUrl(authUrl); config.setAuthenticationMethod(AuthenticationMethod.BASIC); account = new AccountFactory(config).createAccount(); // 获取容器 Container newContainer = account.getContainer(defaultContainerName); if (!newContainer.exists()) { container = newContainer.create(); log.info("account container create ==> " + defaultContainerName); } else { container = newContainer; log.info("account container exists! ==> " + defaultContainerName); } }catch(Exception e) { // 做异常捕获, 避免服务不能正常启动 log.error("Ceph连接初始化异常: " + e.getMessage()); } } /** * 上传对象 * @param remoteName * @param filepath */ public void createObject(String remoteName, String filepath) { StoredObject object = container.getObject(remoteName); object.uploadObject(new File(filepath)); } /** * 上传文件对象(字节数组形式) * @param remoteName * @param inputStream */ public void createObject(String remoteName, byte[] inputStream) { StoredObject object = container.getObject(remoteName); object.uploadObject(inputStream); } /** * 获取指定对象 * @param containerName * @param objectName * @param outpath */ public void retrieveObject(String objectName,String outpath){ StoredObject object = container.getObject(objectName); object.downloadObject(new File(outpath)); } /** * 下载文件, 转为文件流形式 * @param objectName * @return */ public InputStream retrieveObject(String objectName){ StoredObject object = container.getObject(objectName); return object.downloadObjectAsInputStream(); } /** * 删除指定文件对象 * @param containerName * @param objectName * @return */ public boolean deleteObject(String objectName){ try { StoredObject object = container.getObject(objectName); object.delete(); return !object.exists(); }catch(Exception e) { log.error("Ceph删除文件失败: " + e.getMessage()); } return false; } /** * 获取所有容器 * @return */ public List listContainer() { List list = new ArrayList(); Collection<Container> containers = account.list(); for (Container currentContainer : containers) { list.add(currentContainer.getName()); System.out.println(currentContainer.getName()); } return list; } }-
此封装接口将纳入Spring 容器管理, 即为单例, 构造函数会初始化Ceph认证连接等信息
-
将Account 与Container 设为成员变量, 便于复用, 减少开销。
-
初始化会默认一个容器名称, 一般每个服务设置一个容器名称, 如果业务功能比较庞杂, 可以每个业务模块设置一个容器。
-
Swift Api已经做了较完善的封装, 我们内部使用比较简单, 主要封装上传和下载接口, 为便于调用处理, 做了进一步封装。
AutoCephSwiftConfiguration自动化配置类:
@Configuration
@EnableAutoConfiguration
@ConditionalOnProperty(name = "ceph.authUrl")
public class AutoCephSwiftConfiguration {

    @Value("${ceph.username}")
    private String username;
    @Value("${ceph.password}")
    private String password;
    @Value("${ceph.authUrl}")
    private String authUrl;
    @Value("${ceph.defaultContainerName}")
    private String defaultContainerName;


    @Bean
    public CephSwiftOperator cephSwiftOperator() {
        return new CephSwiftOperator(username, password, authUrl, defaultContainerName);
    }

}
ConditionalOnProperty根据ceph.authUrl属性来决定是否加载配置,如果配置文件中没有设置Ceph相关属性, 即使maven中引用, 启动也不会报错。 该自动化配置, 负责初始化一个Ceph Swift 接口操作实例。
-
-
工程配置:
要让自定义Ceph Starter真正生效, 必须遵循Spring boot 的SPI扩展机制, 在resources环境中, META-INF目录下, 创建spring.factories文件:
# Auto Configure
org.springframework.boot.autoconfigure.EnableAutoConfiguration=\
com.itcast.stock.starter.ceph.AutoCephSwiftConfiguration
指定我们上面所写的自动化配置类。
-
用户服务工程配置:
bootstrap.yml增加:
# ceph swift 认证信息配置
ceph:
  username: cephtester:subtester
  password: 654321
  authUrl: http://10.10.20.11:7480/auth/1.0
  defaultContainerName: user_datainfo
3.3 基于snowflake的全局分布式唯一ID
-
snowflake算法:
snowflake是Twitter开源的分布式ID生成算法,结果是一个long型的ID。其核心思想是:使用41bit作为毫秒数,10bit作为机器的ID(5个bit是数据中心,5个bit的机器ID),12bit作为毫秒内的流水号(意味着每个节点在每毫秒可以产生 4096 个 ID),最后还有一个符号位,永远是0。

-
第一位:
占用1bit,其值始终是0,预置为0。
-
时间戳
占用41bit,精确到毫秒,总共可以容纳约140年的时间。
-
工作机器ID
占用10bit,其中高位5bit是数据中心ID(datacenterId),低位5bit是工作节点ID(workerId),做多可以容纳1024个节点。
-
序列号
占用12bit,这个值在同一毫秒同一节点上从0开始不断累加,最多可以累加到4095。
了解snowflake的原理, 那么同一毫秒, 能生成的全局唯一不重复ID?
计算公式, 2^10 * 2^12 = 1024 * 4096 = 4194304。 完全可以满足高并发的场景使用要求。
-
Java代码实现:
/**
 * <p>名称:GlobalIDGenerator.java</p>
 * <p>描述:分布式自增长ID</p>
 * <pre>
 *     Twitter的 Snowflake JAVA实现方案
 * </pre>
 * 核心代码为其GlobalIDGenerator这个类实现,其原理结构如下,我分别用一个0表示一位,用—分割开部分的作用:
 * 1||0---0000000000 0000000000 0000000000 0000000000 0 --- 00000 ---00000 ---000000000000
 * 在上面的字符串中,第一位为未使用(实际上也可作为long的符号位),接下来的41位为毫秒级时间,
 * 然后5位datacenter标识位,5位机器ID(并不算标识符,实际是为线程标识),
 * 然后12位该毫秒内的当前毫秒内的计数,加起来刚好64位,为一个Long型。
 * 这样的好处是,整体上按照时间自增排序,并且整个分布式系统内不会产生ID碰撞(由datacenter和机器ID作区分),
 * 并且效率较高,经测试,snowflake每秒能够产生26万ID左右,完全满足需要。
 * <p>
 * 64位ID (42(毫秒)+5(机器ID)+5(业务编码)+12(重复累加))
 * 生成ID示例;
 * 1154628864413139070
 * 1154628864413139071
 * 1154628864413139072
 * 1154628864413139073
 */
public class GlobalIDGenerator {
    // 时间起始标记点,作为基准,一般取系统的最近时间(一旦确定不能变动)
    private final static long twepoch = 1288834974657L;
    // 机器标识位数
    private final static long workerIdBits = 5L;
    // 数据中心标识位数
    private final static long datacenterIdBits = 5L;
    // 机器ID最大值
    private final static long maxWorkerId = -1L ^ (-1L << workerIdBits);
    // 数据中心ID最大值
    private final static long maxDatacenterId = -1L ^ (-1L << datacenterIdBits);
    // 毫秒内自增位
    private final static long sequenceBits = 12L;
    // 机器ID偏左移12位
    private final static long workerIdShift = sequenceBits;
    // 数据中心ID左移17位
    private final static long datacenterIdShift = sequenceBits + workerIdBits;
    // 时间毫秒左移22位
    private final static long timestampLeftShift = sequenceBits + workerIdBits + datacenterIdBits;

    private final static long sequenceMask = -1L ^ (-1L << sequenceBits);
    /* 上次生产id时间戳 */
    private static long lastTimestamp = -1L;
    // 0,并发控制
    private long sequence = 0L;

    // 机器标识id, 分布式服务需设置不同编号, 不能超过31
//    @Value("${snowflake.workerId:1}")
    private final long workerId;
    // 数据标识id部分, 业务编码, 不能超过31
//    @Value("${snowflake.datacenterId:1}")
    private final long datacenterId;

    public GlobalIDGenerator() {
        this.datacenterId = getDatacenterId(maxDatacenterId);
        this.workerId = getMaxWorkerId(datacenterId, maxWorkerId);
    }

    /**
     * @param workerId     工作机器ID
     * @param datacenterId 序列号
     */
    public GlobalIDGenerator(long workerId, long datacenterId) {
        if (workerId > maxWorkerId || workerId < 0) {
            throw new IllegalArgumentException(String.format("worker Id can't be greater than %d or less than 0", maxWorkerId));
        }
        if (datacenterId > maxDatacenterId || datacenterId < 0) {
            throw new IllegalArgumentException(String.format("datacenter Id can't be greater than %d or less than 0", maxDatacenterId));
        }
        this.workerId = workerId;
        this.datacenterId = datacenterId;
    }

    /**
     * 获取下一个ID
     *
     * @return
     */
    public synchronized long nextId() {
        long timestamp = timeGen();
        if (timestamp < lastTimestamp) {
            throw new RuntimeException(String.format("Clock moved backwards.  Refusing to generate id for %d milliseconds", lastTimestamp - timestamp));
        }

        if (lastTimestamp == timestamp) {
            // 当前毫秒内,则+1
            sequence = (sequence + 1) & sequenceMask;
            if (sequence == 0) {
                // 当前毫秒内计数满了,则等待下一秒
                timestamp = tilNextMillis(lastTimestamp);
            }
        } else {
            sequence = 0L;
        }
        lastTimestamp = timestamp;
        // ID偏移组合生成最终的ID,并返回ID
        long nextId = ((timestamp - twepoch) << timestampLeftShift)
                | (datacenterId << datacenterIdShift)
                | (workerId << workerIdShift) | sequence;

        return nextId;
    }

    /**
     * 获取下一个ID, 字符形式
     * @return
     */
    public synchronized  String nextStrId(){
        return String.valueOf(nextId());
    }

    private long tilNextMillis(final long lastTimestamp) {
        long timestamp = this.timeGen();
        while (timestamp <= lastTimestamp) {
            timestamp = this.timeGen();
        }
        return timestamp;
    }

    private long timeGen() {
        return System.currentTimeMillis();
    }

    /**
     * <p>
     * 获取 maxWorkerId
     * </p>
     */
    protected static long getMaxWorkerId(long datacenterId, long maxWorkerId) {
        StringBuffer mpid = new StringBuffer();
        mpid.append(datacenterId);
        String name = ManagementFactory.getRuntimeMXBean().getName();
        if (!name.isEmpty()) {
            /*
             * GET jvmPid
             */
            mpid.append(name.split("@")[0]);
        }
        /*
         * MAC + PID 的 hashcode 获取16个低位
         */
        return (mpid.toString().hashCode() & 0xffff) % (maxWorkerId + 1);
    }

    /**
     * <p>
     * 数据标识id部分
     * </p>
     */
    protected static long getDatacenterId(long maxDatacenterId) {
        long id = 0L;
        try {
            InetAddress ip = InetAddress.getLocalHost();
            NetworkInterface network = NetworkInterface.getByInetAddress(ip);
            if (network == null) {
                id = 1L;
            } else {
                byte[] mac = network.getHardwareAddress();
                id = ((0x000000FF & (long) mac[mac.length - 1])
                        | (0x0000FF00 & (((long) mac[mac.length - 2]) << 8))) >> 6;
                id = id % (maxDatacenterId + 1);
            }
        } catch (Exception e) {
            System.out.println(" getDatacenterId: " + e.getMessage());
        }
        return id;
    }

    public static void main(String[] args) {
        GlobalIDGenerator id = new GlobalIDGenerator(0, 1);
        for (int i = 0; i < 10000; i++) {
            System.err.println(id.nextId());
        }
    }
}
通过nextId方法, 直接生成全局唯一ID,该方法是有加锁处理,基于内存计算,不易产生阻塞, 实测每秒能产生26万ID(不同机器配置存在差别), 这里模拟一万条, 执行非常快。
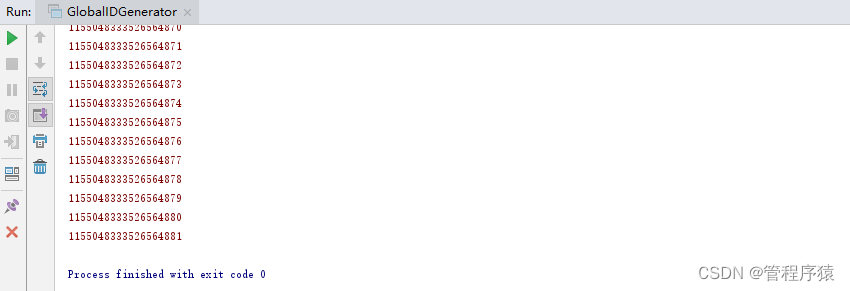
采用SnowFlake方案, 实现与配置简单, 能保证全局唯一性, 同时还具有ID序列特征(单节点的有序性)。
- 项目集成
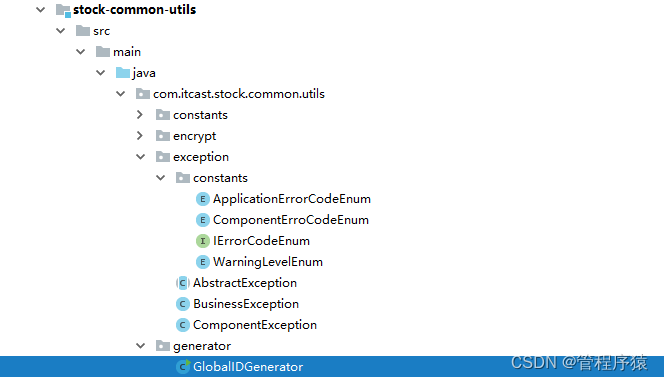
把它作为一个工具类, 放在stock-common-utils工程中。
用户服务工程使用:
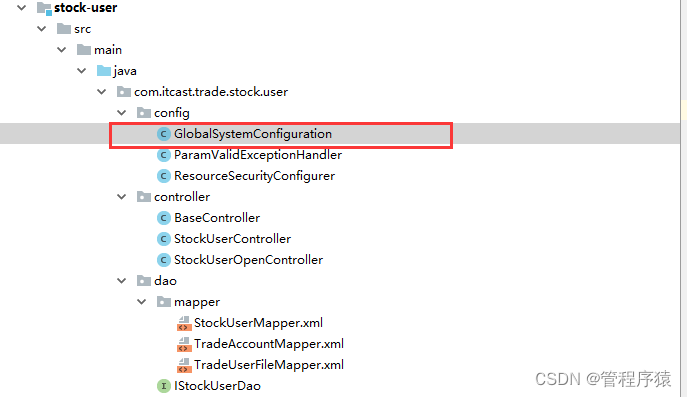
在GlobalSystemConfiguration中, 配置bean, 纳入容器管理, 不用每次调用创建新对象, 减少开销:
    ...

    @Value("${snowflake.workerId}")
    private Long workerId;
    @Value("${snowflake.datacenterId}")
    private Long datacenterId;

    /**
     * 全局ID生成器
     * @return
     */
    @Bean
    public  GlobalIDGenerator globalIDGenerator() {
        if(null == workerId || null == datacenterId) {
            return new GlobalIDGenerator();
        }
        return new GlobalIDGenerator(workerId, datacenterId);
    }
如果没有配置workerId与datacenterId, 内部将会自动生成对应值。
bootstrap.yml配置:
# 全局唯一ID分布式标识配置
snowflake:
  workerId: 1
  datacenterId: 1
如果服务需要部署集群,按序号配置对应值, 不能随便配置, 每个服务配置的值不能重复,并且不能超过32, 因为workerId和datacenterId只有5bit,最大值为2^5。
3.4 文件上传功能
-
先创建实体:
@Data
public class TradeUserFile extends  BaseEntity {

    /**
     * 主键标识
     */
    private Long id;

    /**
     * 用户ID
     */
    private Long userId;

    /**
     * 业务类型(0:身份证, 1:银行卡, 2:信用卡)
     */
    private int bizType;

    /**
     * 文件ID
     */
    private String fileId;

    /**
     * 文件名称
     */
    private String filename;

    /**
     * 文件类型
     */
    private String fileType;

    /**
     * 文件路径
     */
    private String filePath;

    /**
     * 状态(0:有效, 1:无效)
     */
    private int status;

    /**
     * 创建时间
     */
    private Date createTime;

    /**
    * 更新时间
     */
    private Date updateTime;
}
与用户ID关联, 文件ID需保持全局唯一(支持分布式场景), 每个文件都有所属业务类型, 可以扩展。
-
Dao数据层实现
@Repository
public interface ITradeUserFileDao {

    /**
     * 新增用户文件
     * @param record
     * @return
     */
    int insert(TradeUserFile record);

    /**
     * 更新用户文件
     * @param record
     * @return
     */
    int update(TradeUserFile record);

    /**
     * 根据用户ID获取对象
     * @param userId
     * @return
     */
    List<TradeUserFile> getByUserId(Long userId);

    /**
     * 根据文件标识ID获取对象
     * @param fileId
     * @return
     */
    TradeUserFile getByUserIdAndBizType(@Param("userId") Long userId, @Param("bizType")Integer bizType);

    /**
     * 根据文件ID获取对象
     * @param userId
     * @param bizType
     * @return
     */
    TradeUserFile getByFileId(@Param("fileId") Long fileId);

}
有五个数据层操作接口, 支持新增, 修改, 查询功能。 注意如果存在多个参数, 需要加上@Param注解,该注解全路径为org.apache.ibatis.annotations.Param,不要引用同名的其他路径注解。
TradeUserFileMapper文件:
    <select id="getByUserId" resultMap="BaseResultMap">
      select id,
        userId, bizType, fileId,
        filename, fileType, filePath,
        status, createTime,updateTime
      from t_trade_user_file
      where userId = #{userId}
    </select>

    <select id="getByFileId" resultMap="BaseResultMap">
      select id,
        userId, bizType, fileId,
        filename, fileType, filePath,
        status, createTime,updateTime
      from t_trade_user_file
      where fileId = #{fileId}
    </select>

    <select id="getByUserIdAndBizType" resultMap="BaseResultMap">
      select id,
        userId, bizType, fileId,
        filename, fileType, filePath,
        status, createTime,updateTime
      from t_trade_user_file
      where userId = #{userId} and bizType = #{bizType}
    </select>


    <insert id="insert" parameterType="com.itcast.bulls.stock.entity.user.TradeUserFile">
        <selectKey keyProperty="id" order="AFTER" resultType="java.lang.Long">
            SELECT LAST_INSERT_ID()
        </selectKey>
        insert into t_trade_user_file (userId, bizType, fileId,
        filename, fileType, filePath,
        status, createTime)
        values (#{userId,jdbcType=BIGINT}, #{bizType,jdbcType=TINYINT}, #{fileId,jdbcType=VARCHAR},
        #{filename,jdbcType=VARCHAR}, #{fileType,jdbcType=VARCHAR}, #{filePath,jdbcType=VARCHAR},
        #{status,jdbcType=TINYINT}, #{createTime,jdbcType=TIMESTAMP})
    </insert>


    <insert id="update" parameterType="com.itcast.bulls.stock.entity.user.TradeUserFile">
        update t_trade_user_file
        set
            fileId = #{fileId},
            filename = #{filename},
            fileType = #{fileType}
        where
            id = #{id}
    </insert>
insert 采用 selectKey方式获取主键, 插入完成之后, 会将ID保存至参数对象TradeUserFile的ID中。
-
Service层实现:
@Service public class StockUserFileServiceImpl implements IStockUserFileService { @Autowired private CephSwiftOperator cephSwiftOperator; @Autowired private GlobalIDGenerator globalIDGenerator; @Autowired private ITradeUserFileDao tradeUserFileDao; /** * 上传用户文件 * @return */ @Override public String uploadUserIdCard(Long userId, MultipartFile file) throws Exception { if(null == file) { // 文件不能为空 throw new ComponentException(ApplicationErrorCodeEnum.PARAMS_FILE_NOT_NULL); } // 获取唯一文件ID标识 String remoteFileId = globalIDGenerator.nextStrId(); // 上传文件至CEPH cephSwiftOperator.createObject(remoteFileId, file.getBytes()); // 查找对应用户文件 TradeUserFile dbTradeUserFile = tradeUserFileDao.getByUserIdAndBizType(userId, GlobalConstants.FILE_BIZ_TYPE_IDCARD); if(null == dbTradeUserFile){ // 新增用户文件 dbTradeUserFile = new TradeUserFile(); dbTradeUserFile.setBizType(GlobalConstants.FILE_BIZ_TYPE_IDCARD); dbTradeUserFile.setFilename(file.getOriginalFilename()); dbTradeUserFile.setFileType(file.getContentType()); dbTradeUserFile.setFileId(remoteFileId); dbTradeUserFile.setUserId(userId); dbTradeUserFile.setCreateTime(new Date()); tradeUserFileDao.insert(dbTradeUserFile); }else { // 清理原有文件对象 cephSwiftOperator.deleteObject(dbTradeUserFile.getFileId()); // 更新用户文件 dbTradeUserFile.setFileId(remoteFileId); dbTradeUserFile.setFilename(file.getOriginalFilename()); dbTradeUserFile.setFileType(file.getContentType()); tradeUserFileDao.update(dbTradeUserFile); } return remoteFileId; } }-
先做校验, 获取全局文件ID标识, 采用雪花算法实现, 支持分布式, 每秒可以产生26万ID, 能够满足高并发场景要求。
-
上传文件至Ceph系统, 通过封装的cephSwiftOperator实现, ceph 可以支持文件流和字节数组方式传递, 文件不是很大的情况, 可以直接采用字节数组方式。
-
在保存数据库之前, 先要查找用户之前是否已经上传过该业务类型文件, 如果为空, 则新增;
-
如果之前已经上传, 则覆盖更新, 每个用户的每个业务类型, 只能存在一条数据。 在覆盖更新之前,
要将原来上传的物理文件删除, 再做更新。
-
注意整体的实现顺序,是有考究的。 这里实现了多个功能, 为尽量保证一致性, 我们把容易出现问题的文件上传功能放在前面执行, 因为依赖第三方ceph服务, 且持续时间较长; 把SQL操作放在最后。 这样就不会出现有数据库记录, 但没有文件存在的情况。 当然, 弊端是如果数据库保存失败, 上传的文件就成了临时文件, 但这种情况不影响业务, 是可以接收的, 因为业务数据的一致性就更为重要, 后面也可以通过补偿机制, 清理无效的临时文件。
-
-
Controller层实现:
在StockUserController下面, 增加用户身份证上传接口:
@PostMapping("/uploadIdCard")
public ApiRespResult uploadIdCard(@RequestParam("file") MultipartFile file) {
    ApiRespResult  result = null;
    try {
        // 获取用户ID
        Long userId = getUserId();
        // 保存用户上传文件
        String userFileId = stockUserFileService.uploadUserIdCard(userId, file);
        result = ApiRespResult.success(userFileId);
    }catch(ComponentException e) {
        log.error(e.getMessage(), e);
        result = ApiRespResult.error(e.getErrorCodeEnum());
    }catch(Exception e) {
        log.error(e.getMessage(), e);
        result = ApiRespResult.sysError(e.getMessage());
    }
    return result;
}
通过Spring boot实现文件上传, 注意以表单form形式提交, 类型为multipart/form-data, 参数名为file, 非直接数据流方式上传, 不然服务不能正常识别接收文件。
文件上传还有个必要参数是用户ID, 但这里没有设置参数来接收, 我们直接通过增强的TOKEN获取到用户ID, 减少不必要的参数传递。
getUserId()方法,可以先作为空实现, 完成下面token增强的封装后再做完善.
3.5 利用增强Token高效获取信息
-
方案说明
在微服务中, OATUH2的TOKEN处理方案有多种, 有通过统一网关加工处理, 其他服务不参与, 直接通过网关获取用户信息, 但网关职能变得就不再单一, 且其他服务安全性薄弱;有通过JWT TOKEN方式, 各服务直接从JWT中获取用户信息, 但附带信息有限, 且要加解密处理,占用计算成本, 传递JWT的长度比之前token增加数倍; 还有方案是, 各服务直接拿token远程调用认证服务, 获取用户信息,远程连接开销非常高, 且增加认证服务的压力。
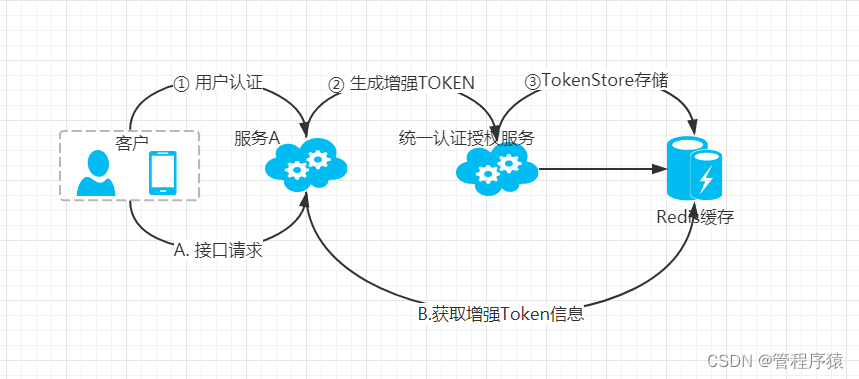
方案其实是可以灵活多样, 这里我们采用一种更高性能的方案:
-
用户认证, 生成增强Token(增加用户ID,账号等主要信息), 存储至Redis缓存中。
-
在接下来的接口请求当中, 通过Token去Redis缓存里面直接获取增强Token信息, 从而获取用户ID等主要信息。
-
这种方案相比以上方案, 能减少交互次数,不再需要请求统一认证服务, 减少加密解密等计算成本, 同时减少数据传递, 只要最基本的Token即可。但此方案的弊端, 必须认证服务和各个服务都能直接访问Redis缓存, 如果是跨项目, 跨区域, 需要暴露外网的情形下, 那么不推荐此方案, 毕竟还是要保障数据的安全性。
-
项目集成使用
这里, 需要通过增强token来获取用户的ID信息, 便于我们在接入层使用。
修改用户服务工程stock-user:
-
封装BaseController, 作为所有Controller的基类, 这里处理一些公用逻辑,便于复用。
getUserId() 获取用户ID方法实现:
/** * 获取当前请求的token * @return */ protected String getCurrentToken() { HttpServletRequest request = ((ServletRequestAttributes) RequestContextHolder.getRequestAttributes()) .getRequest(); String token = request.getHeader("Authorization"); if(null != token) { token = token.replace(OAuth2AccessToken.BEARER_TYPE, "").trim(); } return token; } /** * 返回用户ID * @return */ protected Long getUserId() throws ComponentException { // 获取TOKEN信息 OAuth2AccessToken auth2AccessToken = tokenStore.readAccessToken(getCurrentToken()); if(null == auth2AccessToken) { throw new ComponentException(ApplicationErrorCodeEnum.SYS_NOT_VALID_TOKEN); } // 获取TOKEN的增强信息 Map<String, Object> additionalInfos = auth2AccessToken.getAdditionalInformation(); if(null == additionalInfos) { throw new ComponentException(ApplicationErrorCodeEnum.SYS_NOT_ACCESS_USER); } // 获取用户ID信息 Long userId= (Long)additionalInfos.get(GlobalConstants.OAUTH_DETAILS_USER_ID); if(null == userId) { throw new ComponentException(ApplicationErrorCodeEnum.SYS_NOT_ACCESS_USER); } return userId; }- 先获取Token, 每个接口请求,都会在头部附带Bearer Token, 由getCurrentToken方法负责处理。
- 根据Token, 通过TokenStore从缓存中获取信息, 为空则抛出异常。
- 拿到缓存信息后, 从Map<String, Object>里面获取用户ID, 同时做相应的异常判断。
-
TokenStore从哪来? 这里要做相应配置
在GlobalSystemConfiguration中配置:
    ...

    @Autowired
    private RedisConnectionFactory redisConnectionFactory;


    /**
     * TokenStore实现方式, 采用Redis缓存
     * @return
     */
    @Bean
    public TokenStore tokenStore() {
        RedisTokenStore tokenStore = new RedisTokenStore(redisConnectionFactory);
        tokenStore.setPrefix(GlobalConstants.OAUTH_PREFIX_KEY);
     return tokenStore;
    }
这里要与认证服务的TokenStore的配置保持一致,否则不能正常拿到Token缓存。
注意增加依赖:
-
最后, 在工程配置中增加Redis配置信息:
spring:
  # Redis 缓存配置
  redis:
    host: 127.0.0.1
    password:
    port: 6379
这样, 启动工程之后, 就可以直接BaseController的getUserId方法获取用户ID, 在上面的上传文件功能controller层实现就可以可调用封装的方法。 -
3.6 上传功能使用验证
-
启动服务
-
启动ceph集群(ceph -s 确认状态是正常)
-
启动trade-auth服务
-
启动stock-user服务
-
-
申请token
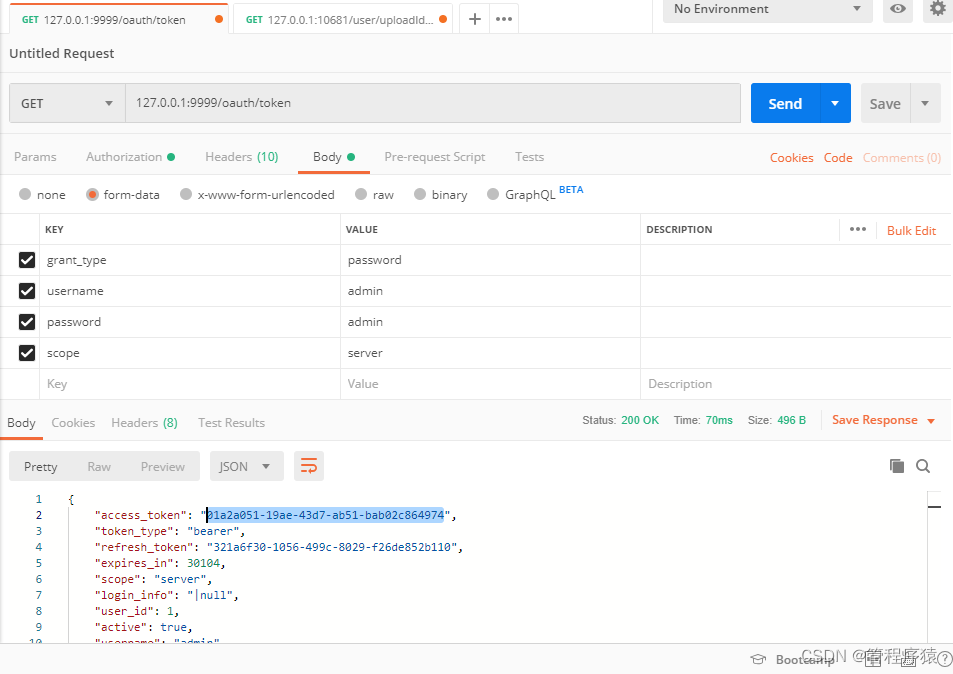
-
上传文件
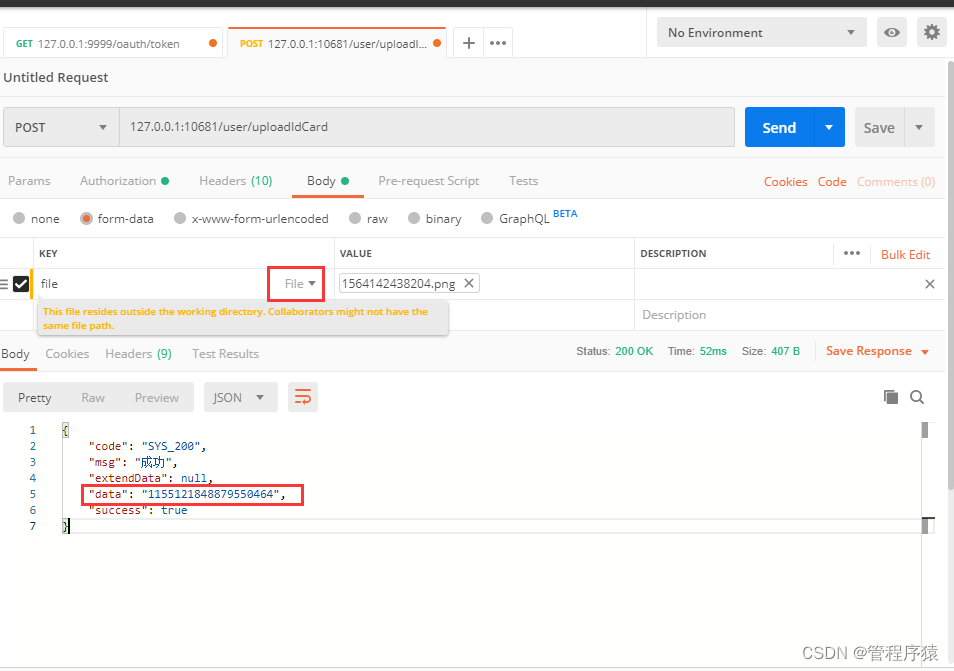
注意构造参数, 表单为form形式, 参数名称为file, 类型要选择File, 才能选择文件。
可以看到接口成功返回了文件ID: 1155121848879550464。
-
查看数据库

查看t_trade_user_file表, 数据成功保存。
接下来实现文件下载功能, 验证文件能否通过ceph成功获取。
3.7 文件下载功能
新增一个接口, 根据文件ID标识下载文件。
-
Dao层:
ITradeUserFileDao接口:
    /**
     * 根据文件ID获取对象
     * @param userId
     * @param bizType
     * @return
     */
    TradeUserFile getByFileId(@Param("fileId") Long fileId);
增加根据文件ID获取文件信息的接口。
-
Service层:
StockUserFileServiceImpl:
/** * 根据文件ID查找文件对象 * @param fileId * @return */ @Override public TradeUserFile getTradeUserFile(String fileId) { return tradeUserFileDao.getByFileId(Long.valueOf(fileId)); } -
Controller层:
    @RequestMapping(value = "/downloadFile", method = {RequestMethod.GET, RequestMethod.POST} )
    public  ApiRespResult downloadFile(@NotBlank(message = "文件ID不能为空!") String fileId) {

       HttpServletResponse response = ((ServletRequestAttributes) RequestContextHolder.getRequestAttributes())
                .getResponse();

        // 获取用户文件
        TradeUserFile tradeUserFile = stockUserFileService.getTradeUserFile(fileId);
        if (null == tradeUserFile) {
            return ApiRespResult.error(ApplicationErrorCodeEnum.USER_FILE_NOT_FOUND);
        }
        BufferedInputStream bis = null;
        OutputStream os = null;
        try {
            // 获取文件流
            InputStream inputStream = cephSwiftOperator.retrieveObject(fileId);
            if(null == tradeUserFile.getFileType()) {
                response.setContentType("application/force-download");// 设置强制下载不打开
            }
            // 设置文件响应类型
            response.setContentType(tradeUserFile.getFileType());
            // 设置文件名
            response.addHeader("Content-Disposition", "attachment;fileName=" + tradeUserFile.getFilename());
            // 流式缓冲下载处理
            byte[] buffer = new byte[1024];
            bis = new BufferedInputStream(inputStream);
            os = response.getOutputStream();
            int i = bis.read(buffer);
            while (i != -1) {
                os.write(buffer, 0, i);
                i = bis.read(buffer);
            }
            os.flush();
            return null;
        } catch (Exception e) {
            log.error(e.getMessage(), e);
        } finally {
            if (bis != null) {
                try {
                    // 关闭输入流
                    bis.close();
                } catch (IOException e) {
                    log.error(e.getMessage(), e);
                }
            }
        }

        return ApiRespResult.sysError("下载失败!");
    }
为便于演示, RequestMapping中增加get方法支持。 获取HttpServletResponse对象, 也可通过参数方式获取。 参数@NotBlank做了自动化校验。
需要增加约束性异常检查, 先检查类头部是否有@Validated注解:
@Validated
public class StockUserController extends BaseController
再检查拦截器中是否存在对ConstraintViolationException异常处理:
/** * 拦截约束性校验异常 * @param cve * @return */ @ExceptionHandler(ConstraintViolationException.class) @ResponseStatus(HttpStatus.BAD_REQUEST) @ResponseBody public ApiRespResult handleConstraintViolationException(ConstraintViolationException cve){ String msg = ""; Set<ConstraintViolation<?>> cves = cve.getConstraintViolations(); for (ConstraintViolation<?> constraintViolation : cves) { msg += constraintViolation.getMessage(); } // 组装错误提示返回 ApiRespResult errorWebResult = ApiRespResult.validError(msg); return errorWebResult; }-
通过service方法, 获取用户文件信息, 如果未找到, 抛出异常。
-
根据文件ID, 从ceph服务器获取文件流,直接输出至客户端,不用再通过临时文件方式输出, 提升处理效率, 上百兆的大文件就不要采用此方式。
-
设置响应类型与文件名称, 便于浏览器及客户端正确识别处理。
-
通过流式缓冲下载处理, 如果网络带宽, 服务器内存配置比较高, 可以将缓冲扩大。
-
最后, 不要忘记关闭流式操作对象, 所有流式操作, 都要养成良好操作习惯, 使用完毕及时释放资源。
不关闭流不会产生内存泄露, 但是会产生系统资源泄露(file descriptor );虽然finalize方法有调用close来释放fd, 但是执行时间点是存在不确定性, 在高并发场景下, 极易出现问题。
-
3.8 文件下载功能验证
- 重新启动用户服务, 访问新增的用户下载接口, 组装参数:
http://127.0.0.1:10681/user/downloadFile?fileId=1155121848879550464&access_token=01a2a051-19ae-43d7-ab51-bab02c864974
填写上传返回的文件ID, 受认证权限控制, 需要附带access_token参数。
- 在浏览器中访问:

可以看到, 文件成功下载。
4. 总结
- 回顾整体实现流程, 先做好Ceph的封装与自动化装配, 便于集成使用; 实现文件上传功能需要记录用户信息, 通过Token增强技术来获取, 高效便捷; 采用snowflake全局分布式ID, 支持分布式微服务使用,且性能良好;最后实现文件下载功能, 对整个流程的功能进行验证。
第3章 Spring Boot 多环境配置与打包发布
1. 目标
- 掌握Spring Boot 多环境配置与打包发布
2. 步骤
- Spring Boot 多环境配置介绍
- Spring Boot 多环境配置规则
- 本地的开发环境配置使用
- 多环境打包配置实现
3. 实现
3.1 Spring Boot 多环境配置介绍
在项目开发过程中, 会存在多个环境, 每个环境的服务器地址不一样,比如redis,数据库等, 在敏捷迭代式交付中, 需要频发更新打包, 完成新需求与版本缺陷。这就需要根据不同环境编写不同配置, 通过MAVEN生成支持各种环境的运行包。
大型互联网微服务项目, 一般会采用统一配置中心来解决此问题, 循序渐进, 先通过Spring Boot本地化多版本配置文件方式来实现不同环境的配置管理, 后面会通过配置中心方式做生产级的集成实践方案。
3.2 Spring Boot 多配置规则
一般Spring Boot 项目, 支持的配置文件多种多样, 比如application.yml、application.properties、优先级更高的bootstrap.yml和bootstrap.properties等。
多环境配置文件名需要满足application-{profile}.properties的格式,其中{profile}对应的是环境标识, 可以自定义填写。 一般定义规则:
application-dev.properties:开发环境
application-uat.properties:测试集成环境
application-prd.properties:生产环境
定义这么多配置文件,那么Spring boot 怎么知道是读取哪个配置文件?
这就还需再定义一个配置文件, 名称为application.properties(用其他application.yml也可以),通过spring.profiles.active属性来设置对应的{profile}值。
也可以通过参数-Dspring.profiles.active来指定{profile}值, 从易读与维护性考虑,建议采用默认配置文件方式。
3.3 本地的开发环境配置使用
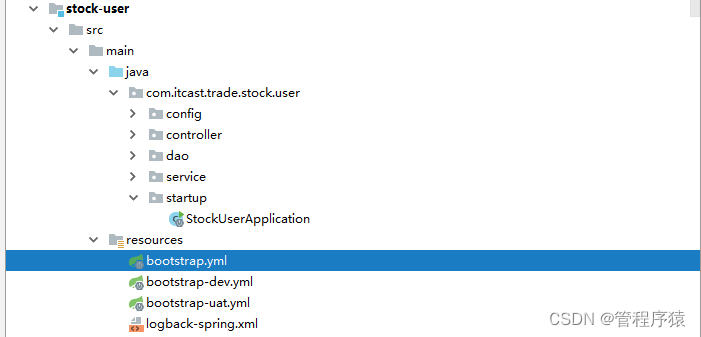
在本地环境中, 建立了两套配置, 一套是本地的dev环境, 另一套是用于联调集成测试的uat环境。
bootstrap.yml配置:
spring:
  profiles:
    active: ${package.environment}
这里没有明确指定一个环境,设置的是一个MAVEN变量。
最新版本的Idea是可以识别MAVEN变量, 老版本是不能识别, 解决方法:
打开Run->Edit Configurations, 在Active Profile输入框中指定配置环境。
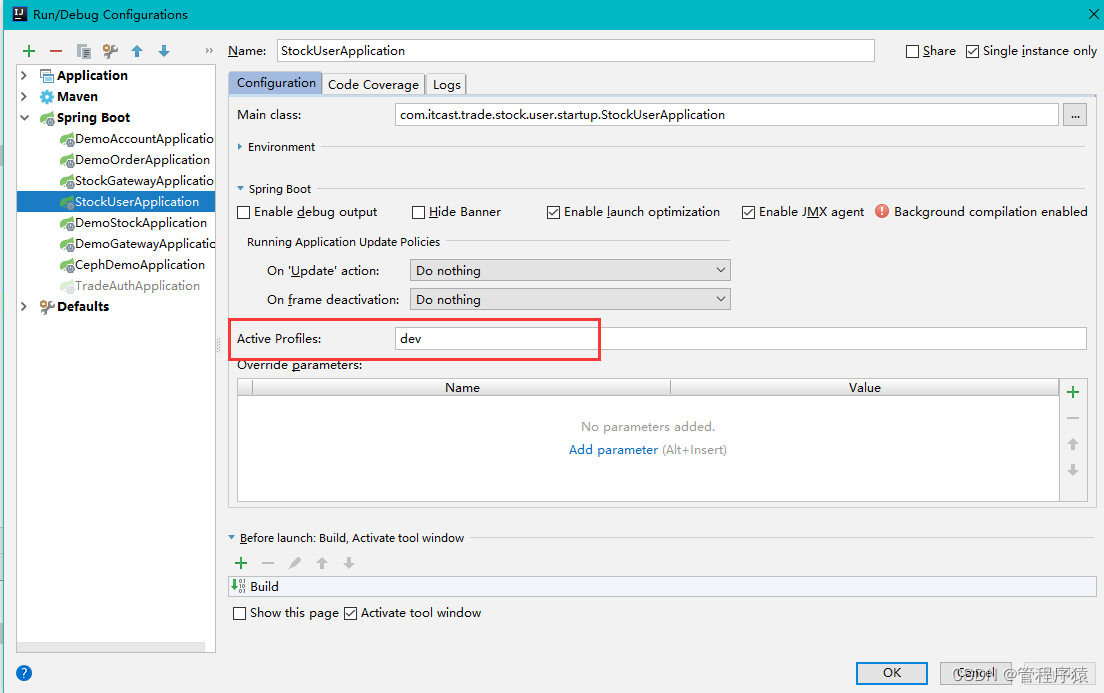
这样, 每次运行就不用再去指定配置文件, 本地环境专门维护bootstrap-dev.yml即可。
接下来如何打包处理? MAVEN是怎么识别? 是否会存在冲突?
3.4 多环境打包配置
-
修改pom.xml文件, 增加以下内容:
<profiles> <profile> <id>dev</id> <activation> <activeByDefault>true</activeByDefault> </activation> <properties> <package.environment>dev</package.environment> </properties> </profile> <profile> <id>uat</id> <properties> <package.environment>uat</package.environment> </properties> </profile> <profile> <id>prd</id> <properties> <package.environment>prd</package.environment> </properties> </profile> </profiles> <build> <finalName>stock-user-${package.environment}</finalName> <plugins> <plugin> <groupId>org.apache.maven.plugins</groupId> <artifactId>maven-resources-plugin</artifactId> <executions> <execution> <id>default-resources</id> <phase>validate</phase> <goals> <goal>copy-resources</goal> </goals> <configuration> <outputDirectory>target/classes</outputDirectory> <useDefaultDelimiters>false</useDefaultDelimiters> <delimiters> <delimiter>${*}</delimiter> </delimiters> <resources> <resource> <directory>src/main/resources/</directory> <filtering>true</filtering> </resource> <resource> <directory>src/main/java</directory> <includes> <include>**/*.xml</include> </includes> <filtering>false</filtering> </resource> </resources> </configuration> </execution> </executions> </plugin> <plugin> <groupId>org.springframework.boot</groupId> <artifactId>spring-boot-maven-plugin</artifactId> <executions> <execution> <goals> <goal>repackage</goal> </goals> </execution> </executions> </plugin> </plugins> </build>-
profiles标签为配置文件标识。这里设置了三个环境, dev, uat和prd。通过activeByDefault标签, 默认激活的是dev环境, 下面的 properties定义了变量package.environment,如果是最新版的IDEA, 可直接运行程序, 会自动识别dev配置文件。
-
buid标签是打包配置, 要注意resources下面增加src/main/java目录扫描:
<resource>
    <directory>src/main/java</directory>
    <includes>
        <include>**/*.xml</include>
    </includes>
    <filtering>false</filtering>
</resource>
此项配置是打包环境变量下, mapper目录下的xml文件, 防止启动报错。
-
-
配置打包命令:
打开maven视图,找到stock-user用户服务工程, 创建打包命令:
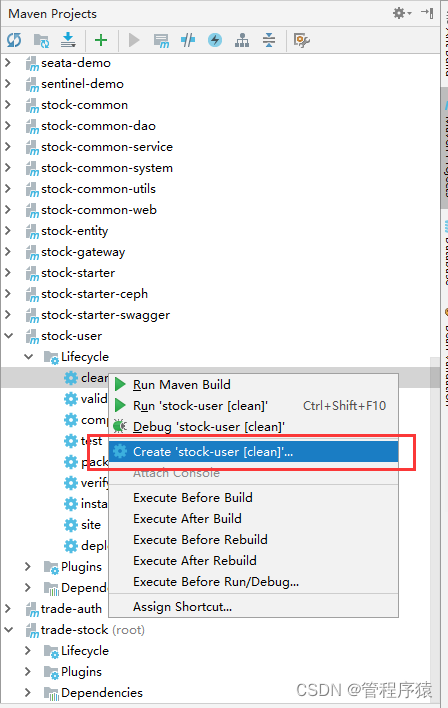
填写clean install -P uat 这里的-P参数是指定profile环境

接下来执行新创建的命令:
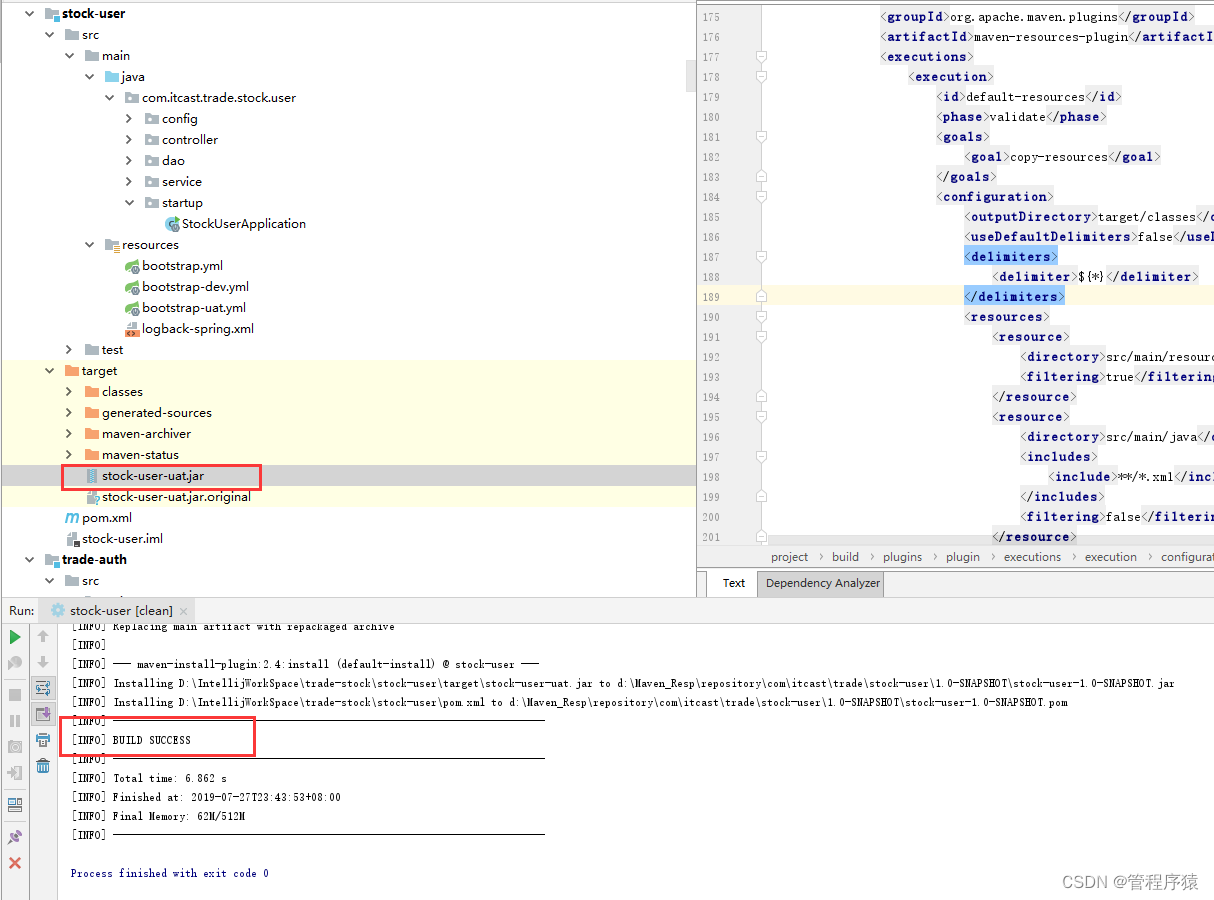
打包成功, 并生成jar包:
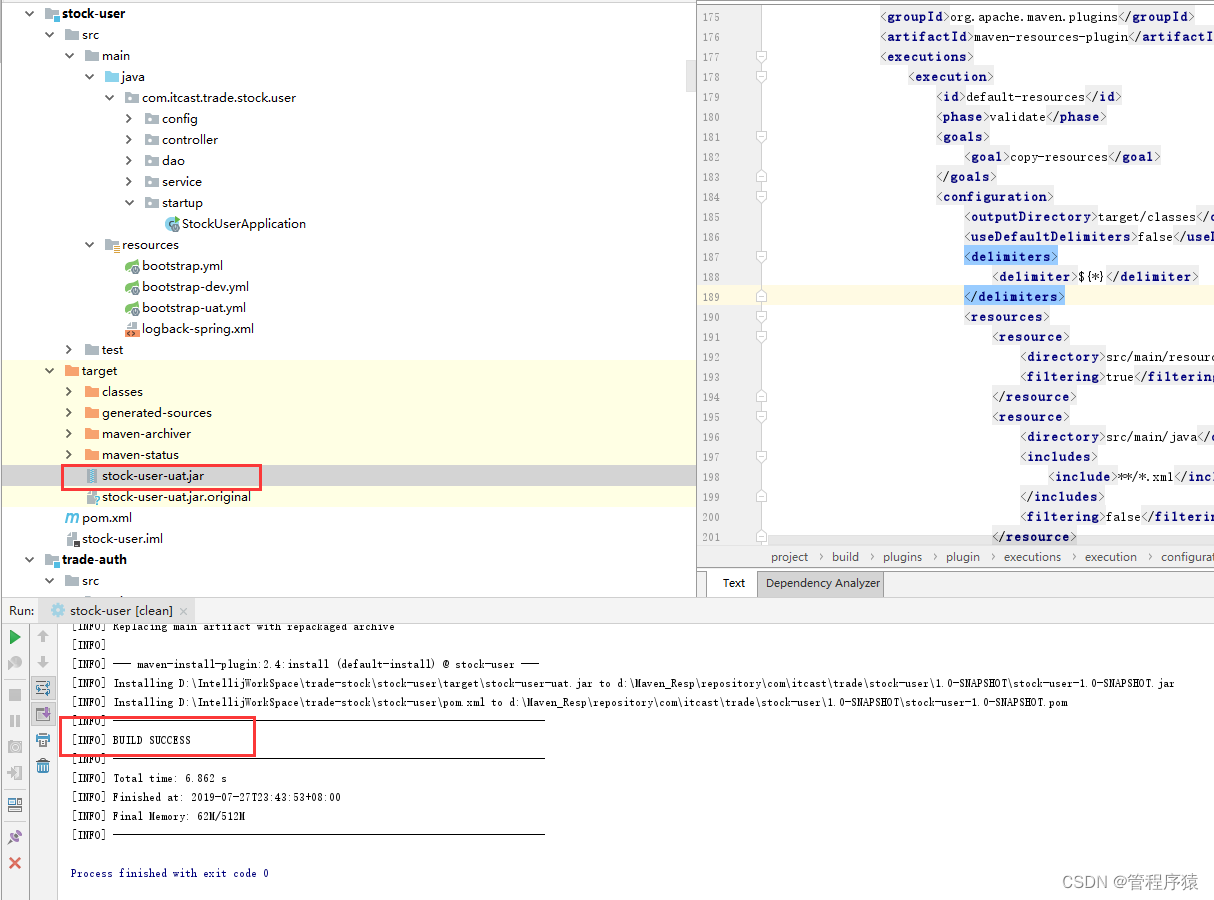
如果打包失败,根据maven错误提示, 检查所有依赖的组件是否已执行clean install, 在打包之前, 最好将所有模块都编译打包一遍, 在最顶级工程下面, 执行clean install命令进行打包,避免编译过程中, 出现的组件依赖问题。
4. 总结
如果要打包生产环境的运行包, 按照上面配置, 再建立一个名为prd的Profile 和对应的bootstrap-prd.yml配置文件, 通过maven执行命令即可。通过这种方式,开发完成后, 不再需要反复修改配置文件, 每个环境维护独立一套配置文件, 不会产生冲突错误, 便于开发管理。
实际项目中, 往往是多人协作,负责不同模块开发, 在打包发布的时候, 会增加deploy命令,
例: clean install deploy -P uat
该命令作用是, 不仅安装到本地MAVEN库, 还会发布到远程MAVEN仓库中,保证每个人生成的都是最新的包, 集成的是最新版本功能。
